Oct 04

Cisco Meeting Server – Part 5: Database Cluster

As with any cluster, there is a master/slave relationship and there is no difference with CMS DB Clustering. We first need to initialise the DB Master, followed then by connecting all DB slaves. Remember.. The CMS DB Cluster must have an ‘odd’ number of members.. Another note to make about cluster members is the Call Bridge doesn’t have to be operational.. Hence DB Cluster members can be on general/standard VMs with typical resource usage such as CPU and Memory.. No need to allocate huge amounts of resources to DB Cluster members.. One example I can give is to have a 2 node Call Bridge Group configured linking to a 3 node DB Cluster.

Configuration steps starting with the CMS Database Master

Attach certificates to the database cluster.. We have already provides CSRs and have signed certificates from previous steps.

From the console enter:

database cluster certs dbserver.key dbserver.cer dbclient.key dbclient.cer chain.cer
cms_database_1

database cluster localnode a (We are specifying the CMS network interface for the DB to use)

database cluster initialize
cms_database_2

database cluster status
cms_database_3

Now Join each of the Slave Database Servers to the database cluster

Upload via SFTP the below certificate files

- Dbserver.key
- Dbserver.cer
- Dbclient.key
- Dbclient.cer

The above files were generated under the Certificates section. These files will be shared among CMS Servers.

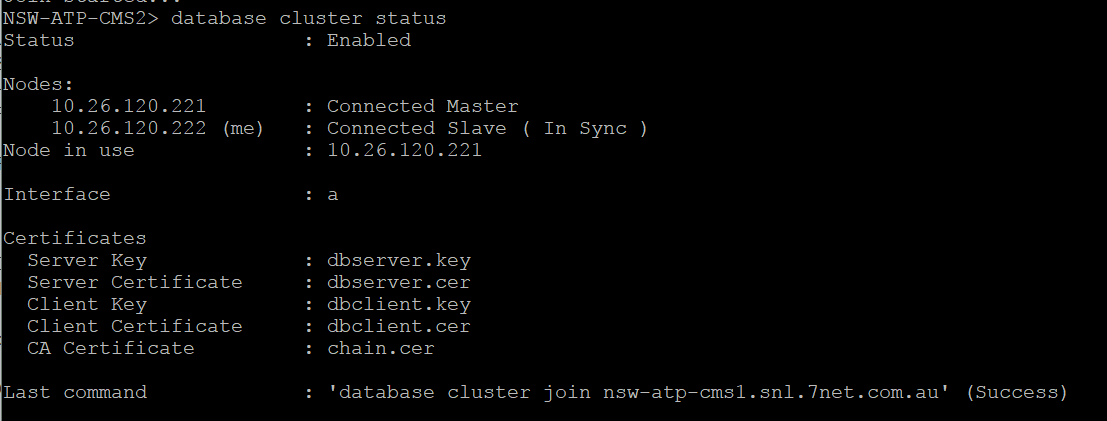
Validate the certificate files on the CMS Server via the ‘pki list’ command
cms_database_4

database cluster certs dbserver.key dbserver.cer dbclient.key dbclient.cer chain.cer
cms_database_5

database cluster localnode a

database cluster join cms_hostname.com.au (this is the DB Master’s hostname)
cms_database_6

Database cluster status
cms_database_7

Repeat for each Slave Database Server. Note: Do not have an equal number of Database Servers in the cluster, must have odd number count. Example Cluster of 3 or 5 not 2 or 4.

Sep 27

Cisco Meeting Server – Part 4: Web Admin Configuration

We are now is a position to start configuring the Core functions of CMS. One of which is the Web Admin to give us access to the GUI.

Ensure, you have copied the webadmin.key from the CMS 1 host to the remaining CMS Hosts. Then also copy the webadmin.cer and chain certificate to all CMS Servers.

From the console enter the below.

webadmin listen a 445 (This allows the 1st Interface to listen of port 445 for the Web Administration portal. We keep this portal off port 443, as we will configure a Web Bridge later for internal webrtc clients.)
webadmin certs keyfile function_certificate cert_bundle (example: webadmin certs webadmin.key webadmin.cer chain.cer
webadmin enable

The CMS server will cross check the Key file matches the Certificate file, and then ensure the Chain Certificate is the actual signing CA Authority.

To validate the webadmin service.. Enter webadmin status.

Now browse to the https://cms1server.example.com.au:445

Sep 20

Cisco Meeting Server – Part 3: Certificates

Certificates are the next step in the CMS deployment. Now with version 2.7+ certificates are mandatory all to be signed by a CA. I’ve listed the functions below that we will generate CSR’s for. A brief description of how to generate the CSR is included. I find it easier to generate all CSRs from a single host, then have the IT Administrator sign all the certificates.. Then I’ll distribute the keys and signed certificates to the appropriate CMS Hosts.

I like to group certificate to functions. Yes, you can just issue a single certificate.. But again, I like to logically separate certificates to functions..

The general command to run is “pki csr function_name CN:cms-host1.example.com subjectAltName:cms-host2.example.com.au,cms-host3.example.com.au

Reboot each CMS Server after licenses have been applied.

Functions

WebAdmin – Standard certificate. I include ALL CMS Servers, including the EDGE (interface a) servers. Use the subjectAltName: attribute for the additional CMS Servers.
Call Bridge – Standard certificate. I will include only the CMS Servers that will host conferences.
Database Server – Standard certificate. I will only include on the CMS Servers that will share the Database.
Database Client – Specific CN for the certificate: CN:postgres Only enter this CN into the CSR. No subjectAltName attribute.
XMPP Server- This certificate will include all CMS Servers that will be a member of the XMPP Cluster. This certificate will also list domains for the organisation, including all domains in a multi-tenancy deployment.
Trunk – Standard certificate. Will include only the CMS Servers that are a member of the XMPP Cluster.
Load Balancing – Standard certificate. I will include only the EDGE servers.

The Chain or Root Certificate

The Cert Bundle is the Trusted Root Certificate. This is required when attaching signed certificates to the various components such as Web Admin. If there is only a single Root CA, then all you need to do is copy the Root CA cert to the CMS Servers via an SFTP client. Then simple reference the cert when activating a component. If there is also an Intermediate CA.. Then you will need to manually create a certificate bundle. To create a certificate bundle, open both the Root CA and the Intermediate CA certificates into notepad. Copy the text of both certificates into a new text file. Root CA text first, then next line add the intermediate certificate text. (no line break), then add a blank (space) line at the end of the file. Save this as a “.cer”. Copy this Root Chain certificate to the CMS Server. Then simply reference the chain certificate when activation components.

I use Filezilla FTP client to upload certificates, download CSRs and keys etc. All certificates, keys etc are loaded into the root directory on each CMS Server.

Run the command pki list to show a list of CSR’s, keys and certificates.

**NOTE: For certificates to be shared among the CMS Servers, copy the cert.key & the certificate to all required CMS Servers.

Sep 12

Cisco Meeting Server – Part 2: Licensing

All CMS Servers require a LIC-CMS-K9 host license. (Top Level SKU is R-CMS-K9). This enables Call Bridge, Web Bridge and TURN Server featurs. This is a zero dollar license from Cisco, that’s right.. You can deploy as many CMS VMs as you like.. However to allow conferencing you will need to purchase SMP+ or PMP+ licenses.

Quick run-down on the two licensing types:

SMP+ is a shared license. This license is invoked for all unknown users/owners that are hosting a conference within the CMS infrastructure.
PMP+ is a Personal Multiparty License. This license is assigned to users within the organisation. When a ‘licensed’ user hosts a meeting instead of a SMP+ license being used, a PMP+ license is granted. PMP+ licenses are included with the CUWL Meetings licensing type. Can be upgraded from CUWL Std or Pro.

How to Apply Licensing to CMS Servers.

Following the same typical process as you would for assigning PAK for the Part LIC-CMS-K9. You will need the MAC Address from the CMS. (cmd is ipv4 a). This will generate a cms.lic file for download. As mentioned above, this license will enable Call Bridge, Web Bridge and Turn Service.

Keeping with the first CMS Server, Next step is to assign the PAK for either SMP+ or PMP+. Exact same process as above. This will generate another cms.lic for you to download.

We can now install this cms.lic via an SFTP Client such as Filezilla. Simply drop the cms.lic file to the root of the CMS Server.

Process for Remaining CMS Servers

Moving onto the second and remaining CMS Servers.

First step is to again assign the Server PAK (Part LIC-CMS-K9) to the second CMS Server, you will need the MAC Address. A cms.lic file will be generated and available for download..

Next step is to share the additional features, in this case it’s the PMP+ / SMP+ licenses between the CMS 1 and CMS2 Server. To do this we navigate to the ‘Licenses’ tab on the Cisco Licensing Portal (traditional). Drop down the ‘Move’ menu and select Share -> Get Activation Code. Paste in the source MAC which is CMS 1′s MAC Address and Destination MAC being the CMS 2 MAC Address. Enter your CCO related email address to receive the activation code. Submit. An activation code will be emailed to the previously mentioned address.

Now we’ll copy this activation code and go back to the ‘Move’ menu and select Share -> Use Activation Code. Past the activation code and submit. The next page will list the additional licenses or feature you wish to share. Select the PMP+ / SMP+ feature and submit. This will generate a new cms.lic for CMS 2 server. Now simply follow the above process to add the license file to the CMS 2 Server via SFTP client.

Repeat the ‘Process for Remaining CMS Server’ for any additional CMS Servers.

Call Bridge Server with features (SMP+ and PMP+)
cms_license_1

Sep 04

Cisco Meeting Server – Part 1: Base Settings

I’ll be going through a scalable and resilient deployment in parts, as there is simply too much to get through in a single post. Some will also be applicable to single deployments. The CMS design is using three CMS Call Bridges and Expressway as the reverse proxy and video path. I will not be deploying an Edge Server in this design.. However, I’ll add on the Edge configuration after the blog series, as the CMA App still requires this infrastructure.

Start Virtual Server from VMWare, then log into CMS as username: admin and password: admin. The system will have you change the password. Select a secure password and confirm. We now have access to the console. Lets configure some basic connectivity and system settings.

Add IP Address to Interface ‘a’ – ipv4 a add ipaddress/prefix gateway_ipaddress
Add DNS Servers – dns add forwardzone . dns_server_ipaddress **The dot represents ALL Domains.
Add NTP Servers – ntp server add ntp_server_ipaddress
Add Hostname (Reboot required) – hostname name_of_CMS (exclude the domain suffix)
Add Timezone (Reboot required) – timezone Australia/Sydney. (timezone list, shows you all the Timezones available to use if you’re not in Aussie Land)

To validate above settings run the below commands

Validate IP Address and Gateway -> ipv4 a
Validate DNS server and forward zone -> dns
Validate NTP server and sync -> ntp status
Validate Timezone -> timezone

**Note**

CMS passwords expire after 6 months by default. Hence, I also like to set the password age to the max 9999. Below is how to achieve this.

Firstly display the current password age/expiry

>user info admin

Configure the new password age rule (global)

>user rule password_age 9999

We then have to reset the admin username’s password for the password age rule to take effect.

>passwd admin
>ENTER THE PASSWORD FOR THE ADMIN ACCOUNT

Confirm the password age for the admin account

>user info admin

Jul 27

SPA122 and CUCM Registration How-To…

Configuring an SPA122 for CUCM, quick guide.

Connect Network Port to Laptop, default IP is 192.168.15.1
Browse to the web page. Default login is admin and password admin
Navigate to Network Setup -> Internet Settings
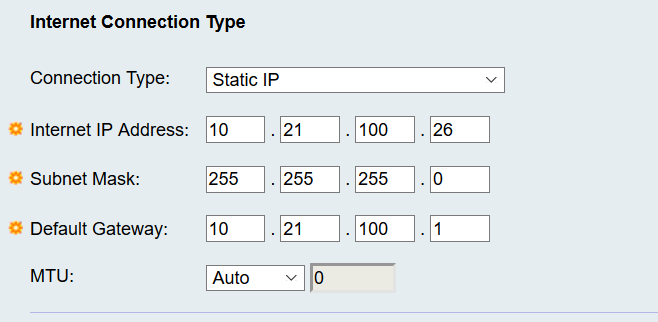
Complete the IP Details for the SPA122 device to connected to the network. The Internet Port is used for SIP Signalling, registration and media.

spa-122-1

Optional Settings for Domain Name and DNS.. Are also recommended.

Navigate to Voice – > Line 1

Scroll down to the Proxy and Registration Section

spa-122-2

Scroll down to the Subscriber Information Section
Complete the below fields

Display Name
User ID
Password
Enable Auth ID
Auth ID

spa-122-3

Submit

CUCM Configuration

Create an Enduser. *User ID must only be in numerical format.. Not characters permitted.
Set the Digest Credentials
Set the Telephone Number

Create a Third-party SIP Advanced Device.

Standard Phone setup.. With the exception for the below.

- Set the Owner ID to the above created User
- Set the Digest User to the above created User

The SPA122 should now successfully register to the CUCM Cluster.

Jul 12

Session Timer Too Small – ITSP

Receiving a Session Timer too small from the ITSP (SIP/2.0 422 Session Timer too small)?

INVITE FROM ITSP

SENT TRYING

SENT INVITE TO CUCM

RECEIVED TRYING

RECEIVED SESSION TIMER TOO SMALL

CALL FAILED

CUCM has a min session timer of 1800. By default the CUBE will accept any negotiated size for the session timer. Hence we need to ensure the session timer is negotiated correctly with the ITSP before handing onto CUCM.

 *** Required Changes on the CUBE ***

Router(config)# voice service voip

Router(conf-voi-serv)# sip

Router(conf-serv-sip)# min-se time

 *** After the above change ***

INVITE FROM ITSP

SENT TRYING to ITSP

SENT SESSION TIMER TOO SMALL to ITSP

RECEIVED INVITE (with session timer of 1800) from ITSP

SENT TRYING to ITSP

SENT INVITE TO CUCM

RECEIVED TRYING FROM CUCM

RECEIVED CALL IN PROGRESS (Ringing) from CUCM.

Call succeeded.

Jul 02

Cisco Unified CM SIP Route Patterns

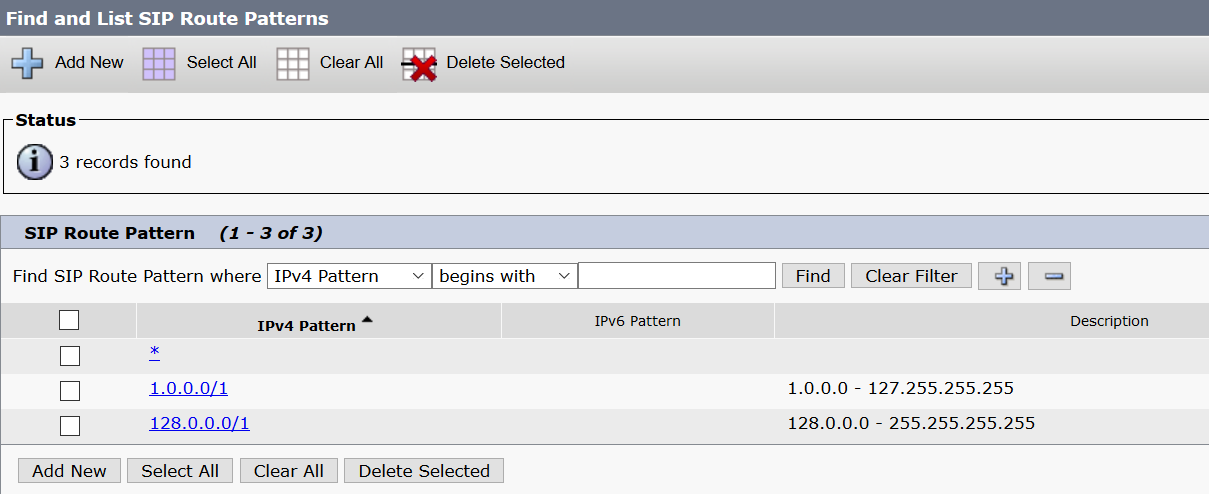
SIP Route patterns in CUCM allows the system to route SIP URIs to a predefined destination.. Mostly toward to the Collaboration Edge environment. To cover all possible URI formats use the below configuration.

Note: CUCM doesn’t allow to cover the entire IPv4 Range in one expression. The work around is to split into two expressions as per image below. (1.0.0.0/1 & 128.0.0.0/1)

SIP Route Patterns

Sep 24

Cisco Meeting Server – CMA ‘Copy Weblink’

You might be wondering where the Copy Weblink is in the CMA Invite Menu, or why can’t participants just click on my ‘join’ weblink and be connected straight into my meeting room.

Simple explanation.. The ‘Web Bridge URI’ field on the WEB Admin GUI is blank. That’s it.. However, for you Multi-Tenancy deployments.. Unfortunately there is a limitation! Only one URL can be defined, as this setting is required to be done via the WEB Admin GUI.

In a multi-tenancy case, users will have to forgo this ‘Copy Weblink’ etc and simply have the ‘https://join.tenant_domain.com.au’ listed in the invite, requiring participants to enter the Meeting ID to connect into a meeting room

cms-web-link-1

Sep 14

TMS Repeatedly Dialling PSTN Numbers with CMS

Has a very interesting problem with TMS and CMS integration piece. For any TMS meeting scheduled with dial out participants when the participant phone number had a zero prefix (Australian Standard for PSTN breakout), the TMS / CMS system would repeatedly dial the participant, even though the participant had already accepted the first TMS/CMS call out and had successfully joined the meeting.

This only occurred for phone numbers with a zero prefix. Hence phone number with +61 formation, or the straight 10 digit (again based in Australia).

Explanation

In CMS I have configured for user to dial a phone number using any standard means.. Straight 10-digit number, prefix with zero, plus e164 format, extension etc.. So catching all of the users dialling behaviours and making sure they route.. I transformed all of the above different dialling behaviours to a standard plus e164 format.. So essentially globalising the dialled number.

Any number leaving CMS is in a plus e164 format. Easy for the CUCM guys to manage routes.

TMS dialled number was in a zero prefix format. Example 00408842… so worries… TMS would make an API call to CMS to create a callleg for the above number. CMS would transform the number into a plus e164 number. So the number would become +61408842… CMS would route this to CUCM for PSTN breakout. CUCM would then localise the number into a compliant Telco format. The number now became 0408842…

The call would be dialled.. The participant would answer and be joined the CMS Meeting.. All good you say.. Well not quite yet.. While CMS had confirmed that indeed the participant had joined the meeting.. TMS never received such confirmation..

After CMS dials out to the participant, TMS will then send a GET request to CMS asking if a Call Leg has been established for the participant dialled. To break this down TMS sends a GET /api/v1/callLeg filter with 00408842… (notice this is the number TMS sent to CMS to be dialled originally). However.. CMS has no such Call Leg… TMS, then resends a POST request to CMS to create a Call Leg for the 00408842… so CMS the dials out to the participant again. The participant receives another call, even though they are already in the meeting!

This happens multiple times until TMS gives up.. (configurable).

Why is this So?

CMS contains a couple of key pieces of information in the Call Leg.

1. RemoteParty
2. OrginalRemoteParty

Remote Party is the connected Called Party ID. Remember how I was saying CUCM (or the CUBE) will localise the called number to comply with Telco Standards.. The CUCM (or CUBE) will send back the connected called ID to CMS.. This is then documented for the RemoteParty ID.

Original Remote Party ID is the dialled number from CMS to CUCM. Essentially this is the ‘Transformed’ number.

Following my case above.. The CMS Call Leg will have the below

remoteParty = 0408842…
orginalRemoteParty = +61408842…

By now, you’re probably putting the puzzle together.. The number TMS requested to be dialled is no where to be seen in the Call Leg, hence TMS believes the participant did not join the meeting (based in the results of the GET callLeg request by TMS), so TMS attempts a redial.

The Fix (for now)

To resolve this issue, allow the dialled number from TMS to be passed through CMS without transformation onto the CUCM Server. This reflects in the Original Remote Party field as being the number that TMS dialled.. Hence the GET request for TMS matches the dialled number.