Sep 05

Saving WAV Files for Cisco Meeting Server with Audacity

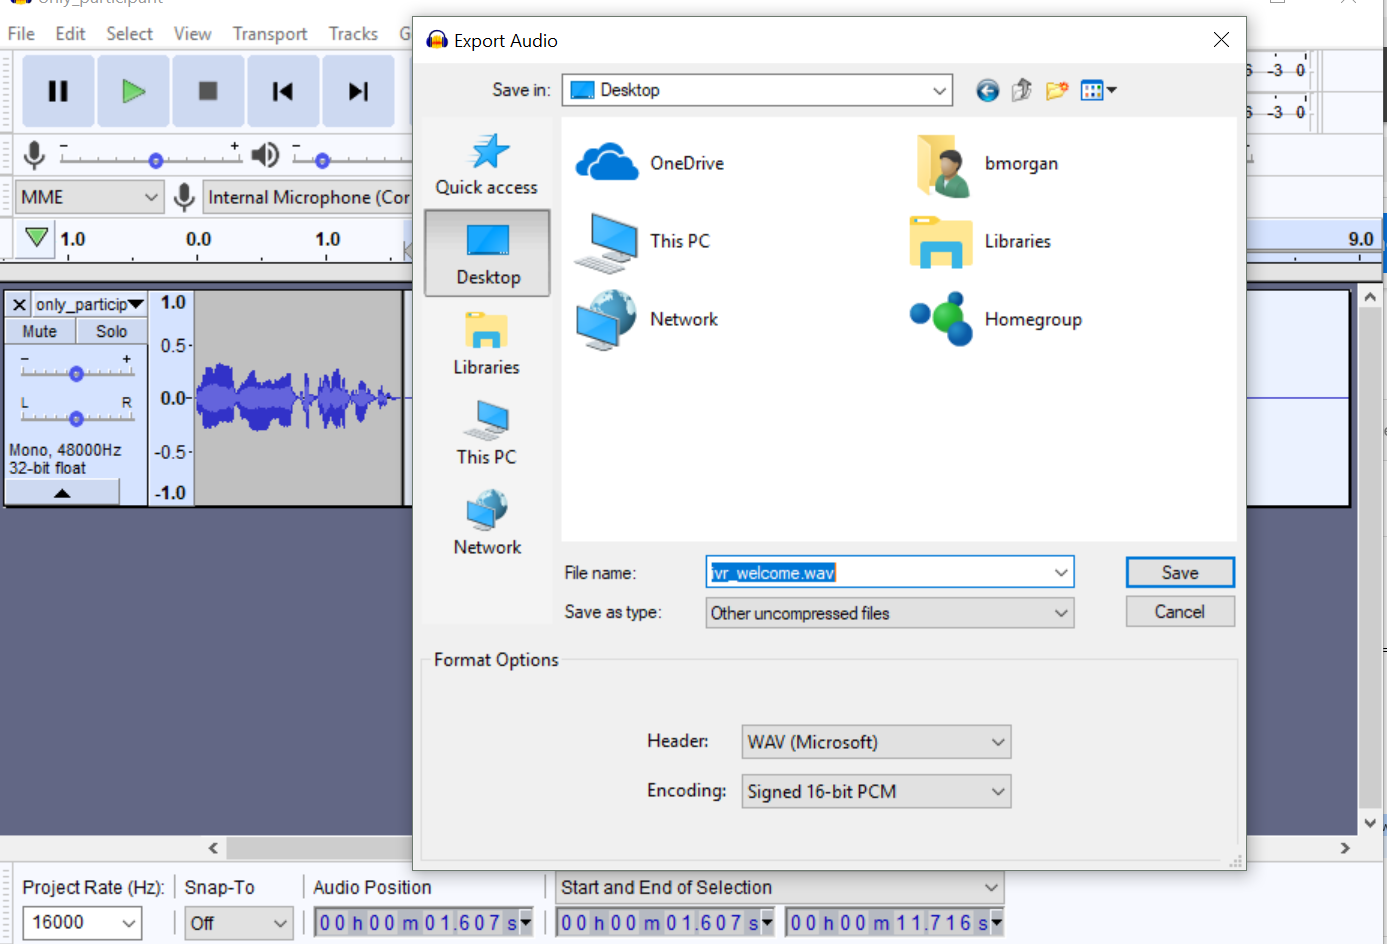
With audacity you can modify WAV files for the Cisco Meeting Server.. The important notes are the file must be under 500KB and be saved with ‘WAV (Microsoft)’ as type and Encoding to be Signed 16-bit PCM.

One important note to make aswell in regards to the wav file ‘only_participant.wav’. Cisco CMS will repeat this message continuously with no breaks for AUDIO ONLY callers. The default ‘only_participant.wav’ file is padded with 10 seconds silence. So…. We also need to pad the WAV file for 10 seconds.. (more if you like), otherwise audio callers will be driven crazy waiting for someone else to join the conference.. Again.. This only impacts audio only callers.. Video callers only hear this announcement once.

cms-wav-files

Aug 15

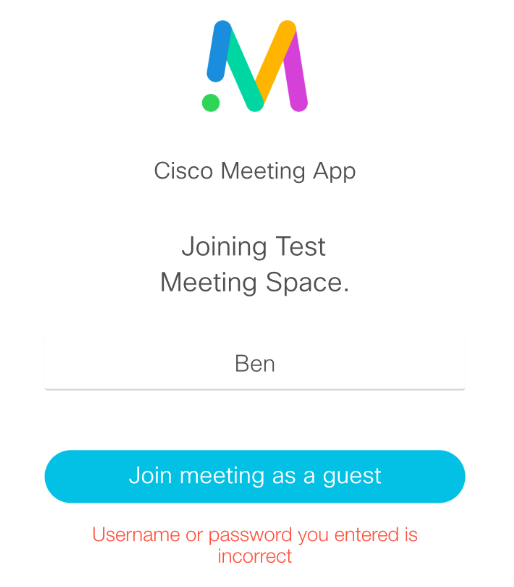
Troubleshooting CMS Webrtc Connections – Incorrect Username/Password

cms-webrtc-tshoot1

You receive this error when you attempt to log into your personal space via the “Sign in” button and also when you attempt to join a meeting as a Guest.

The XMPP Server is guy who will authentication users, whether they be local domain users or guest users.

With Guest users. The web bridge sends the call bridge instructions to create a temp guest user account, the call bridge creates this account, then send the web bridge the username/password details.. The Web bridge, then will contact the XMPP Cluster to verify authentication for the newly created guest user.. As you can see below capturing packets on the EDGE device.. The port TCP 5222 is being blocked toward the XMPP Cluster.

Cisco Document references the below ports only.

cms-webrtc-tshoot2

cms-webrtc-tshoot3

cms-webrtc-tshoot4

Aug 10

Cisco Expressway – CPL Reference to Block Toll Fraud

Quick reference for CPL rules to close all potential toll fraud calls. (Australia)

Single Domain reference below. For multi-domain environments, will just need to duplicate for each. Be careful of the order.

Please reference the image below, but essentially we allowing:

- Ben.morgan@domain.com.au
- ben@domain.com.au
- ben1@domain.com.au
- Ben.morgan1@domain.com.au
- 3 digit extension@domain.com.au
- Full 10 digit number@domain.com.au
- E164 number@domain.com.au

Block everything else.

expressway-cpl

If anyone has additional expressions to add in case I missed one.. Please add a comment.

Aug 04

Cisco Meeting Server – LDAP Discussion

Crikey.. All these API commands, recently have been doing a couple of CMS deployments.. And literally have to jot down my most used commands.. aswell as most used IDs.. Can be very tedious to configure then look back at what you have configured!

Thought I would jot down here the commands I most use.. More for my memory as I know more deployments will come my way.. And rather than cross referencing the API continuously.. well you get my drift..

LDAP is a killer.. Customers always seem to create their own variation of standardised ldap fields.. I reckon its just to keep guys like us on our toes..

LDAP API Commands

GET: /ldapservers – displays all ldapservers to go deeper, copy the ldapserver ID and paste it to the end of the above API string.. This will now show all fields for that ldap server connection. Note: you best copy this server ID somewhere safe, as you’ll need it later.

GET: /ldapmappings – this seems never ending when first trying to sync to an organisation’s LDAP..fields most used are , this is the authentication mapping. ie username for the CMA/webrtc client. REMEMBER to configure the XMPP Domain on the CMS and to create a _xmpp-client._tcp.domain 5222 SRV record.

GET: /ldapsources – if you thought ldapmappings was never ending.. you’ll quickly get used punching this little bugger in.. Main culprit is the filter field to ensure you’re only bring across the users required.. One organisation can have multiple ldapsources dependind on what userprofiles are to be assigned to users.

POST: /ldapsyncs – Yes finally we sync to LDAP.. You may need to enter this string a million times over before all the above settings are finalised and users have been successfully imported.. And then.. You’ll enter this string another million times for changes that need to be made..

*Handy Tip*
To remove LDAP users.. Simply delete the ldapsource, then run the POST: /ldapsyncs again…

Ok so what do the fields mean..

Ldapserver

<address> = the ldap server IP Address
<port> = port used to connect to ldap. Mainly 389 but can use 3268 if need be.
<username> = This is the service account used to access ldap user records. This must be in a CN path format. Eg. CN=service_user,OU=IT,DC=domain,DC=com
<password> = Password for the service account.. NOTE: this field does not show when running a GET: /ldapserver.
<secure> = whether you want a TLS Ldap connection or leave unsecure.

LdapMapping

<jidMapping> = This is the authentication string for users. The @domain MUST match one of your XMPP Domains configured. Example format is $sAMAccountName$@meet.domain.com.au NOTE: you can also insert any AD attribute here if the sAMAccountName is not to your liking. I like to try and the organisation’s email prefix as a standard.. So sometimes I will use $mailNickname$@meet.domain.com
<nameMapping> = This displays a friendly name for the user in the CMS System. Typically used is $giveName$ $sn$
<coSpaceNameMapping> = This is the display name for the user’s meeting space. Typically used is $givenName$ $sn$’s Meeting Space
<coSpaceUriMapping> = This is the meeting space’s URI prefix. IMPORTANT: This cannot be the same as the <jidMapping> prefix. So typically the URI would be $mailNickname$.space or $sAMAccountName$.space. Get the picture.. append a “.space”.
<coSpaceCallIdMapping> = This is the Meeting Room Number. This code is entered in when someone joins via an IVR or the Weblink. If you do not complete this field.. The CMS system will automatically generate a Call ID for you. NOTE: This field MUST be unique across the organisation AND… across ALL tenants configured on the system. If you can get away with using an extension number and all ldap accounts have a unique extension number (highly unlikely) use this.. Easy for the user to remember.. BUT as with most case.. A system generated Call ID is your only option.

LdapSource

This is where we tie everything together to essentially create profile for the ldap sync.
<server> = This is the ldapserver ID from previous steps.. Paste it in here
<mapping> = this is the ldapmapping ID from previous steps.. Paste it in here
<tenant> = if you are configuring multi-tenancy.. Well paste the tenant ID in here.
<baseDn> = This is the base ldap search path.. ALL users must be within this path. This doesn’t mean you want to import all users in the path.. That is what the “filter” is for.. Example is OU=Users,DC=domain,DC=com
<filter> = This how we specify ‘who’ exactly we want to import. Maybe its just an OU? Maybe its only members of a particular security group. Or only users with a telephone number.. You get my drift.. A couple of examples

Member of Group called ‘CMS’ = memberof=cn=CMS,ou=security,ou=groups,dc=domain,dc=com
Member of Group called ‘CMS’ AND have a mailNickname AND Telephone configured = (&(mailNickname=*)(telephoneNumber=*)(memberof=cn=CMS,ou=security,ou=groups,dc=domain,dc=com))
Users who have a Telephone Number, but who are not a member of the security Group called ‘CMS’ = (&(telephoneNumber=*)(!(memberof=cn=CMS,ou=security,ou=groups,dc=domain,dc=com)))

Why would we need to exclude a Group for? Maybe we only want to attach a PMP+ license to a specific Security Group? And the remaining users to share SMP+ licenses. In this case we would create TWO ldapsources.. One ldapsource with a filter matching all users but excludes users in a security group. Then the other ldapsource to filter only users in the security group. On this ldapsource we will also attach a ‘userProfile’. A userProfile allow us to apply a PMP+ license to users.
<userProfile> = Paste in the userProfile ID. (create a userProfile and attach the ‘haslicense’ to the profile)

LdapSyncs
We POST to this string.. With no Body everytime we want to sync to ldap.. At this stage there is no schedule we can apply. The option is to create a python script to run the ldapsync on a schedule.. I’ll leave that up to you. But, please post any scripts here for others to use or improve on.

Jul 30

2N GSM Gateway Voice Blue Configuration

As I get a few requests to setup GSM gateways for backup purposes and for mobile to mobile calling.. I always find that I have to sift through doco and click on boxes and to navigate the GSM configuration portal. I thought I would share a quick run down of a basic set of configuration for outbound and inbound calling.

Scenario to configure..
1. Use 2N GSM Gateway for backup purposes only.
2. Outbound calls to use all 4 SIMs and have called ID enabled.
3. Inbound Calls to be directed to the Reception, and also have all 4 SIMs available to use.

So we’ll start from the very beginning.. Crack open the GSM gateway and plug it into your LAN.. I normally direct connect it to my laptop initially. The default IP Address is 192.168.1.2/24.

Log into the gateway with the username: Admin and password is 2n.

There isnt too much to configure here.. Its just knowing where to go to get the gateway up and running.

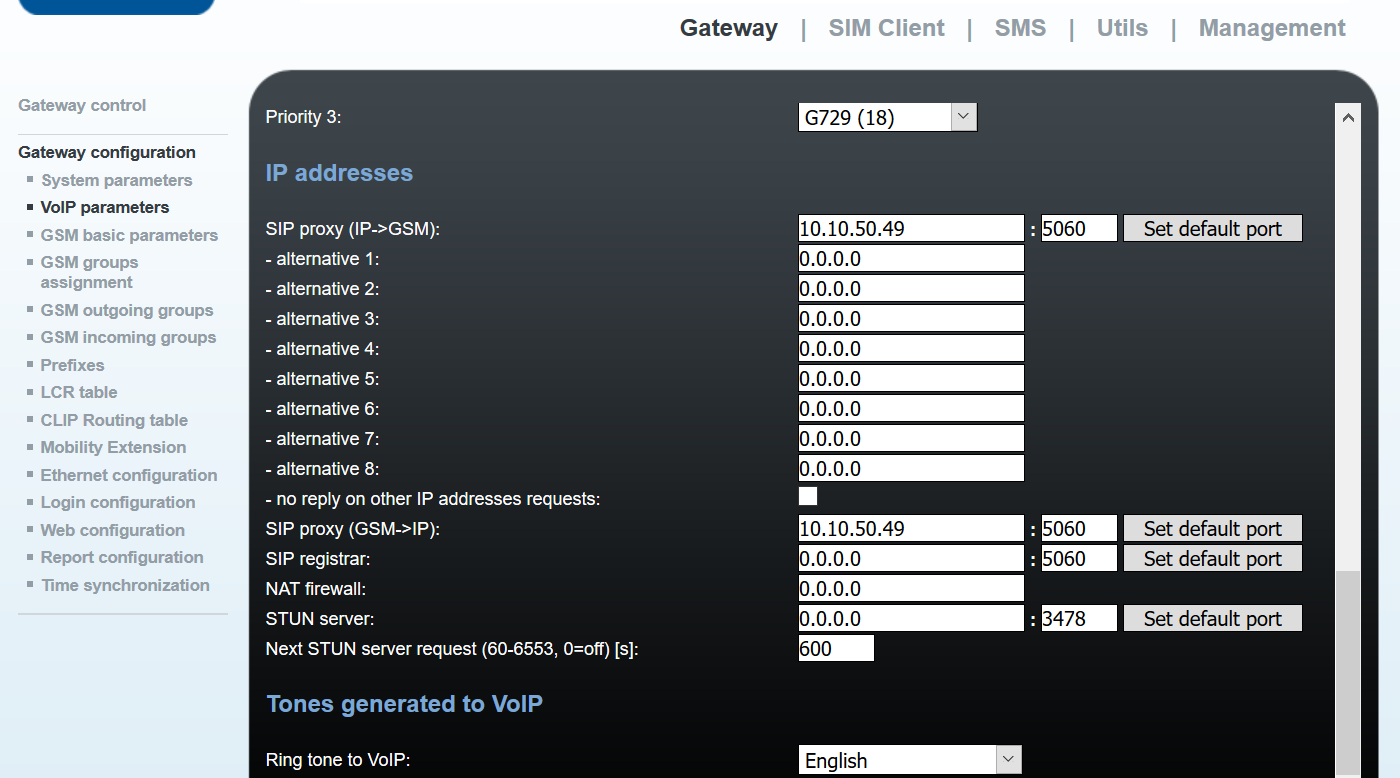
Lets head to the Gateway Configuration Menu (Left), then select Voip Parameters. Here we will want to enter the IP Address of your CUCM Servers. I have entered for both fields IP->GSM and GSM->IP as I have the requirement to setup both outbound and inbound calling.

I also selected English for the VOIP Ring Tone.
2n-1

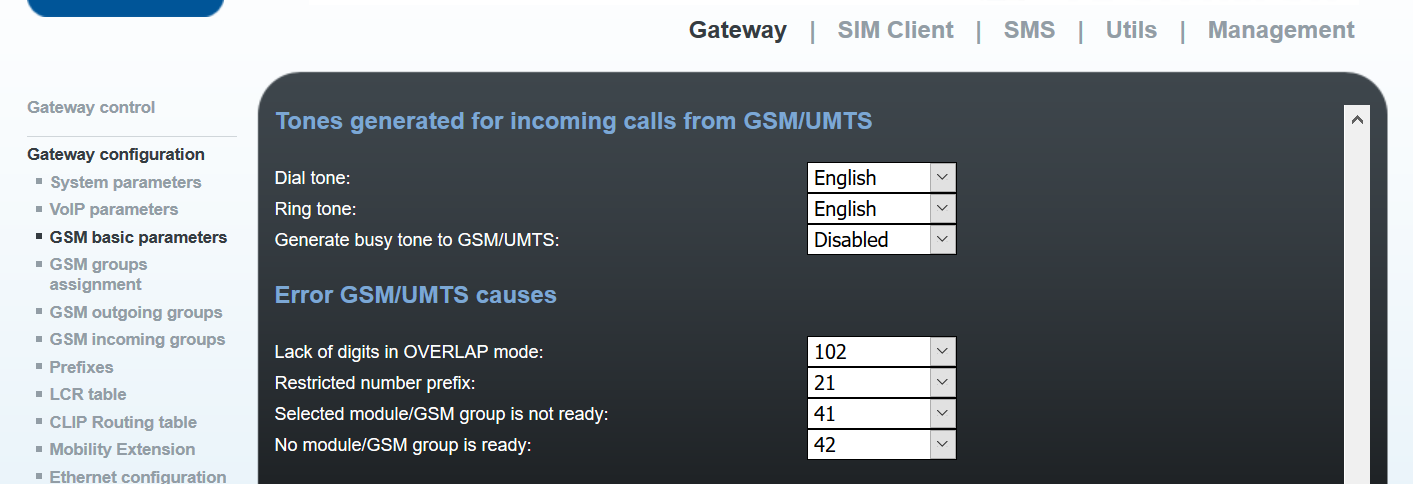
Next is to ensure the Ring Tones are set correctly.. Default is set to European.. So that sound a lot different us Aussies. I set this to English for both Dial tone and Ring tone.
2n-2

Onto the GSM Groups Assignment. By default all SIMs are placed into Group 1. I will leave this for my scenario.. However, you can dedicate SIMs for either outbound or inbound calling.

2n-3

Lets jump down to Prefixes. Simply put, Prefixes allow for normalisation of called numbers. This is exactly what I need to do, as the GSM Gateway will receive Called Numbers from CUCM with a Zero (0) prefixed.. We need to remove the Zero before we dial out to the Telco network. The below image depicts just that. I’m removing the Zero and replacing with ‘nothing’ essentially.
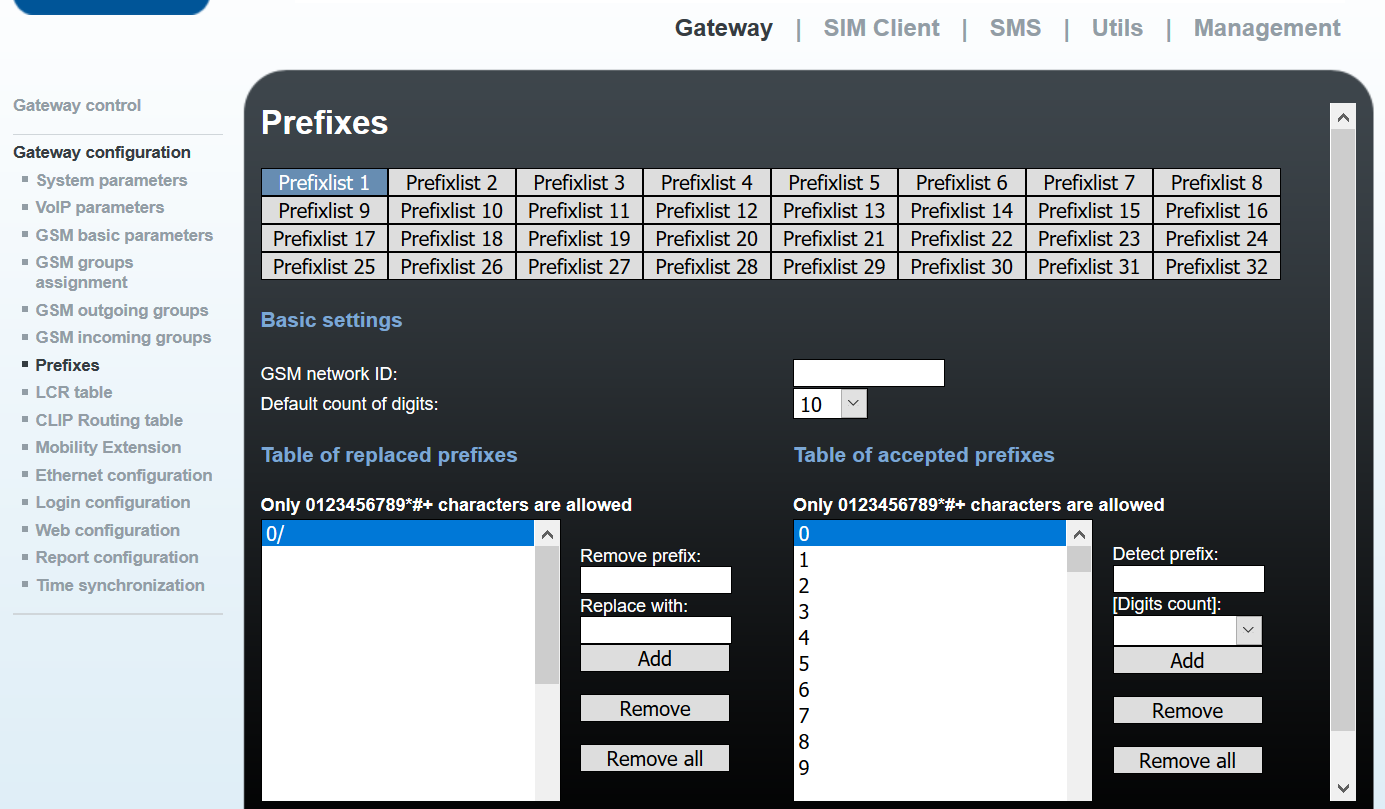
2n-4

Ok, lets move onto GSM incoming groups. This is where we can configure some inbound functions. In my scenario, I need to direct all calls to the Reception Phone. Firstly, I need to drop down the ‘Mode’ box and select “Accept incoming call + dialtone”. The 2N GSM Gateway by default will reject all calls from the GSM network.

Next, I modify the DTMF dialling timeout field. Default is 10 seconds.. I change tis to 0 seconds. This will not wait for any dtmf digits to be pressed and forward the call onto the List of Called Numbers. (below image). Now this takes us to the List of Called Numbers, essentially all inbound calls in this group will call in a sequential order any number in the list. Just make sure this number exists in CUCM.
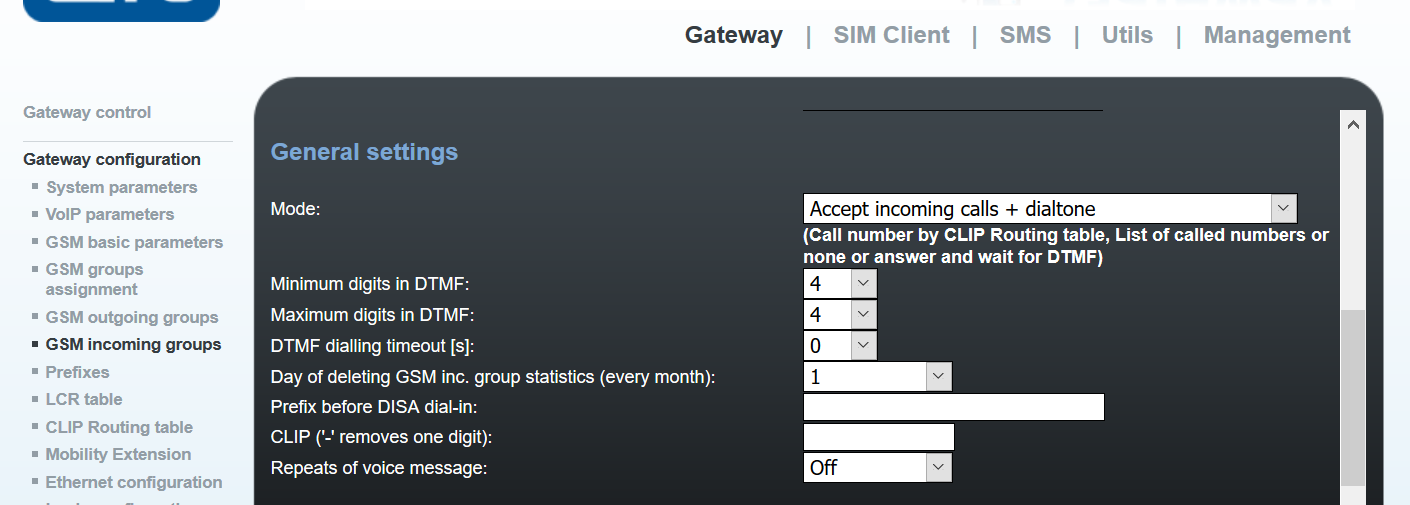
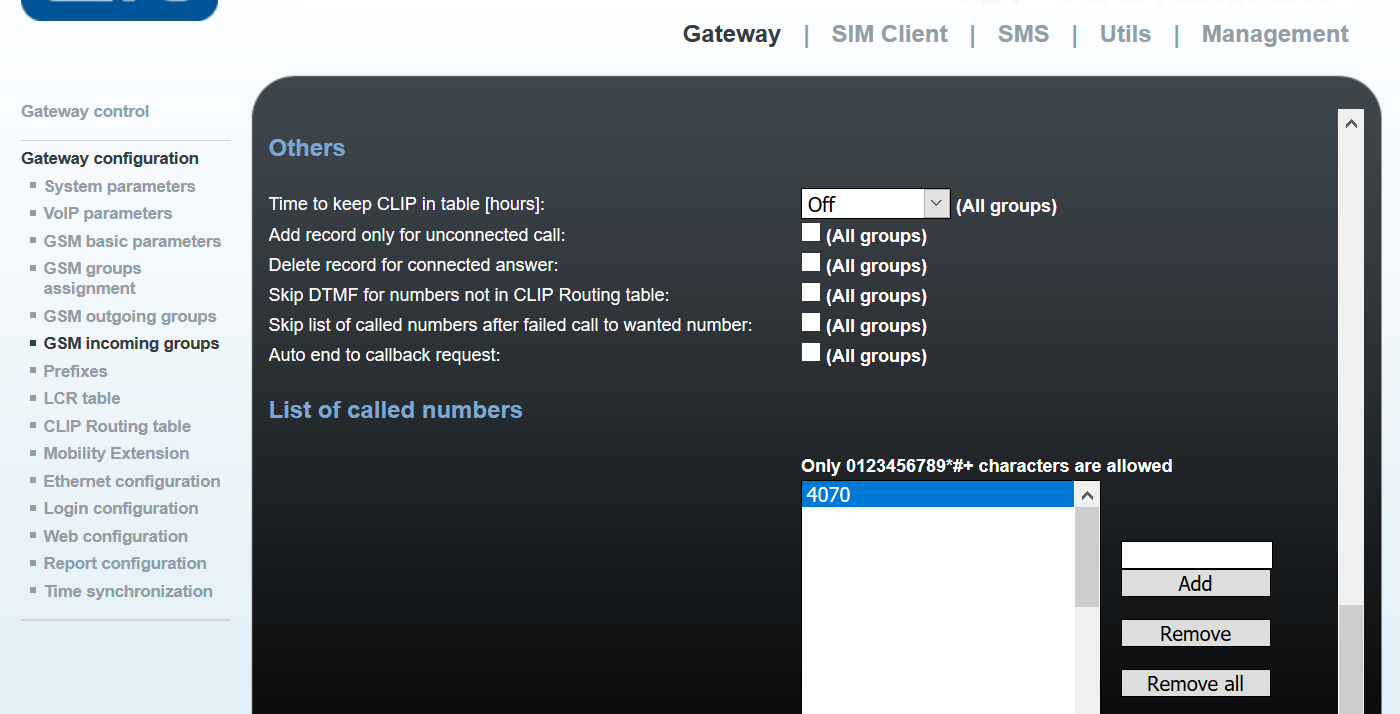
2n-5

2n-6

Now of course, I always recommend changing the default password.. I’ll let you figure that one out.

That’s it for the GSM Gateway side of the story.. I leave with a couple if useful features on the GSM Gateway.. Its packet capturing and making test calls both toward the GSM and CUCM. Self explanatory so if you get stuck, these two tool will definitely come in handy.
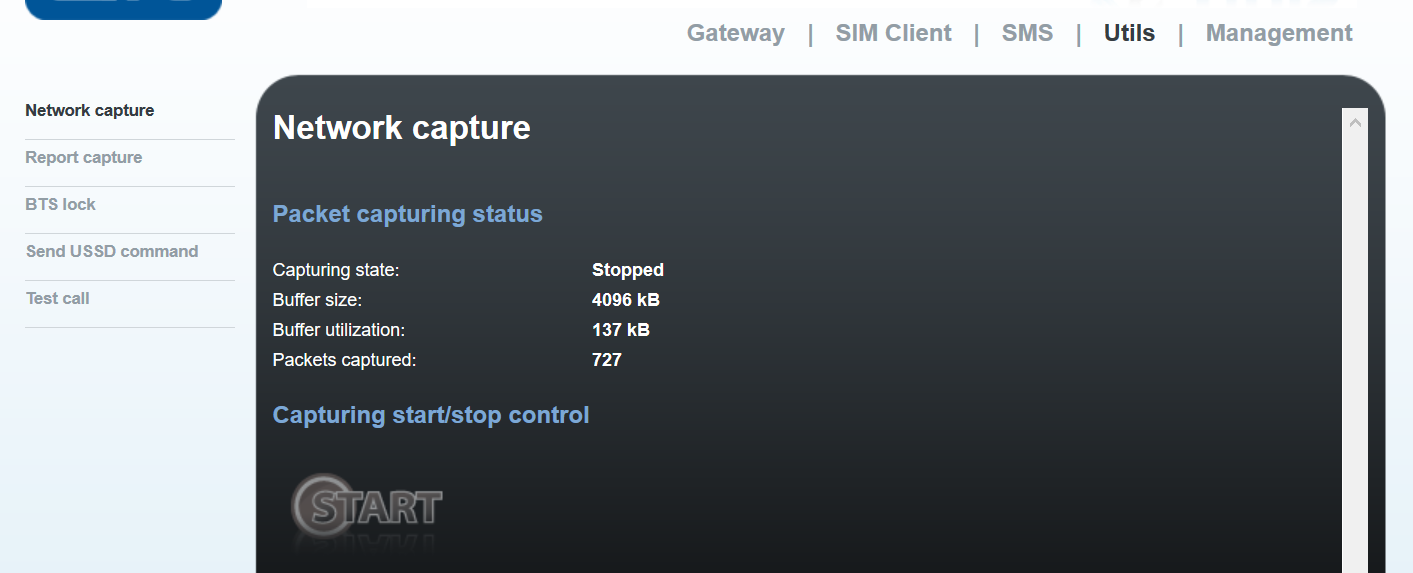
2n-7

Now onto the Cisco CUCM Side.

Start by creating a new SIP Trunk Security Profile. You can just copy the standard non secure security profile. Ensure the Outgoing Protocol is UDP. Also see below for the checkbox enablement.
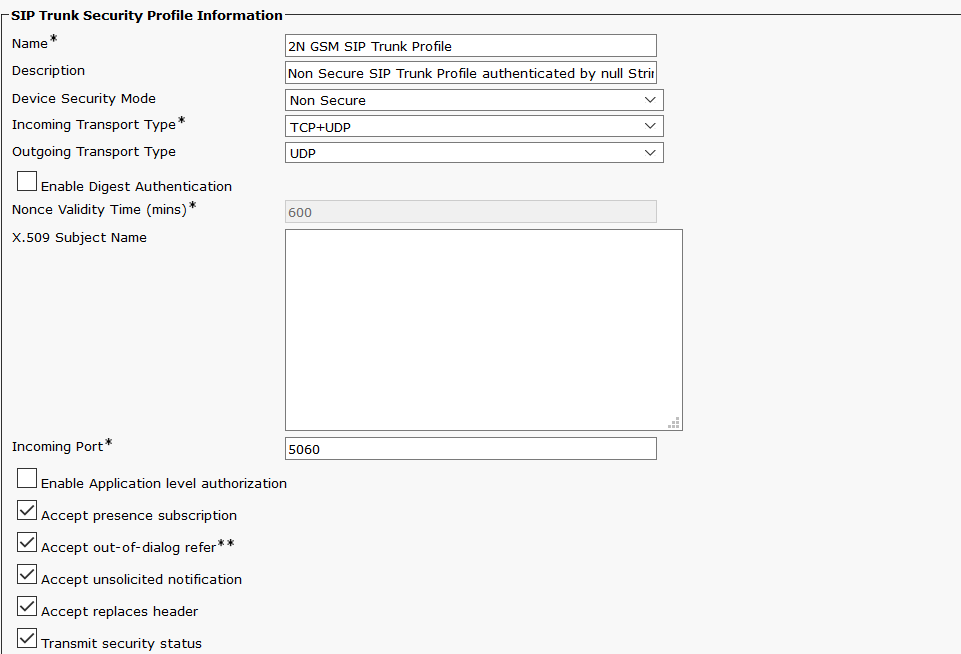
2n-8

Next, lets create a SIP Trunk. Nothing fancy here. Just make sure you have the required fields configured along the below fields.

- Calling Search Space
- Destination Address
- Sip Profile
- SIP Trunk Security Profile

Create a Route Group and add the new created SIP Trunk. You can also edit an existing Route Group if you wish.

We then need to create a Route List, we add the Route Group we create in the previous step the this Route List. Forget this step if you have simply added the SIP Trunk to an existing Route Group.

Create a route pattern and select the Route List above.

Remember to Reset the Trunk!

Now make some test calls..
Jul 15

Cisco CMS Ad-Hoc Conferencing with CUCM

For those interested.. A short article of configuring CMS as an Ad-Hoc Conference resource in CUCM.

NOTE: prior to CUCM 11.5 SU3 TLS used is version 1.0. CMS 2.3+ uses TLS 1.2 by default, so to allow pre 11.5 CUCM versions to connect to CMS.. We need to set the minimum TLS version via MMP.

Commands are:

tls webadmin min-tls-version 1.0
tls sip min-tls-version 1.0

For CUCM to use CMS as an Ad-Hoc conference bridge we need to configure a user on CMS with the API role associated. CUCM essentially creates a temp conference space for the ad-hoc conferences.. CUCM does this via HTTPS using API strings.

Commands to configure a User on CMS

User add username api
The MMP console will ask you to set a password.

Lets remain on CMS, and log into the Web Admin portal. We now need to configure Incoming Call Settings. This will allow calls to enter and terminate on the CMS Server. CUCM will add the SIP Trunk Destination Address as the suffix/domain to all calls for ad-hoc conferences. So we need to configure the SIP Trunk Destination Address into the Incoming Call Handling page on CMS.

Incoming Call Settings

cms-ad-hoc-2

Now we turn to the CUCM Server. First step is to upload the certificate chain that signed the ‘Web Admin’ service certificate to the CUCM as CallManager-trust.To find out which trust certificate to use you can jump back on the MMP for CMS and run the command ‘webadmin’ and look for the ‘CA Bundle File’. Jump into your SFTP client and download the CA file to you PC.. ready for upload to the CUCM Server.

Once uploaded, navigate to Media Resources and Conference Bridge and select ‘Add new’.

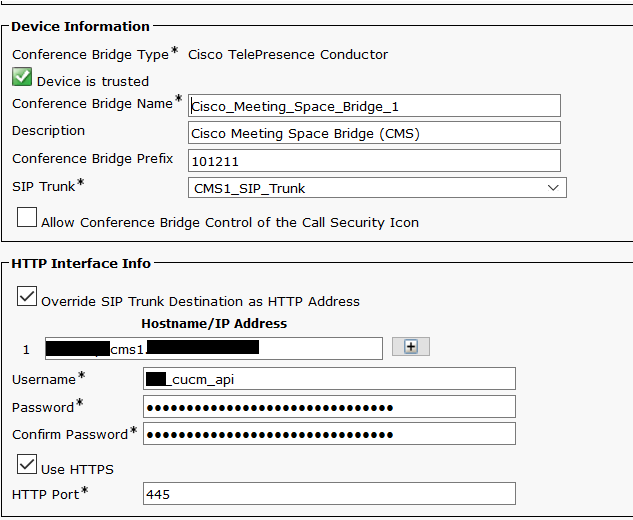
Complete the following fields on the conference bridge configuration page.

Conference Bridge Name = Nothing special here.. Just assign a logical name for the conference bridge.
Description = Again.. Something logical always helps
Conference Bridge Prefix = If you have multiple CUCM Clusters linked to CMS or multiple CMS Call Bridges, you will need to apply a prefix. This mitigates the risk of two CUCM Servers from two difference clusters creating a temp ad-hoc conference with the same conference ID. If there are two Call Bridges, you must then create a conference bridge resource for each with a different prefix. This will assist with load balancing issues (Load balancing across two or more Call Bridges is not supported in the Ad-Hoc Conferencing setup).
SIP Trunk = Select the CMS SIP Trunk, which will also be referenced below.
Override SIP Trunk Destination as HTTP Address = checked.
Hostname/IP Address = FQDN of your CMS Server..
Username = enter the username create in the above steps
Password = self explanatory..
Use HTTPS = checked.
HTTP Port = This is the port you have configured for the Web Admin Server.. I use 445 in this case, default is 443.

Save, then we reset the bridge. Should now show as registered. You can add the Conference Bridge to your select MRGs and MRGLs for testing.

cms-ad-hoc-3

cms-ad-hoc-4

Jul 04

Create a Lecture Mode Space – Cisco CMS

Essentially we are creating a single meeting space with multiple access methods. ie the Speaker/Presenter will connect to the meeting space via a separate access method to a student or participant. It is through this means, we can apply or attach policies in the form of Call Leg Profiles, so when a student joins the meeting space we can have policy enforcing Mute Only for example.

Below it the process to creating a Lecture Only Room

Create the Call Leg Profiles

These profiles will determine what type of features or access the participants will have when they connect into a conference.

Presenter Call Leg Profile

POST /api/v1/calllegprofiles

Body

needsActivation = false
Name = Presenter
defaultLayout = allEqual

Guest – Muted Call Leg Profile

POST /api/v1/calllegprofiles

Body

needsActivation = true
Name = Guest – Muted
defaultLayout = speakerOnly
rxAudioMute = true
rxVideoMute = true
deactivationMode = deactivate

We need to retrieve both Call Leg Profile ID’s for use later.

GET /api/v1/calllegprofiles

Create the Meeting Space.

Now we create a space, name the space something meaningful and friendly to read.

POST /api/v1/cospaces

Body

Name = Class Meeting Space

Retrieve the Meeting Space ID

GET /api/v1/cospaces

Create the Access Methods

Once the space has been created, we will create two access methods (one for the Speaker or presenter and one for the students). We will attach the above created call leg profiles to their respective Access Method.

Access methods are appended to the cospace API string. Example.

https://cms_server.example.com.au:445/api/v1/cospaces/866aadfd-6ff4-43ca-ae0d-3aab6711c598/accessmethods

POST /api/v1/cospaces/cospace_ID/accessmethods

Included below is a Call ID, however you can also specify a SIP URI to call directly into this space, can also add passcode (PIN) to access to the meeting

Presenter Access Method

Body

callId = 1234
callLegProfile = 9a491602-851a-46c4-a2c9-9f144c1a53e9 (Presenter Call Leg Profile ID)

Guest – Muted Access Method

Body

Uri = guest.mute
callId = 5678
Passcode = 11111
callLegProfile = ed5834e4-c2fc-43b1-a703-2394b8e4d200 (Guest Call Leg Profile ID)

Now when a participant connects to the Meeting Space via the Call ID 1234, they will join the meeting without activation and be permitted to send/receive video/audio. However, if a participant connects to the Meeting Space using the Call ID 5678 (or the URI guest.mute@example.com.au), they will sit in the ‘Lobby’ until the presenter joins the meeting. When the participant does join into the meeting, their system will be muted for both video and audio. In addition, their screen will only ever show the active speaker.

Jun 24

Cisco CMS Upgrade – Resilient Split Deployment

Just a quick blurb on upgrading this CMS beast.. the key is to backup configs, certificates and license files.. if you do that.. you can easily restore if all goes bums up!

Step 1a. is take a Manual Backup, I say manual as the guide recommended not to rely on on the automated backup that the system uses once the upgrade kicks off.. I like to errr on the side of safety and peace of mind.. so take a separate manual backup.
Step 1b. Download the backup file to your local PC Drive..
Step 2. While you on the SFTP/FTP Client.. copy the cms.lic file to your PC Drive
Step 3. Now copy all… ALL certificates, Certificate Chains and Certificate Keys to your PC Drive..
Step 4. Download the upgrade ZIP from Cisco.com. Extract to your SFTP Directory ready for upload.
Step 5. Upload the extracted content (upgrade.img) to the root directory of all CMS Servers.

Before we go any further, for a resilient deployment, we should be upgrading slaves first, the the master. We need to ensure the Database cluster is in-sync before we proceed with any upgrade.

Step 6. Check database status and confirm which CMS Server is the current DB Master. > database cluster status

Step 7. NOW jump onto the MMP and run the upgrade starting with the slave Database cluster servers.. command is “upgrade upgrade.img no-backup”

cms-upgrade-1

Wait until each CMS Server has rebooted and connected back into the database cluster (> database cluster status) before proceeding to upgrade the next CMS Server. Repeat until all CMS Servers have been upgrade (with the Master being the last node to be upgraded).

Step 8. Once we have upgraded all CMS Server and the database cluster is again in-sync we can progress to updating the database schema (if required by the upgrade version).

Log into the Database Master CMS Node, and run the database cluster upgrade_schema.

Check the upgrade with > database cluster status. Enable = success.

Confirmation Checks

Command is “version”

cms-upgrade-2

Then validate the cms.lic, certificate keys etc are still residing on the CMS Server. Fingers Crossed! (seriously.. all should be good)

Commands to use:

“pki list” to display keys and certificates.
“license” to display active licensing

If something is missing.. simply upload required files from your PC Drive..

cms-upgrade-3

Just a screen shot to show validation from the Web Admin portal

cms-upgrade-4

Jun 15

Cisco Webex Teams Hybrid – Configuration Key Notes

Webex Teams has been announced with the name Spark being retired.. We are seeing quite a few take ups with the whole hybrid deployment. Thought I’d jot down some of the key points to deploying hybrid with Webex Teams..

The whole hybrid deployment is based on a strong foundation of having the Collaboration Edge architecture embedded into your UC environment. Believe it or not, but this is half your battle with the hybrid deployment. If you can make B2B call from CUCM out through the expressway architecture thats great news.. if you can’t or the collaboration edge environment has not been deployed.. no biggie.. just ensure you focus on getting this B2B deployment right first.. this will make your life easier moving forward. I have done a couple of articles around the whole B2B experience..

The Webex Teams connector (spark connector) is simple to deploy. The expressway is associated in the Webex Team Admin console (Spark Control Hub), from here the connectors are downloaded to the expressway. For the Call Aware and Call Connector, you simply point to the CUCM using the application user created below. There are a couple of hoops to jump in terms of proving ownership of domain etc.  Through the control Hub, you will also point to your expressway-e device using MTLS on port 5062.

So in saying that.. lets move onto the key components for CUCM. The main areas are around User Configuration.

Application User Creation

The Webex team expressway connector requires an application user with CTI and AXL rights. The below expands on the actual roles required by the application user.

Standard CTI Allow Control of All Devices
Standard CTI Allow Control of Phones Supporting Conf & xfer
Standard CTI Allow Control of Phones Supporting Rollover
Standard CTI Enabled
Standard TabSync User

Required Attributes for End Users

Webex Teams requires a few items to be configured in CUCM for Endusers in order to be ‘Webex Teams’ compliant and allow the Webex Teams ‘Control Hub’ to automatically create Webex Remote Destinations or CTI Endpoints essentially.

Required Items

- Enduser must control atleast one device or device profile.
- Must have Mobility Enabled
- Must have Primary Extension selected
- Must have following groups assigned to enduser
*Standard CTI Allow Control of Phones Supporting Conf & xfer
*Standard CTI Allow Control of Phones Supporting Rollover
*Standard CTI Enabled
- Home Cluster must be checked
- Line Appearance for controlled device/device profile must be selected.

Expressway-C (B2B) Key Points

Webex Traversal Client Zone

Parameter Value
Name Webex_Traversal
Type Traversal Client
Hop Count 15
Username webex_traversal
Password *****
H.323 mode Off
SIP mode On
Port 7007
Transport TLS
TLS verify On
Accept proxied registrations Deny
Media encryption mode Force encrypted
ICE support Off
Multistream Mode On
SIP Poison mode Off
Preloaded SIP route support On
SIP Parameter preservation On
Authentication Policy Check credentials
Peer 1 Address hostname_of_expressway-e_device

CUCM Neighbour Zone

You’ll need to make some slight modifications to the CUCM Neighbour zone.

Parameter Value
Name CUCM
Type Neighbour
Hop Count 15
H.323 mode Off
Port NA
SIP mode On
Port 5065
Transport TCP
Accept proxied registrations Allow
Media encryption mode Auto
ICE support Off
Multistream Mode On
Preloaded SIP route support Off
Authentication Policy Do not check credentials
SIP Authentication trust mode Off
Peer 1 Address cucm-hostname
Zone profile Custom
Monitor peer status Yes
Call signaling routed mode Always
Automatically respond to H.323 searches Off
Automatically respond to SIP searches Off
Send empty INVITE for interworked calls On
SIP parameter preservation On
SIP poison mode Off
SIP encryption mode Auto
SIP REFER mode Forward
SIP multipart MIME strip mode Off
SIP UPDATE strip mode Off
Interworking SIP search strategy Options
SIP UDP/BFCP filter mode Off
SIP UDP/IX filter mode Off
SIP record route address type IP
SIP Proxy-Require header strip list NA

Append the below Search Rules to your Expressway-C Device.

Webex Outbound Search Rule

Rule name Webex Hybrid Outbound Call
Description Webex Hybrid Calling
Priority 70
Protocol SIP
Source Named
Source Name CUCM
Request must be authenticated No
Mode Alias pattern match
Patter type Regex
Pattern String .*@.*\.call\.ciscospark\.com.*
Pattern behaviour Leave
On successful match Stop
Target Webex_Traversal
State Enabled

Webex Inbound Search Rule

NOTE: the pattern string must exactly match the first domain name in the Clustered Full Qualified Domain Name in the Enterprise Parameters page on CUCM.

Rule name Webex Hybrid Inbound Call
Description Webex Hybrid Calling
Priority 60
Protocol SIP
Source Named
Source Name Webex_Traversal
Request must be authenticated No
Mode Alias pattern match
Patter type Prefix
Pattern String hybrid.example.com.au
Pattern behaviour Leave
On successful match Stop
Target CUCM
State Enabled

Expressway-E  (B2B) Key Notes

Webex Traversal Zone

Parameter Value
Name Webex_Traversal
Type Traversal Server
Hop Count 15
Connection Credentials
Username webex_traversal
Password *****
H323
Mode Off
SIP
Mode On
Port 7007
Transport TLS
TLS verify mode On
TLS verify subject name hostname of expressway-c device
Accept Proxied registrations Allow
Media encryption mode Force Encrypted
ICE support Off
Multistream Mode On
SIP Poision Mode Off
Preloaded SIP routes support On
SIP Parameter preservation On
Authentication
Authentication Policy Do not check credentials

Webex DNS Zone

Name Webex_DNS
Type DNS
Hop Count 15
H323
Mode Off
SIP
Mode On
TLS verify mode On
Fallback transport protocol TLS
TLS verify subject name callservice.ciscospark.com
TLS verify inbound mapping On
Media encryption mode Force Encrypted
ICE support Off
Preloaded SIP routes support On
Modify DNS request On
Domain to search for callservice.ciscospark.com
Authentication
SIP authentication trust mode On
Advance
Include address record Off
Zone profile Default

Webex Outbound Search Rule

Rule name Webex Hybrid Outbound Call
Description Webex Hybrid Outbound Call
Priority 100
Protocol SIP
SIP Variant All SIP Variants
Source Named
Source Name Webex_Traversal
Request must be authenticated No
Mode Alias pattern match
Pattern Type Regex
Pattern String .*@.*\.ciscospark\.com
Pattern Behaviour Leave
On successful match Stop
Target Webex_DNS
State Enabled

Webex Inbound Search Rule

Rule name Webex Hybrid Inbound Call
Description Webex Hybrid Inbound Call
Priority 100
Protocol SIP
SIP Variant All SIP Variants
Source Named
Source Name Webex_DNS
Request must be authenticated No
Mode Any Alias
On successful match Stop
Target Webex_Traversal
State Enabled