Oct 01

Activating Services on IM&P – AXL Service

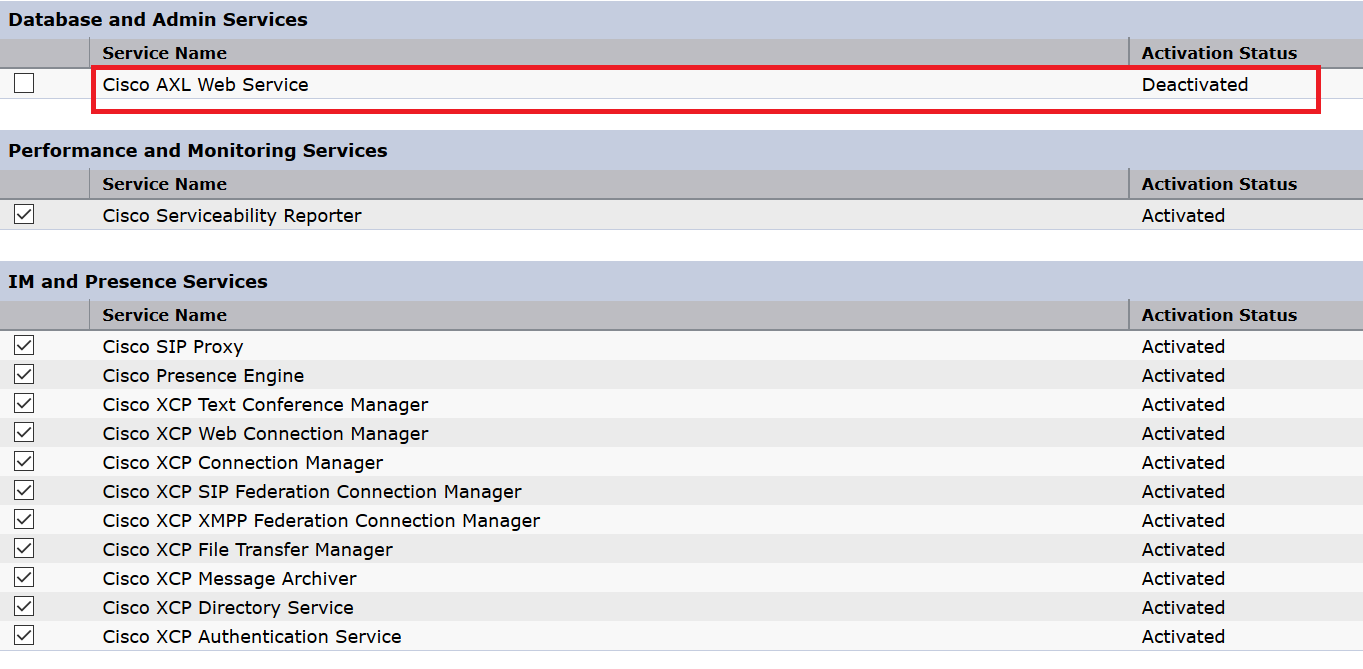
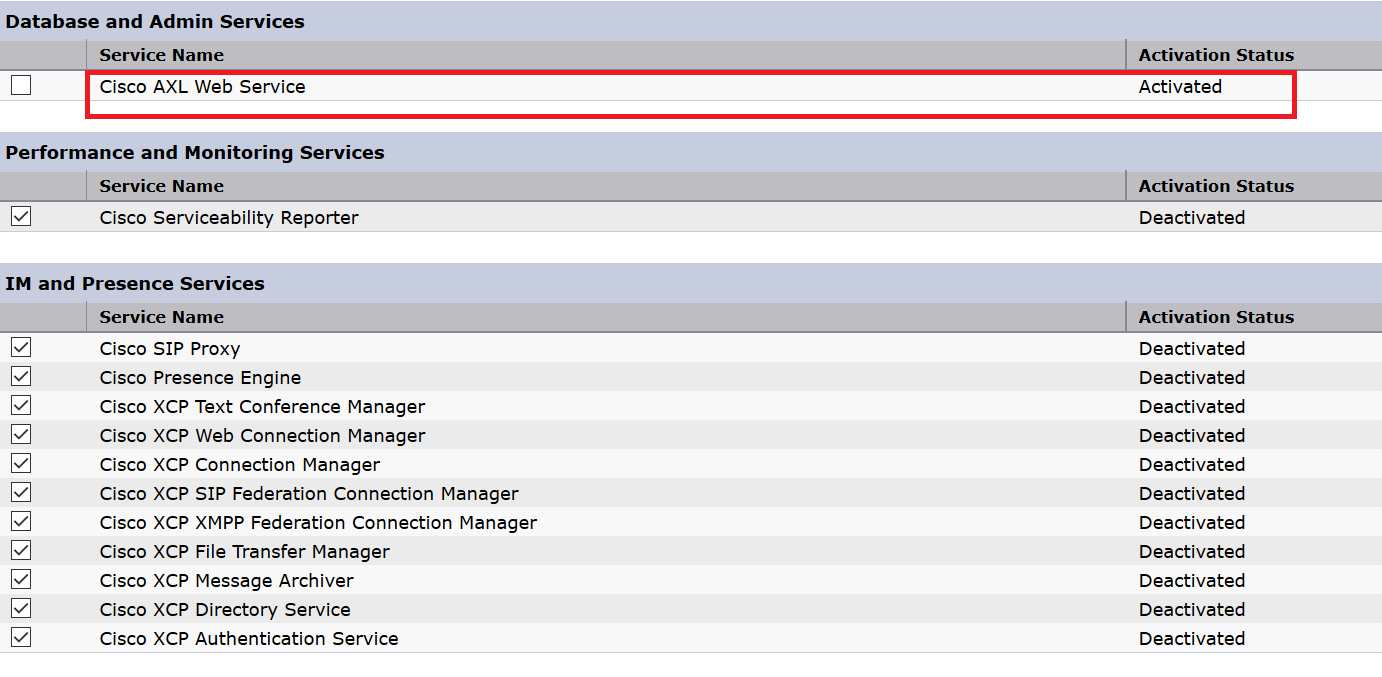
Little gotcha with activating services on the Cisco IM & Presence Server version 11.0.1.XXXXX-X. After selecting ‘Set to Default’ for Service Activation, we can see the Cisco AXL Web Server is indeed already activated – great. However when we go ahead and click ‘Save’, essentially activating the selected services, the Cisco AXL Web Server returns to ‘Deactivated’. This is a critical service to allow Jabber to connect to the IMP Cluster, so you’ll need to go back and check the Cisco AXL Web Service to activate the service.

This is easy to miss and can cause some pain when you try and connect Jabber for the first time..

As we can see below the Cisco AXL Web Service is showing as Activated.

Cisco AXL Web Service

After selecting SAVE, the Cisco AXL Web Service returns to Deactivated.
Cisco AXL Web Service

Sep 10

Jabber – Login Issue – Please Enter Your Password for Webex

Cannot log into Jabber from any device, the “please enter you password for webex” prompt appears in Jabber even though you are attempting to log into a local presence domain.

webex1

webex2

PC Jabber logs Snippet.

INFO [0x00001a04] [s\impl\system\CredentialsSyncer.cpp(116)] [CredentialsSyncer] [CredentialsSyncer::Impl::syncCredentials] – sync Credentials for : WebEx

If Jabber finds its given Domain in the WebEx Cloud, then it will only attempt to register to the WebEx Cloud for IM and Presence and not the Local IM and Presence Cluster. This is how Jabber is designed.

To resolve the issue, the given Domain name must be removed/unregistered from Webex Cloud. If this cannot be done for any reason then follow one or more of below methods to overcome the issue.

1) Use EXCLUDED_SERVICES=WEBEX during the Jabber for Windows client installation with the MSI:
http://www.cisco.com/c/en/us/td/docs/voice_ip_comm/jabber/10_6/CJAB_BK_C56DE1AB_00_cisco-jabber-106-deployment-and-installation-guide/CJAB_BK_C56DE1AB_00_cisco-jabber-106-deployment-and_chapter_01011.html#JABW_RF_A47E40C4_

e.g.
msiexec.exe /i CiscoJabberSetup.msi /quiet CLEAR=1 EXCLUDED_SERVICES=WEBEX

2) A mobile Jabber client can click on the following URL (from an Email for example):
ciscojabber://provision?ServicesDomain=resmed.com&ServiceDiscoveryExcludedServices=WEBEX
http://www.cisco.com/c/en/us/td/docs/voice_ip_comm/jabber/11_0/CJAB_BK_D657A25F_00_deployment-installation-guide-jabber-110/CJAB_BK_D657A25F_00_deployment-installation-guide-jabber-110_chapter_0100.html#CJAB_TK_C0B6538A_00

3) Use ServiceDiscoveryExcludedServices, and specify WEBEX, in a configuration file (group or the global jabber-config.xml file):
http://www.cisco.com/c/en/us/td/docs/voice_ip_comm/jabber/11_0/CJAB_BK_D657A25F_00_deployment-installation-guide-jabber-110/CJAB_BK_D657A25F_00_deployment-installation-guide-jabber-110_chapter_01010.html#CJAB_RF_CAA78385_00

e.g.

<?xml version=”1.0″ encoding=”utf-8″?>

<config version=”1.0″>

 <Policies>

   <ServiceDiscoveryExcludedServices>WEBEX</ServiceDiscoveryExcludedServices>

 </Policies>

</config>

Jul 15

Cisco JID – Resolving Contacts with Blank Spaces

Resolving JID’s when the usernames have a blank space can be challenging. I had an issue where the IM Address would be formatted correctly (email address) when a user viewed their own profile from within Jabber. However, if that same user searched the directory and viewed a contact’s profile, the IM Address would only display the firstname.

The user ID was in the format of “firstnamelastname@domain”

The Jabber client was ending the IM Address string after the firstname. Therefore the presence status would only show offline and the IM Feature was disabled. The blank space was breaking the IM Address.

IMP 10.5.2 was in use and the Directory URI was checked for the Advanced Settings, this was working ok as the IM Address in self view in Jabber was showing the Directory URI

The issue here was the Directory Search and the resolving of contact JID’s to their SIP URI.

Nagajothi Thangapandian provided assistance in this case and advised to hardcode the directory lookup resolver to the SIP URI which was mapped to the email address. Below is the snippet of code that will be placed into the jabber-conf.xml file.

This resolved my issue, but will also come in handy if you need to migrate or change IM Addresses for contacts.

<?xml version=”1.0″ encoding=”utf-8″?>
<config version=”1.0″>
<Directory>
<SipUri>mail</SipUri>
<BDISipUri>mail</BDISipUri>
<UseSIPURIToResolveContacts>true</UseSIPURIToResolveContacts>
<BDIUseSIPURIToResolveContacts>true</BDIUseSIPURIToResolveContacts>
<UriPrefix>sip:</UriPrefix>
<BDIUriPrefix>sip:</BDIUriPrefix>
</Directory>
</config>

Jan 28

Creating a Photo Repository for Collaboration Edge.

Install IIS on a selected Windows Server. Select the basic features, no need to change the defaults.
Open the IIS Management Window. Navigate to the Default Website. If this is an existing IIS Server, Right-click the Default Website and select “Add New Website”. Assign the new website a name, default path and unique port to use. More than likely the default website will already be port 80, so choose a different port.

Add your photos to the default path you selected above. The filename for the each photo must be in the following format: username.jpg

Modify the jabber-config.xml file and add the following lines:

<PhotoUriSubstitutionEnabled>true</PhotoUriSubstitutionEnabled>
<UdsPhotoUriWithToken>http://192.168.0.100:9080/%%uid%%.jpg</UdsPhotoUriWithToken>

Upload the jabber-config.xml to the all CUCM Servers. Restart the TFTP Service.

Browse to the VCS Control. Navigate to Configuration -> Unified Communications -> Configuration page. Under Advanced, select the hyperlink “Configure HTTP Server Allow List”. Select New to add the photo repository server to the Whitelist. Complete the IP Address and Description details and select create entry.

The Jabber client will now have access to the photo repository server from both inside and outside the corporate network.

Dec 16

CUCM and IM&P Integration with SRV Records

For us Cisco techs, one of the more often than not nowadays is that have to deal with the MS world of DNS (AND Certifciate Architecture… I’ll talk about this in later articles). I’ve had a fair bit of experience with DNS in the past, so I thought I would just share a little about integrating CUCM with IM & Presence using SRV records both ways to support CUCM Clusters and IM & Presence Clusters for high availability.

DNS Configuration

Create A (Host) Records

CUCM DNS A Records

Type Hostname IP Address
A cucm01.uplinks.com.au 192.168.0.20
A cucm02.uplinks.com.au 192.168.0.21

IM&P DNS A Records

Type Hostname IP Address
A imp01.uplinks.com.au 192.168.0.30
A imp02.uplinks.com.au 192.168.0.31

Create SRV Records

IM&P Cluster Name: imp.uplinks.com.au

Type Identifer Protocol Weight Priority Host
SRV _sip _tcp 10 10 imp01.uplinks.com.au
SRV _sip _tcp 10 10 imp02.uplinks.com.au

CUCM Cluster Name: cucm.uplinks.com.au

Type Identifer Protocol Weight Priority Host
SRV _sip _udp 10 10 cucm01.uplinks.com.au

Verify Records via NSLOOKUP

>  set q-all
>  _sip._tcp.imp.uplinks.com.au
>  _sip._udp.cucm.uplinks.com.au

The above should output the following results.

-        The SRV Records and their target hosts
-        An A record for every target host identified in the SRV record.

CUCM Configuration

SIP Trunk

  1. Navigate to Device, then select Trunks
  2. Select Add New
  3. Select SIP Trunk for Trunk Type
  4. Select Next
  5. Complete the details of the SIP Trunk as per normal.
  6. Under SIP Information, check the box  Destination Address is SRV

Note: When the checkbox is ticked, CUCM changes the outbound SIP protocol from udp to tcp.

  1. Type the IM&Presence Cluster Name. (imp.uplinks.com.au)
  2. Select Save and then reset the Trunk.

Configure SIP Publish Trunk

  1. Navigate to the Service Parameters, then Cisco CallManager.
  2. Find “IM & Presence Publish Trunk”
  3. Drop the arrow down and select the above SIP Trunk.

 IM & Presence Configuration

SRV Cluster Name

  1. Navigate to Service Parameters, then Cisco SIP Proxy.
  2. Find “SRV Cluster Name”
  3. Type the IM&Presence cluster name (imp.uplinks.com.au)
  4. Select Save

Presence Gateway

  1. Navigate to Presence, then Gateways.
  2. Select Add New
  3. Select CUCM for Presence Gateway Type.
  4. Type a Descriptive note.
  5. Type the SRV Record for the CUCM Cluster Name.

Note: Do not strip the SRV Identifier or Protocol. Example input would be _sip._udp.cucm.uplinks.com.au

Jul 30

Photo Retrieval Using UDS Directory Service in Jabber

Configuring Photo retrieval in Jabber clients to work with UDS Directory Services is slightly different to the EDI methods.

The only photo retrieval method UDS supports is HTTP Based. So you’ll need to create a web server to save your photos too.

Ensure that you can browse and open the photos from a PC or laptop using the HTTP path.

UDS uses a URL Template to dynamically build the photo retrieval path. The variable used by UDS is %%uid%%, this is the username field in CUCM EndUser.

Therefore the only line of code we need in the Jabber-config.xml file is the following

<UdsPhotoUriWithToken>http://webserver.domain/photos/%%uid%%.jpg</UdsPhotoUriWithToken>

Example Jabber-conf.xml file layout.

<Directory>
<DirectoryServerType>UDS</DirectoryServerType>
<UdsPhotoUriWithToken>http://webserver.domain/photos/%%uid%%.jpg</UdsPhotoUriWithToken>
</Directory>

Note: If you had tried other methods of photo retrieval, you may need to remove the CSF folder under %profile%\AppData\Local\Cisco\Unified Communications\Jabber. then sign back into Jabber.

Photos should be 128px x 128px. However the Jabber Client will resize if the image is larger.

To verify the photoUrlTemplate is correct review the Jabber Log file under %profile%\AppData\Local\Cisco\Unified Communications\Jabber\CSF\Logs\ and search for the line ‘photoUrlTemplate=’

This should reflect the value of the field in the jabber-config.xml file.

Jul 20

Configuring IM&P Server with PostgreSQL Database for Persistent Chat

Installing and Configuring Cisco IM&P 10.0 with PostgreSQL 9.3 on Windows 2008 R2 Server.

Download the PostgreSQL Database Appliation from PostgreSQL Website

Run the downloaded executable and complete the wizard.

Connecting to the PostgreSQL Database

Open the Administration console for PostgreSQL (pgAdmin III), then start and connect to the database service from the sub-menu.

Create a new Login Role. The Role Name is the username, ensure to assign a password to this login role as the Cisco IM&P Service requires this. Under Role Privileges, check the ‘superuser’ box.

Creating a Database

Click on the ‘Databases’ object to Create a New Database. Give the database a name (lower-case) and assign the above created user as the Owner.

Allowing Client Connections

In PostgreSQL v9.3 the database listens on all available IP Addresses configured on the Host Server. In order to restrict listening IP Addresses, modify the postgreqls.conf file located under the install directory \data\postgresql.conf

For host IP 192.168.1.1 , modify the following line

listen_address = ‘*’ to listen_address = ‘192.168.1.1’

PostgreSQL Database version 9.3 by default only accepts database connections from the localhost. In order to allow remote connections into the database we need to modify the hba.conf file located under the installation directory \data\hba.conf

Add the following line to the hba.conf file

HOST ALL ALL 192.168.1.0/24 md5

Cisco IM&P Server Configuration

Within the IM&P server we need to create an external database relationship and then assign the external database to a service like Persistent Chat.

Creating an External Database
Navigate to Messaging -> External Server Setup -> External Databases. Add new Database and complete the required details. The Database Name is to be lower case, Database Type Postgres, User Name (Role Login), IP Address for the Hostname and keep the default Port Number.

After saving the configuration, there will be errors in the External Database Section. This is because this database is not yet linked to a service.

Linking the External Database to the Persistent Chat Service.

Navigate to Messaging -> Group Chat and Persistent Chat. Enable Persistent Chat, then scroll down to the Persistent Chat Database assignment section and drop the menu down and select the above created external database. Save the Configuration.

Check Database Connectivity

Navigate to Diagnostic -> System Troubleshooter. Then scroll down to the External Database Troubleshooter and check the system health.
Jul 10

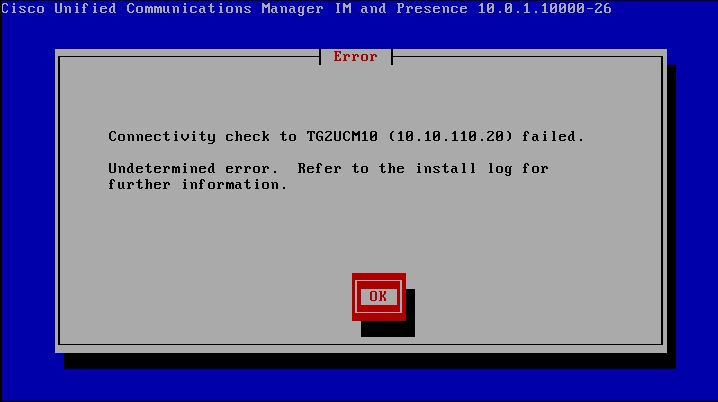
Cisco IM&P Server Install Fails – Connectivity Check to CUCM Publisher Fails

A slight change to the way IM&P is added to the CUCM Infrastructure in version 10. The IM&P Server is now thought of like a Subscriber in the CUCM Environment as it so tightly integrated in CUCM. So before you install IM&P Server, you will need to add the server to CUCM first, just as you would a CUCM Subscriber.

CUCM -> System -> Server -> Add New

Server Type will be CUCM IM and Presence, then enter the required details for IP Address and Presence Domain.

Now you can go ahead and install the IM&P Server.

Cisco IM&P Install Error