Feb 06

Cisco Jabber Last Logged in Report

To find out the last logged in times for Jabbers in CUCM required the below shell command. I found the command on the Cisco Support Forum.. I have added the reference link to the bottom of this blog. I though I would extend the the process of getting the info out of CUCM and into a spreadsheet to make some sense of the data.

SSH to the CUCM Publisher Server and execute the below SQL command.

run sql select e.userid, cd.timelastaccessed from enduser as e, credentialdynamic as cd, credential as cr where e.pkid=cr.fkenduser and e.tkuserprofile=1 and e.primarynodeid is not null and cr.tkcredential=3 and cr.pkid=cd.fkcredential order by cd.timelastaccessed

Jabber last Logged In

Snippet of the results.

jabber-last-logged-in-1

I had logging enabled in Secure Shell as the results will span past the shell buffer. Open Excel and import the log file generated. I use ‘Delimitated’ and separated via ‘space’.

After the log file has been imported into excel, I use the Unix to excel time formula to make sense of the date.

Formula is =CELL/(60*60*24)+”1/1/1970″

*Note: ensure the format of the cell is ‘Date’.

Save the spreadsheet, and you now have a full list of all users and their last logged in date for Jabber.

References:

Cisco Support Forum: https://supportforums.cisco.com/t5/unified-communications/jabber-report/td-p/2957556

Apr 30

Cisco Jabber cannot Call out to PSTN

Migrated to SIP Carrier and experience an issue where Deskphones could call out to the PSTN, however the Cisco Jabber softphones could not. The annunciator message was played from the carrier network. The remote device (being the device across the PSTN Network) would ring once.

Tracing the SIP messages, I could see the carrier was sending back a SIP reason of “Q.850;cause=41″. Looked up the code which is “Temporary Network Failure – Try again”. So not too much help there..

I analysed the SDP being sent to the carrier from the Cisco Jabber softphone vs the Deskphone and found the video and content sharing attributes were being passed out to the Telco. This Telco connection is just an audio PSTN service, so it would not support video.

I created a new Device Pool for the SIP Trunk to the CUBE, along with a new Region and set the Video to “None”. This effectively disables Video, hence any endpoint including Cisco Jabber establishing call, will not send the Video/Content media attributes. Telco is now happy and calls proceed through the PSTN.

FYI, have pasted below the differences in the SDP.

SDP – Cisco Jabber

v=0
o=CiscoSystemsSIP-GW-UserAgent 9138 8218 IN IP4 192.168.241.20
s=SIP Call
c=IN IP4 192.168.241.20
t=0 0
m=audio 17206 RTP/AVP 8 0 18 101
c=IN IP4 192.168.241.20
a=rtpmap:8 PCMA/8000
a=rtpmap:0 PCMU/8000
a=rtpmap:18 G729/8000
a=fmtp:18 annexb=no
a=rtpmap:101 telephone-event/8000
a=fmtp:101 0-15
a=ptime:20
m=video 51372 RTP/AVP 31
c=IN IP4 192.168.241.20
m=application 17458 RTP/AVP 125
c=IN IP4 192.168.241.20

SDP – Standard IP Phone (No Camera)

v=0
o=CiscoSystemsSIP-GW-UserAgent 7438 4222 IN IP4 192.168.241.20
s=SIP Call
c=IN IP4 192.168.241.20
t=0 0
m=audio 18034 RTP/AVP 8 0 18 101
c=IN IP4 192.168.241.20
a=rtpmap:8 PCMA/8000
a=rtpmap:0 PCMU/8000
a=rtpmap:18 G729/8000
a=fmtp:18 annexb=no
a=rtpmap:101 telephone-event/8000
a=fmtp:101 0-15

a=ptime:20

Apr 10

Group Voicemail Alternative – Cisco Jabber

Departmental or Group voicemail is always requested when deploying a phone system. The traditional method of distribution lists worked great, however since the introduction of Jabber, there seem to be caveats in configuring these lists. Jabber will display the voice message no worries, this is great.. Except you can not accept or decline a voice message. So you will still need to log into the Voicemail Server via the phone and follow the prompts to accept messages.

Another method is to use Alternate Extensions (if the user doesn’t already have a mailbox). This is limited to a certain number of users who can access the mailbox via alternate extensions. But I’ve found in most cases.. The number of users wanting access to department or group mailbox is fewer than the limitation.

Alternate Extensions also allows Jabber to visually display the voicemail, allow to tag as unread, read, delete message etc.. And yes voice message are indeed synchronised across the Jabber clients that have access to the mailbox. Users can also forward voice messages from Jabber 11.8.

Outline on how to set up this alternate method is below.

The Jabber Service Profile must include the Voicemail Server configuration along with the Credentials field set to “not set”. ie this means the user must enter the credentials for the mailbox.

On the Unity Connection Server ensure the below is configured.

- Mailbox Password is set (This is not the PIN)
- Alternate Extension of the Jabber Users
- MWI Extension of the Jabber Users.

Assign the Jabber Service Profile to the End User in CUCM. Once the user logs into the Jabber client, select the Voice Messages Tab. The user will have to enter the credentials of the group mailbox.

On top of this, we can also configure single mailbox for the group. (if the destination email address is a Exchange/O365 mailbox).

Dec 05

Cisco MRA Jabber – Cannot Communicate with Server – Reverse DNS

Another “Cannot Communicate with Server” error when logging into Cisco Jabber. This error can lead to many possibilities of where the actual error lies. You will need to do some digging. I come across a doozy and have documented below. But this relates to the newer version on Expressway 8.8+ which now also queries reverse DNS zones to confirm operations. If PTR records are missing or mis-configured you will know about it..

The symptoms I received were as follows:

- I could resolve the SRV record and A records
- I could log into Jabber from within the Corporate LAN
- If I typed an incorrect password, I would receive “Username or Password is incorrect” message
- If I typed in the correct password, I would receive the infamous “Cannot Communication with Server” error.

Versions I’m running:

- CUCM/IMP version 11.0.1.21900
- Expressway version 8.8.1

Processes and Solution (to this particular scenario):

- Expressway-E Event Log showing Service Unavailable – 503 error.
MRA Jabber- Set the ‘network’, ‘network tcp’ and ‘network sip’ diagnostic logging to DEBUG.
- Attempted to log into Jabber. Captured and Downloaded logs.
- Analysed log file and found this line. “Detail=Certificate verification failed for host=X.X.X.X, additional info: Invalid Hostname cor8-ppp2557.per.dsl.connect.net.au”
- Discovered a PTR record for my exact Expressway-E’s A Record had been created somewhere on the Web, and when the Expressway-C was actioning a Reverse DNS Lookup Query, this PTR record was being found. What are the chances hey??
- I had to create a Reverse Lookup Zoen for the Expressway-E Public IP Address, add the correct PTR record. Once I flushed DNS.. Everything started to work fine and I could log into Jabber remote.

**Leaving Thoughts.. As I’ve also found in CUCM version 11.5, reverse DNS plays a very important role now.. Make sure all A records have PTR records and only one!

Nov 20

Forward Voicemail Messages with Jabber 11.8+

From Cisco Jabber 11.8+, users can forward voice messages to other user mailboxes. One very good feature is Cisco Jabber also allows the user to record a header message that gets attached to the original voice message. This is also available for Jabber on mobile devices.

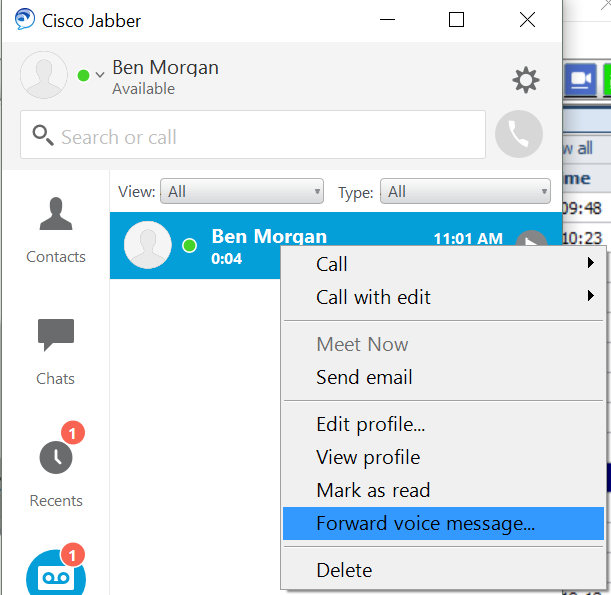
In Cisco Jabber navigate to the Voice Messages tab, then right click the voice message and select ‘Forward Voice Message’

cisco-voicemail-forward-1

A window now opens, which allows you to record a message. You can then playback the recorded message, re-record etc.

cisco-voicemail-forward-2

Once happy with the recorded voice message, search for users in the directory. (NOTE: users must have a voice mailbox). You can also select multiple recipients.

cisco-voicemail-forward-3

Sep 25

Deploying Jabber MSI via Group Policy Without Arabic Language

Cisco Jabber is great collaboration tool for any organisation.. The install process for individual PCs is simple and quick.. However deploying Cisco Jabber via Microsoft’s Group Policy is a more painful process for the Windows Administrator. This is because for some unknown reason.. The Cisco Jabber MSI package selects the lowest language identifier to install, this turns out to be Arabic! Great, so how do we deploy Cisco Jabber in English. Well there are a couple of hoops to jump through to have English as the selected language and I’ve briefly documented how below. I’ve also included a link to good Cisco reference and the required EXE’s for Microsoft to play nice.

Download and extract WinSDKTools.zip and install WinSDKTools_amd64.msi on Server (you will need x86 installer if 32 bit). After installing this, go to C:\Program Files\Microsoft SDKs\Windows\v7.1\Bin and double click on Orca.Msi. This will install the Orca application.

Open Orca and navigate to File > Open. Browse to and select the CiscoJabberSetup.msi.

Once the MSI is opened, navigate to View > Summary Information.

Cisco Jabber

Remove all language codes under languages except for 1033 (English).

Cisco Jabber Arabic Language

Click OK and go File > Save As and save over the top of the original CiscoJabberSetup.msi. Language of msi file has now been changed, set up GPO to deploy software.

Cisco Reference:

http://www.cisco.com/c/en/us/td/docs/voice_ip_comm/jabber/10_5/CJAB_BK_D6497E98_00_deployment-installation-guide-ciscojabber/install_client.html

Jun 30

Jabber – Cannot Communicate with Server

Deploying Cisco Jabber (MRA) to a CUCM Cluster can sometimes have its pitfalls especially when the firewall is managed by a third party vendor. Although, the all to common error message “Cannot Communicate with Server” can be frustrating to troubleshoot, the devil lies in the details. This can also be very useful when needing to provide debugs reports to third party firewall vendors to investigate further on your behalf.

1st step is to view the jabber log file, this can sometimes be a long file to extract the key bits of information you’re after.. One idea is just to find the “cannot communicate’ error message. Then reverse engineer the log file.

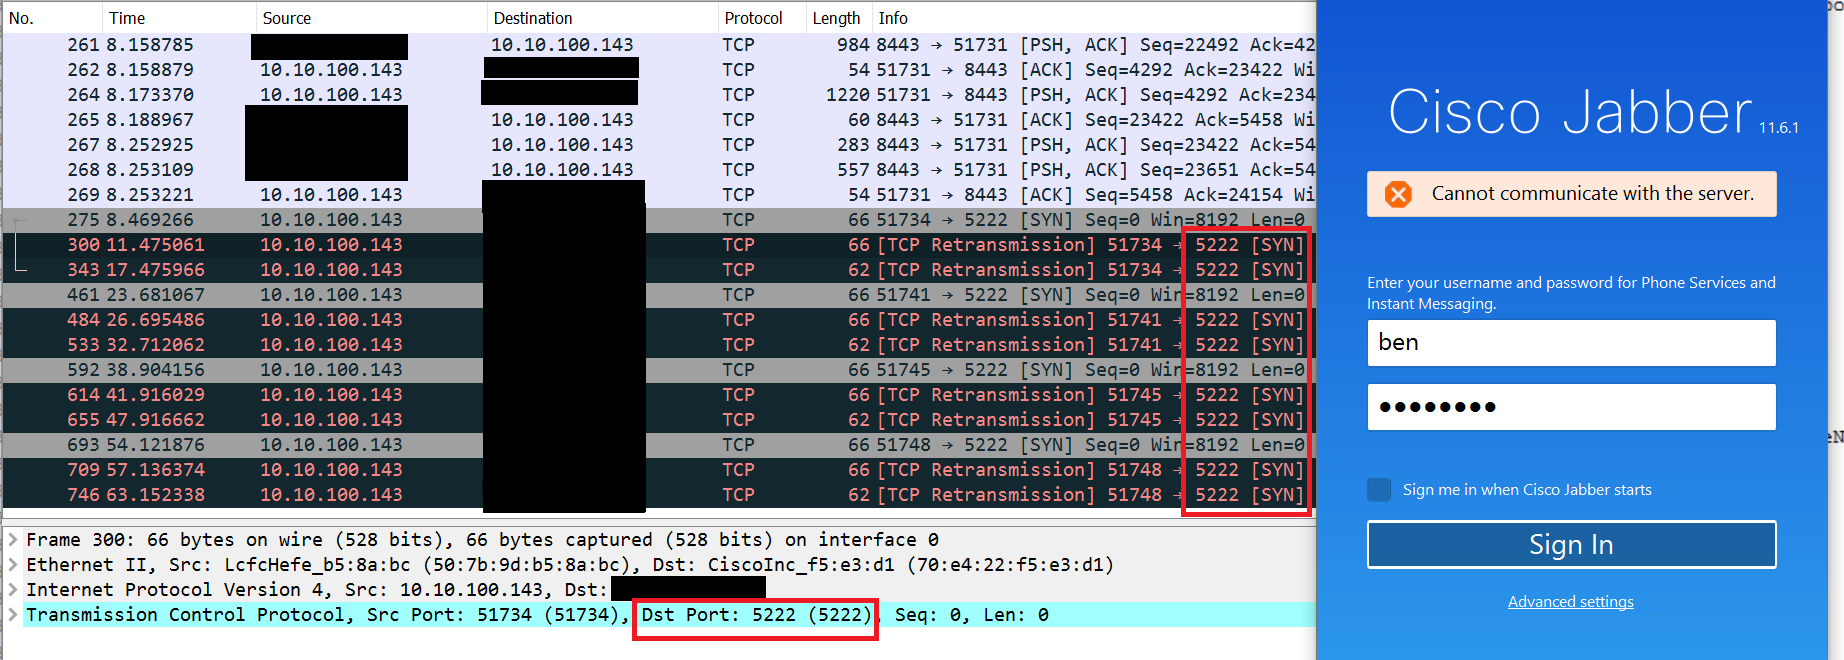
2nd step is open a wireshark session and attempt a jabber connection. This provides key details about the connection process and is very useful to pass onto the thirdparty firewall vendor. Analysing the packets will give you insights into the login process from the DNS SRV query to attempting connections to CUCM and Presence servers.

In the below example, I had to troubleshoot the “Cannot Communicate with Server” error message. This turned out to be a inbound Firewall Port issue. The vendor did not open TCP 5222 from Public to the Expressway-E device. I had to send the vendore this packet capture for evidence to investigate further into the issue. I’ve also included the error messages in the Jabber log file to complete the picture. TCP Port 5222 is used for XMPP connection to the Presence Server.

Putting the packet capture and the jabber log together, gives you a full picture of where Jabber is exactly failing in the connection process.

Jabber-XMPP

Jabber-XMPP-1

Mar 26

Cisco Jabber: Save Chat History to Outlook

To enable Cisco Jabber Chats to be saved to Outlook, you ‘ll need to modify the jabber-config.xml file. A subfolder called “Cisco jabber Chats” is created under the ‘Inbox’ folder in Outlook.

Note: Just like with emails, users are able to delete the chat folder and any chat conversation located inside. The deleted chat conversation will sit in the Deleted Items, when deleted from the Deleted Items, the chat conversation will site in the Recovered Deleted Items bin until Exchange purges the items.

Jabber for Windows 10.6 supports MS Exchange 2010 and Exchange 2013 and Jabber for Windows 11.0+ supports MS Office 365 as well.

In the example below, CUCM is selected for the authentication service, seeing that most (if not all) Cisco UC Implementation these days are sync’ed with Active Directory.

The Operation Mode “EnabledByPolicy” enables the option in Outlook “Save chat sessions to Cisco Jabber Chats Folder in MS Outlook”, and does not permit users to disable this option. If you wish for the users to enable/disable this feature as required, the Operation Mode  must be “EnabledByDefault”.

Most Exchange Environments have autodiscover enabled and configured, hence the Domain Names (Internal/External) are configured for the Exchange Addresses. If autodiscover is not enabled, simply the enter the Internal/External Hostnames for the Exchange CAS Servers.


Jabber-config.xml snippet.
<?xml version=”1.0″ encoding=”utf-8″?>
<config version=”1.0″>
<Options>
<Start_Client_On_Start_OS>true</Start_Client_On_Start_OS>
<SaveChatHistoryToExchangeOperationMode>EnabledByPolicy</SaveChatHistoryToExchangeOperationMode>
<Exchange_UseCredentialsFrom>CUCM</Exchange_UseCredentialsFrom>
<ExchangeAutodiscoverDomain>Internal_Domain_Name</ExchangeAutodiscoverDomain>
<InternalExchangeServer>Internal_Domain_Name</InternalExchangeServer>
<ExternalExchangeServer>External_Domain_Name</ExternalExchangeServer>
</Options>
</config>

Dec 05

Jabber Softphones for Collaboration Edge Access

Cisco Jabber as evolved rapidly over the past couple of years with a lot of growth still to come. With the introduction of Collaboration Edge architecture, Cisco Jabber can be used from outside the corporate network while being secure (both Signalling and Audio).

For Cisco Jabber to connect through the Collaboration Edge environment and be feature rich the below is required.

- Cisco Unified CM
- Cisco IM & Presence
- Cisco Unity Connection
- SRV Records (External and Internal)
- Cisco Expressway-E and Expressway-C

The following Cisco Jabber Devices can be configured to connect through the Collaboration Edge environment.

- MS Windows Operating System
- MAC Operating System
- Apple iPad
- Apple iPhone
- Android mobile devices

Fro each of the above devices to connect through the Collaboration Edge environment a phone device is required to be configured in CUCM. Each phone device name must be prefixed to allow CUCM to identify the device type. Prefixes include:

- CSF (Windows/MAC)
- TCT (iPhone)
- TAB (iPad)
- BOT (Android)

I’ve outlined below the steps to create a Cisco Jabber softphone. (In the below example an iPhone device type will be created.

1. In CUCM navigate to Device -> Phones
2. Select Add New
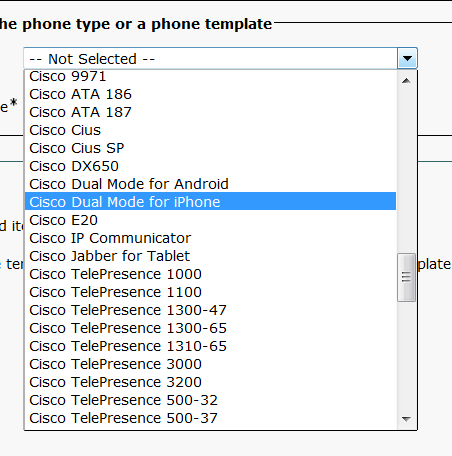
3. Drop down the Phone Type Menu and select Dual Mode for iPhone.
Jabber

jabber-2

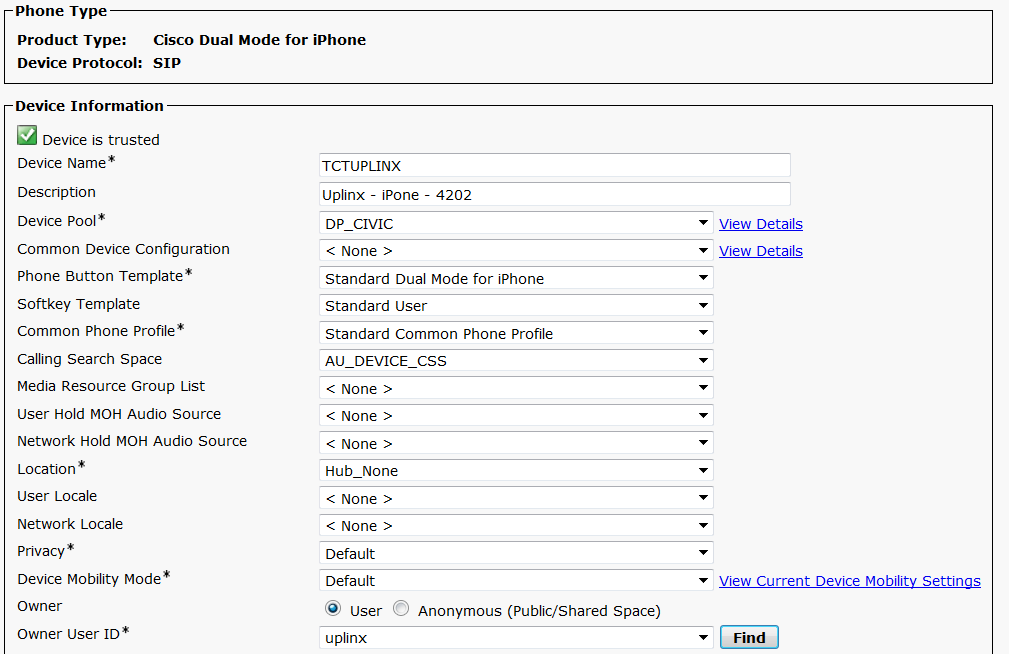
4. The Device Name is ‘TCTusername’ The device name has a 15 character limit.
5. Complete the Description, I always place the device type in the description as well for easy identification.
6. Complete the other required fields (with an *)
7. Select the appropriate user for the Owner Field
Jabber

8. Add a new DN (Top Left)
9. Enter the extension of the user. (The User would have an existing deskphone, make sure to use the same extension, creating a shared line like setup)
10. Select the Partition. (After the selecting the Partition, the Line details should auto populate until the ‘Line 1 on Device TCTUPLINX Section)
11. Complete the Display Name and External Phone Mask.
12. Select ‘Associate End Users and select the end user who will use this device/line. FYI, this section allows CUCM to auto publish phone status for a user. Example. If this line is busy, the system will change the user status to ‘OnCall’.
13. Click Save
14. Navigate to the User Management -> End User page
15. Find and select the required User.
16. Scroll down to Service Settings section and ensure the ‘Home Cluster’ and ‘Enable User for IM & Presence’ is checked.
17. Add the newly created device to the Controlled Devices window for the user.
18. Click Save.

This user is now ready to download the Cisco Jabber App and log into the UC System from both within the corporate network or from outside the corporate network.

** NOTE 1: RTP will be encrypted from the Mobile device to the Expressway-E Device. However, the default non-secure device security profile does not encrypt RTP from the Expressway-C to the CUCM. This is typically on the same LAN segment. If you are required to encrypt RTP over this LAN segment as well, create a secure Device Security profile with the appropriate encryption algorithms and assign the Device. (Device Page). Also, the Expressway-C must include the Device Security Profile name in its SAN Certificate.

**NOTE 2: Device Types are as follows:

- Android Device is ‘Dual Mode for Android’
- iPad Device Type is ‘Cisco Jabber for Tablet’
- Windows.MAC Device Type is ‘Cisco Unified Client Services Framework’
- iPhone Device Type is ‘Dual Mode for iPhone’

**NOTE 3: A Cisco Jabber softphone/mobile device will consume a UCL Enhanced License if the Owner remains as anonymous. If an owner is selected and the owner(user) already owns another device, the Cisco Jabber softphone/mobile device will add to the UCL Enhanced Plus or CUWL Std/Pro license count depending the number of devices owned by the user.

Aug 25

Jabber AD Search Filter

By default the Jabber client will only search for user accounts in the selected OU path under the Service Profile. The default AD search filter is

(&(objectCategory=person)

To enable Jabber to search for contacts and enabled users in Active Directory, modify the base filter to

(&(|(objectclass=user)(objectclass=contact))(!(objectclass=Computer))(!(UserAccountControl:1.2.840.113556.1.4.803:=2)))

Where to apply the Base Filter.

Navigate to the Directory Profile section in the Service Profile. The Service Profile is listed under User Administration -> Users Settings.

Enter the above mentioned filter into the “Base Filter (Only used for Active Directory)” field.

**Updated**
You also have to add the following lines to your jabber-config.xml.

<?xml version=”1.0″ encoding=”utf-8″?>
<config version=”1.0″>
<Directory>
<UseSIPURIToResolveContacts>true</UseSIPURIToResolveContacts>
<SipUri>mail</SipUri>
<UriPrefix>sip:</UriPrefix>
</Directory>
</config>