Apr 10

Group Voicemail Alternative – Cisco Jabber

Departmental or Group voicemail is always requested when deploying a phone system. The traditional method of distribution lists worked great, however since the introduction of Jabber, there seem to be caveats in configuring these lists. Jabber will display the voice message no worries, this is great.. Except you can not accept or decline a voice message. So you will still need to log into the Voicemail Server via the phone and follow the prompts to accept messages.

Another method is to use Alternate Extensions (if the user doesn’t already have a mailbox). This is limited to a certain number of users who can access the mailbox via alternate extensions. But I’ve found in most cases.. The number of users wanting access to department or group mailbox is fewer than the limitation.

Alternate Extensions also allows Jabber to visually display the voicemail, allow to tag as unread, read, delete message etc.. And yes voice message are indeed synchronised across the Jabber clients that have access to the mailbox. Users can also forward voice messages from Jabber 11.8.

Outline on how to set up this alternate method is below.

The Jabber Service Profile must include the Voicemail Server configuration along with the Credentials field set to “not set”. ie this means the user must enter the credentials for the mailbox.

On the Unity Connection Server ensure the below is configured.

- Mailbox Password is set (This is not the PIN)
- Alternate Extension of the Jabber Users
- MWI Extension of the Jabber Users.

Assign the Jabber Service Profile to the End User in CUCM. Once the user logs into the Jabber client, select the Voice Messages Tab. The user will have to enter the credentials of the group mailbox.

On top of this, we can also configure single mailbox for the group. (if the destination email address is a Exchange/O365 mailbox).

Mar 20

Cisco Unity Connection – Saving Voice Messages

Cisco Unity Connection Administration.

Ensure the ‘Web Inbox’ permissions are enabled in the relevant Class of Service. The Class of Service is found in Unity Connection under ‘Class of Service -> Class of Service’ then selecting the relevant Class of Service for the user.

Cisco Unity Connection Web Inbox

Web Inbox

To access the web Inbox use the URL https://ciscounityserver/inbox

Once logged in select the Voice Message to download

Cisco Unity Connection Web Inbox

Right-click ‘message.wav’ and select Save Link As. Select the appropriate destination folder and select Save.

Cisco Unity Connection Web Inbox

Can now play voice message using PC/laptop installed media player.

Cisco Unity Connection Web Inbox

Jun 05

Upgrade CUC form 9.1.1 to 9.1.2 – Sync Error on Switch-Version

When upgrading CUC 9.1.1 to 9.1.2. You may receive the following error when switching between active and inactive partitions.

—————————————–
Operation failed

ERROR: Sync after switch version failed
—————————————–

Steps to resolve the issue

On Subscriber run – utils dbreplication stop (here you have to wait some time once is finish wait for like 10 min.)

On Publisher run – utils dbreplication stop (here you have to wait some time once is finish wait for like 10 min.)

On Publisher run – utils dbreplication reset all

Reboot both servers using: utils system restart

On the Subscriber utils cuc cluster overwritedb (here you also need to give it time)

Apr 25

Unified Messaging with CUC Distribution Lists

Quick note on Single Inbox with Cisco Unity Connection with Distribution Mailboxes configured. The voicemail .wav file will only be synchronised with the Member’s email inbox if the “Dispatch for Delivery” is unchecked.

So you can’t have the best of both worlds yet. Members will have to manage the voice messages amongst themselves for responding to customers/callers. Cisco Jabber will however display the voice messages in all instances.

The “Dispatch for Delivery” checkbox can be found under the System Handler settings, then Message settings menu.


Feb 21

Integrating Cisco Unity Connection with Office 365 – Simplified

Microsoft Office 365 is becoming more popular with many Businesses taking advantage of its simplicity to manage and strong emphasis on data protection. However there are many services that are still located local to the Business premise that needs to integrate/communicate with the Office 365 Servers. One of these services is Cisco Voicemail. The main Cisco Voicemail application is called Cisco Unity Connection (CUC). Within the CUC application is a feature called Unified Messaging Single Inbox. The feature synchronises voicemails between the Cisco Voice mailbox and in this case the MC Office 365 user email mailbox. While this feature is not new by any means, what is in its early days is the configuration between Cisco and Office 365. There are some excellent guides on Cisco.com regarding Single Inbox, at the same time not all the required documentation is in a single place. I’ve documented the process I followed while integrating Cisco CUC with MS Office 365.

1. Create an MS Office 365 admin user. This user does not require a license on the MS Office 365 service. IMPORTANT NOTE: Cisco CUC does not support AD Federation Services (ADFS). What this means: do not create the admin user in the Active Directory environment. You must create the admin user in MS Office 365 directly.

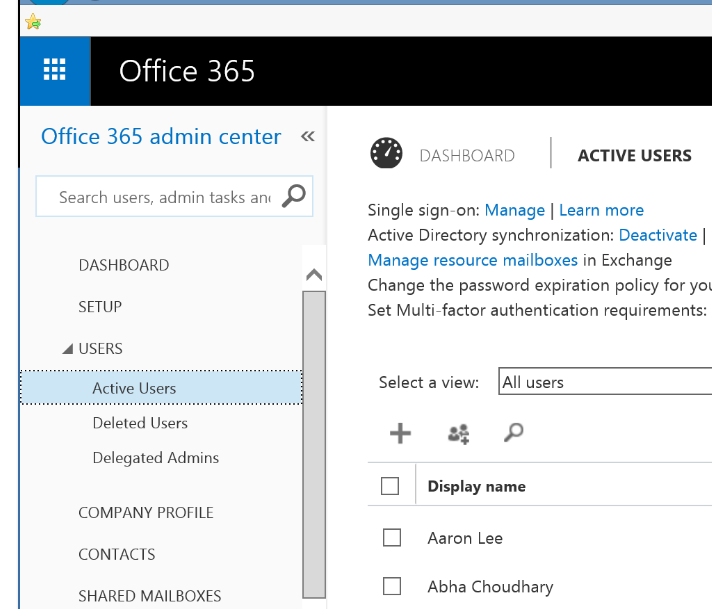
Browse to the MS Office 365 web admin page and login using your administrator credentials. Under the Office 365 Admin Centre, navigate to Users -> Active Users.

Microsoft Office 365 and Unity Connection

Click to create a new user and complete the required details. IMPORTANT NOTES: Uncheck the “Make this user change their password with Outlook Web App on next login”. Uncheck the license for this user. If you only have a single license plan, you will not be able to uncheck the license plan. Save the new user, then go back into the user account (edit) and then uncheck the license plan.

2. Assign Impersonation rights for the MS Office 365 user account.

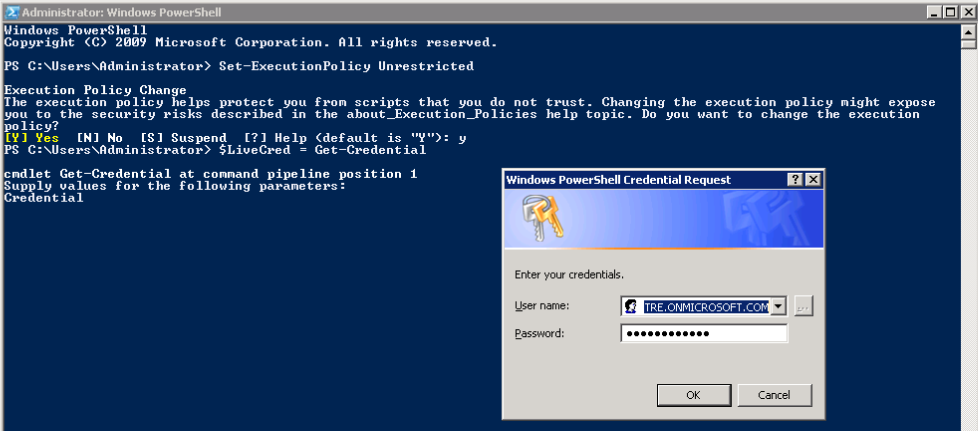
a) Run the Windows Powershell as Administrator.
b) Run the command “Set-ExecutionPolicy Unrestricted”
c) Run the command “$LiveCred = Get-Credential” then enter the Office 365 administrator credentials.
d) Create a session with Office 365. Run the command “$Session = New-PSSession -ConfigurationName Microsoft.Exchange -ConnectionUri https://ps.outlook.com/powershell/ -Credential $LiveCred -Authentication Basic –AllowRedirection”
e) Run the command ”Import-PSSession $Session”. This import the remote exchange shell commands into Powershell.
f) Assign impersonation role to the unity user created in step 1. Run this command “new-ManagementRoleAssignment -Name:Unity -Role:ApplicationImpersonation -User:useraccount@domain.onmicrosoft.com”

Microsoft Office 365 and Single Inbox

Microsoft Office 365 and Single Inbox

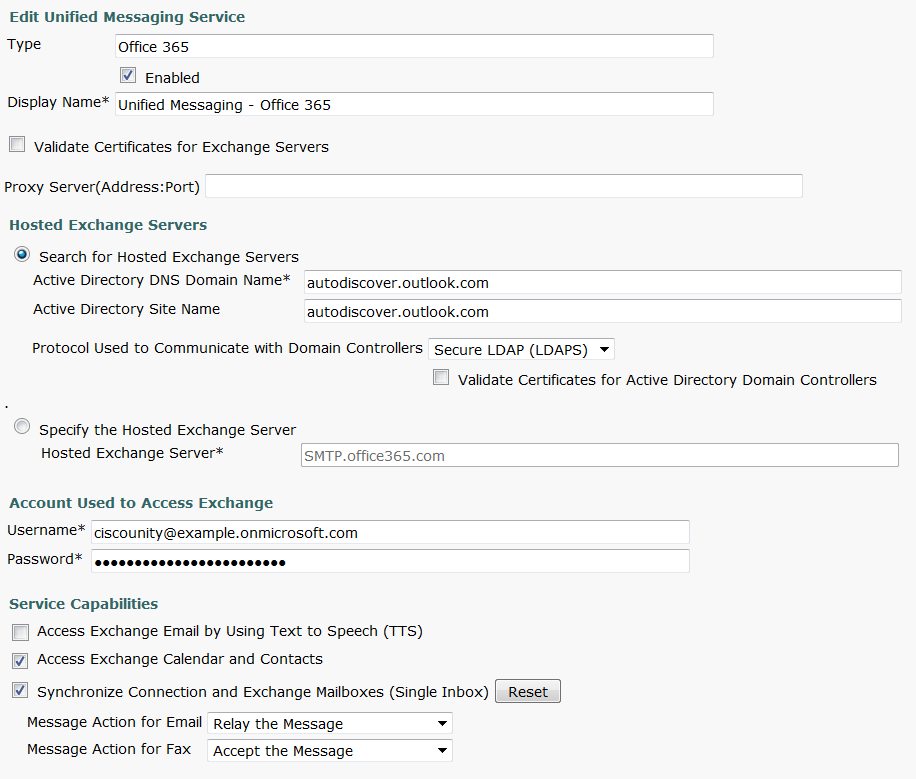
3. Cisco Unity Connection configuration tasks. Navigate to Unified Messaging -> Unified Messaging Services. Select Add New. I’ve attached a picture to explain the configuration. Key Notes to takeaway: Type is Office 365, Must select “Search for Hosted Exchange Servers” then enter “autodiscover.outlook.com” in both the DNS Domain and the Site Name fields. Must select Secure LDAP (LDAPS). The user account must include the full suffix, with the onmicrosoft.com.

Cisco Unity Connection and MS Office 365

Cisco Unity Connection and MS Office 365

4. Now all that’s left is to run tests and add a unity connection user to the unified messaging.

Dec 29

Unity Connection Number Conversion – Integration with LDAP

In Unity Connection, we have the option to manipulate telephone numbers from the LDAP Directory for users. Typically we would map the LDAP attribute telephone to the Unity Extension field. However since in CUCM the DNs are configured as extension and not the full e164 number format, therefore the user and mailbox DNs/Extension do not match between CUCM and CUC.

This is where Unity Connection number conversion is helpful. This allows us to manipulate the telephone field from LDAP into an extension number. The conversion is based on a regular expression. I’ve listed the below regex examples from the Cisco Unity Connection Guide.

When the user is imported in Unity Connection a new field Telephone is created along the existing extension field.  The telephone field stores the e164 number and the extension stores the resulting regex number.

Example:

REGEX =        .*(\d{4})

E164    =        +61288793845

Extension =  3845

Unity Connection Number Conversion