Nov 05

Unusual Case Study of CUCM Call Recording Implementation

A week ago I’ve got a partnership offer from Cisco Solution Partner that develops various solutions on top of Cisco UCM, Telepresence and UCCX products and sells them through channel partners. While discussing their app suite for CUCM I was told about the interesting case study which I’ve decided to share with you to take a break from technical posts.

The client is a large media agency with hundreds of field reporters all over the country. They interview dozens of VIPs daily and the challenge was to minimize the time of delivering interview recordings to the agency newsmakers.

So here is the approach they took… When starting a new interview the reporter turns on his voice recorder (for high-quality recording) AND makes a phone call to the special office number placing the mobile phone on the table along with the voice recorder.

What happens next is:

1) CUCM routes the incoming call to the recording app, which establishes the connection with the reporter’s phone and starts recording the interview;

2) at the same time the recording application pushes the XML service to Cisco IP phones of several newsmakers who are subscribed to the call recordings of this reporter; the XML service plays “beep” informing newsmakers about the new interview started and shows the interface on the IP phone:

3) after pushing the “Listen” button, the newsmaker listens to the interview being recorded and composes the news message.

The whole picture looks like this:
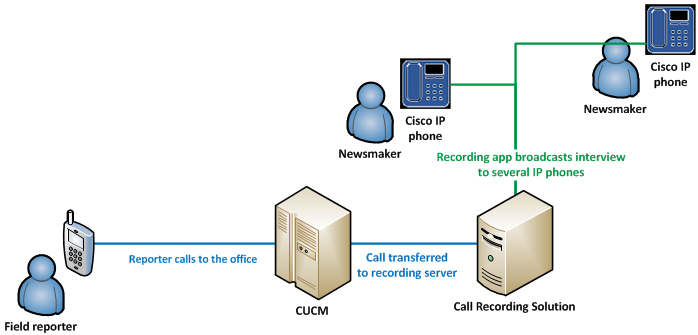
recording1

This way the agency newsmakers receive new content just on the fly and the news message may go online even before the reporter returns to the office.

Quite an interesting client story, what do you think? If you need to learn more about them, here they are – aurus5.com

May 05

On Demand Call Recording with UCCX v10

On Demand Call Recording SPANs RTP Packets from the IP Phone to the PC the CAD Software is installed, hence the PC must be directly connected to the IP Phone for this to work.

The CAD Software will then send the voice stream to the UCCX Server to store the recorded conversation as a WAV file. The WAV files can then be accessed via the Supervisor Console to playback and also option to save the WAV file for long term retention.

Lets get started on how to configure on Demand Call Recording.

Requirements:

1. Enhanced or Premium licenses
2. PC NIC Card supporting tagged vlans
3. IP Phones supporting SPAN to PC feature
4. PC directly connected to the PC port on the IP Phone

Configuration Steps

CUCM

1. Enable the SPAN to PC feature on the device configuration page.
2. Disable G722 codec negotiation either on the device configuration page or system wide via the Enterprise Parameters

UCCX Desktop Admin (Workflow Administrator)

1. Navigate to the Workflow created for the Agents. Under the appropriate Workflow Group, go to CAD Agent then User Interface. The CAD User Interface configuration page will be displayed in the right pane.

2. From the Toolbar Tab select the first available Task. Ensure the Visible checkbox is ticked, and then Add an Action. The Select Window is displayed. Here is where we will add the required action. Click ‘Utility Action’, now Click ‘New’. Give the Action a Name, Select ‘Record’ for the Action, then ‘Start’ for the Attribute. Click OK to save.

3. Complete the process again, but this time for the Stop Recording Action.

4. Now we have two Actions configured. We will select the Start Recording Action, and click ‘Add Action’. This adds the Start Recording action into the Task pane. Give the Task a Hint. Also customise the icon, this is optional. Then click ‘Apply’

5. Select the next available Task and Ensure the Visible checkbox is ticked, then Add an Action. The Select Window is displayed. Goto the Utility Action Tab. You will see the previous two Actions we configured. This time we will select ‘Stop Recording’ and click Add Action.

6. Give the Task a Hint and customise the icon. Click ‘Apply’ when complete.

Cisco Desktop Administrator

1. Access the Cisco Desktop Administrator through web administration pages for UCCX.

2. Navigate to Personnel, then Agents. On the Agents Window, for the required Agents select the Workflow Group where the Call Recording Actions are configured.

3. Navigate to Services Configuration, then Multiline, Monitoring & Recording, then VoIP Monitoring Device. Select the Monitor Service and enable Desktop Monitoring. The Monitor Service will more than likely be the UCCX Server.

4. Click SAVE.

Agents PC

1. Navigate to c:\Programs Files\Cisco\Desktop\bin – Then double-click the PostInstall.exe. Ensure the UCCX Server IP Address is correct. Click Next, now select the NIC that is connected to the IP Phone. Click OK.

2. Restart CAD software if you had this open. You will now see the Two new Tasks that were

3. As a side note, just ensure the NIC supports Priority and VLAN Tagging.

Retention Notes:

By default each recording message is retained for 7 Days only. The Supervisor has the option to extend the retention to 30 Days for each individual recording. If you wish to store the recording for a longer period, you will need to Save the recording as a WAV File on your PC or Storage Server.