Mar 26

Cisco Jabber: Save Chat History to Outlook

To enable Cisco Jabber Chats to be saved to Outlook, you ‘ll need to modify the jabber-config.xml file. A subfolder called “Cisco jabber Chats” is created under the ‘Inbox’ folder in Outlook.

Note: Just like with emails, users are able to delete the chat folder and any chat conversation located inside. The deleted chat conversation will sit in the Deleted Items, when deleted from the Deleted Items, the chat conversation will site in the Recovered Deleted Items bin until Exchange purges the items.

Jabber for Windows 10.6 supports MS Exchange 2010 and Exchange 2013 and Jabber for Windows 11.0+ supports MS Office 365 as well.

In the example below, CUCM is selected for the authentication service, seeing that most (if not all) Cisco UC Implementation these days are sync’ed with Active Directory.

The Operation Mode “EnabledByPolicy” enables the option in Outlook “Save chat sessions to Cisco Jabber Chats Folder in MS Outlook”, and does not permit users to disable this option. If you wish for the users to enable/disable this feature as required, the Operation Mode  must be “EnabledByDefault”.

Most Exchange Environments have autodiscover enabled and configured, hence the Domain Names (Internal/External) are configured for the Exchange Addresses. If autodiscover is not enabled, simply the enter the Internal/External Hostnames for the Exchange CAS Servers.


Jabber-config.xml snippet.
<?xml version=”1.0″ encoding=”utf-8″?>
<config version=”1.0″>
<Options>
<Start_Client_On_Start_OS>true</Start_Client_On_Start_OS>
<SaveChatHistoryToExchangeOperationMode>EnabledByPolicy</SaveChatHistoryToExchangeOperationMode>
<Exchange_UseCredentialsFrom>CUCM</Exchange_UseCredentialsFrom>
<ExchangeAutodiscoverDomain>Internal_Domain_Name</ExchangeAutodiscoverDomain>
<InternalExchangeServer>Internal_Domain_Name</InternalExchangeServer>
<ExternalExchangeServer>External_Domain_Name</ExternalExchangeServer>
</Options>
</config>
Dec 05

Jabber Softphones for Collaboration Edge Access

Cisco Jabber as evolved rapidly over the past couple of years with a lot of growth still to come. With the introduction of Collaboration Edge architecture, Cisco Jabber can be used from outside the corporate network while being secure (both Signalling and Audio).

For Cisco Jabber to connect through the Collaboration Edge environment and be feature rich the below is required.

- Cisco Unified CM
- Cisco IM & Presence
- Cisco Unity Connection
- SRV Records (External and Internal)
- Cisco Expressway-E and Expressway-C

The following Cisco Jabber Devices can be configured to connect through the Collaboration Edge environment.

- MS Windows Operating System
- MAC Operating System
- Apple iPad
- Apple iPhone
- Android mobile devices

Fro each of the above devices to connect through the Collaboration Edge environment a phone device is required to be configured in CUCM. Each phone device name must be prefixed to allow CUCM to identify the device type. Prefixes include:

- CSF (Windows/MAC)
- TCT (iPhone)
- TAB (iPad)
- BOT (Android)

I’ve outlined below the steps to create a Cisco Jabber softphone. (In the below example an iPhone device type will be created.

1. In CUCM navigate to Device -> Phones
2. Select Add New
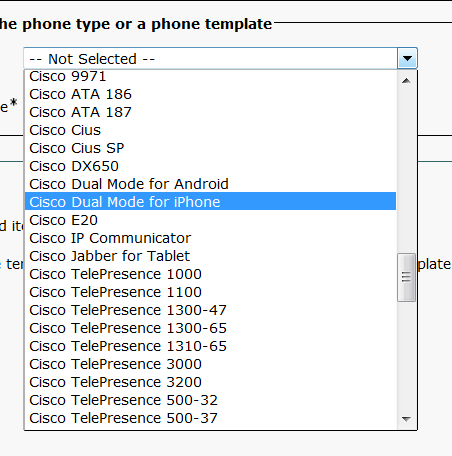
3. Drop down the Phone Type Menu and select Dual Mode for iPhone.
Jabber

jabber-2

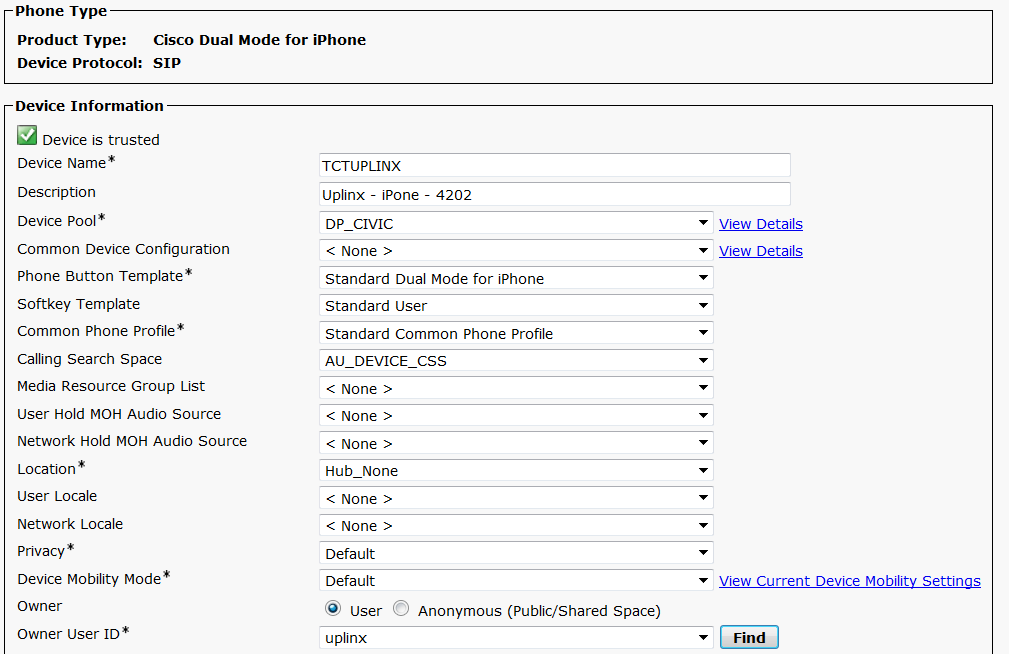
4. The Device Name is ‘TCTusername’ The device name has a 15 character limit.
5. Complete the Description, I always place the device type in the description as well for easy identification.
6. Complete the other required fields (with an *)
7. Select the appropriate user for the Owner Field
Jabber

8. Add a new DN (Top Left)
9. Enter the extension of the user. (The User would have an existing deskphone, make sure to use the same extension, creating a shared line like setup)
10. Select the Partition. (After the selecting the Partition, the Line details should auto populate until the ‘Line 1 on Device TCTUPLINX Section)
11. Complete the Display Name and External Phone Mask.
12. Select ‘Associate End Users and select the end user who will use this device/line. FYI, this section allows CUCM to auto publish phone status for a user. Example. If this line is busy, the system will change the user status to ‘OnCall’.
13. Click Save
14. Navigate to the User Management -> End User page
15. Find and select the required User.
16. Scroll down to Service Settings section and ensure the ‘Home Cluster’ and ‘Enable User for IM & Presence’ is checked.
17. Add the newly created device to the Controlled Devices window for the user.
18. Click Save.

This user is now ready to download the Cisco Jabber App and log into the UC System from both within the corporate network or from outside the corporate network.

** NOTE 1: RTP will be encrypted from the Mobile device to the Expressway-E Device. However, the default non-secure device security profile does not encrypt RTP from the Expressway-C to the CUCM. This is typically on the same LAN segment. If you are required to encrypt RTP over this LAN segment as well, create a secure Device Security profile with the appropriate encryption algorithms and assign the Device. (Device Page). Also, the Expressway-C must include the Device Security Profile name in its SAN Certificate.

**NOTE 2: Device Types are as follows:

- Android Device is ‘Dual Mode for Android’
- iPad Device Type is ‘Cisco Jabber for Tablet’
- Windows.MAC Device Type is ‘Cisco Unified Client Services Framework’
- iPhone Device Type is ‘Dual Mode for iPhone’

**NOTE 3: A Cisco Jabber softphone/mobile device will consume a UCL Enhanced License if the Owner remains as anonymous. If an owner is selected and the owner(user) already owns another device, the Cisco Jabber softphone/mobile device will add to the UCL Enhanced Plus or CUWL Std/Pro license count depending the number of devices owned by the user.