Sep 03

Unity Single Inbox – Unable to Send a Notification for Subscription

After configuring Cisco Unity Connection 10.5 with Single Inbox (Exchange 2007). The exchange CAS Server starting throwing the event log ”
Unable to send a notification for subscription GwBhdTJlbWwyazcwMS5jb3JwLnJlc21lZC5vcmcQAAAABimsqT/fhkiUE13QqEeQVA==. (Send attempts: 4)” every second. This then starting causing performance issues in relation to the EWS and WEB service with Exchange.

Also, when leaving a voice message, the initial wav attachment would be delivered successfully, however, no updates could be sent. Example, If the voice message was read, or deleted from both Unity Connection or Outlook.

All Exchange permissions were confirmed, local rights, impersonation etc. All these looked to correct. The Unity Connection Unified Messaging configuration was checked, again everything seemed to be correct.

The notification packets were indeed leaving the Exchange Server toward the Unity Connection, however what was discovered with the notification packet was the Cisco Unity Server labelled “netbios_name” and not the FQDN of the Cisco Unity Connection Server. Therefore the Cisco Unity Connection server was not responding to the notification from Exchange as it could not resolve its own name (netbios_name).

Straight to the Cluster Configuration Menu to check the server names.. And as I suspected the server names were not in FQDN format.. I corrected these server names and rebooted the two Cisco Unity Connections to be flush out the cache.

I then configured the CsMbxsync Trace settings from 10 to 22 in Cisco Unity Connection Serviceability page. Downloaded the Mailbox Sync logs from RTMT and verified messages were passing to and from Exchange and Unity Connection. Ran a test voicemail and sync in both directions worked ok.

EVENT in Application Log

==============================================

Unable to send a notification for subscription GwBhdTJlbWwyazcwMS5jb3JwLnJlc21lZC5vcmcQAAAABimsqT/fhkiUE13QqEeQVA==. (Send attempts: 4)

==============================================

Log Name:      Application
Source:        MSExchange Web Services
Date:          8/20/2015 9:39:13 AM
Event ID:      6
Task Category: Core
Level:         Warning
Keywords:      Classic
User:          N/A
Computer:      SERVERNAME.Domain.org
Description:
Unable to send a notification for subscription GwBhdTJlbWwyazcwMS5jb3JwLnJlc21lZC5vcmcQAAAABimsqT/fhkiUE13QqEeQVA==. (Send attempts: 4) Event Xml:
<Event xmlns=”http://schemas.microsoft.com/win/2004/08/events/event”>
<System>
<Provider Name=”MSExchange Web Services” />
<EventID Qualifiers=”32768″>6</EventID>
<Level>3</Level>
<Task>1</Task>
<Keywords>0×80000000000000</Keywords>
<TimeCreated SystemTime=”2015-08-19T23:39:13.000Z” />
<EventRecordID>12558510</EventRecordID>
<Channel>Application</Channel>
<Computer>SERVERNAME.Domain.org</Computer>
<Security />
</System>
<EventData>
<Data>GwBhdTJlbWwyazcwMS5jb3JwLnJlc21lZC5vcmcQAAAABimsqT/fhkiUE13QqEeQVA==</Data>
<Data>4</Data>
</EventData>
</Event>
Apr 25

Unified Messaging with CUC Distribution Lists

Quick note on Single Inbox with Cisco Unity Connection with Distribution Mailboxes configured. The voicemail .wav file will only be synchronised with the Member’s email inbox if the “Dispatch for Delivery” is unchecked.

So you can’t have the best of both worlds yet. Members will have to manage the voice messages amongst themselves for responding to customers/callers. Cisco Jabber will however display the voice messages in all instances.

The “Dispatch for Delivery” checkbox can be found under the System Handler settings, then Message settings menu.


Feb 21

Integrating Cisco Unity Connection with Office 365 – Simplified

Microsoft Office 365 is becoming more popular with many Businesses taking advantage of its simplicity to manage and strong emphasis on data protection. However there are many services that are still located local to the Business premise that needs to integrate/communicate with the Office 365 Servers. One of these services is Cisco Voicemail. The main Cisco Voicemail application is called Cisco Unity Connection (CUC). Within the CUC application is a feature called Unified Messaging Single Inbox. The feature synchronises voicemails between the Cisco Voice mailbox and in this case the MC Office 365 user email mailbox. While this feature is not new by any means, what is in its early days is the configuration between Cisco and Office 365. There are some excellent guides on Cisco.com regarding Single Inbox, at the same time not all the required documentation is in a single place. I’ve documented the process I followed while integrating Cisco CUC with MS Office 365.

1. Create an MS Office 365 admin user. This user does not require a license on the MS Office 365 service. IMPORTANT NOTE: Cisco CUC does not support AD Federation Services (ADFS). What this means: do not create the admin user in the Active Directory environment. You must create the admin user in MS Office 365 directly.

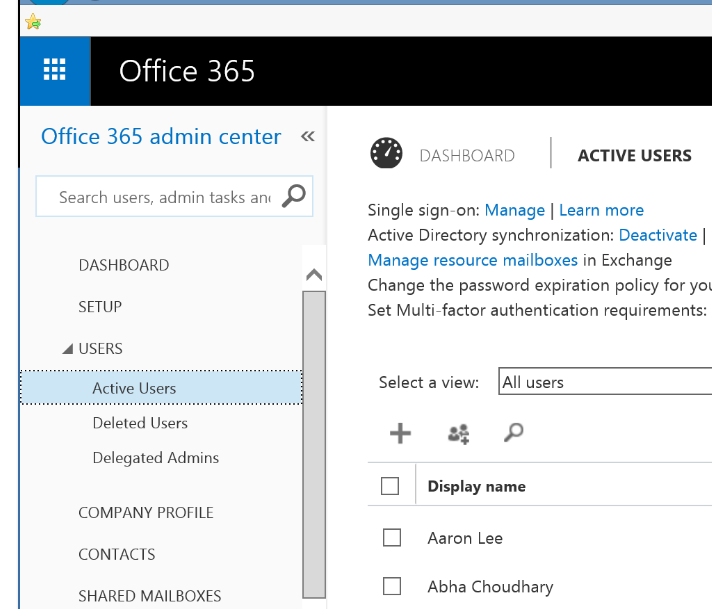
Browse to the MS Office 365 web admin page and login using your administrator credentials. Under the Office 365 Admin Centre, navigate to Users -> Active Users.

Microsoft Office 365 and Unity Connection

Click to create a new user and complete the required details. IMPORTANT NOTES: Uncheck the “Make this user change their password with Outlook Web App on next login”. Uncheck the license for this user. If you only have a single license plan, you will not be able to uncheck the license plan. Save the new user, then go back into the user account (edit) and then uncheck the license plan.

2. Assign Impersonation rights for the MS Office 365 user account.

a) Run the Windows Powershell as Administrator.
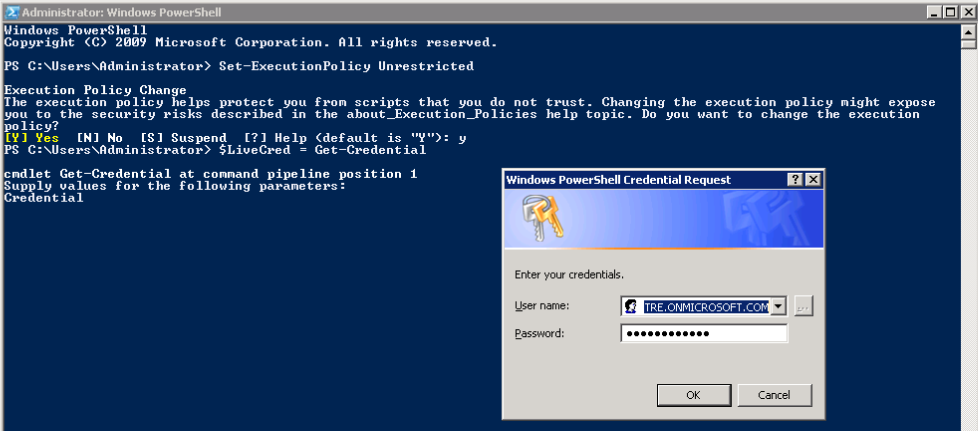
b) Run the command “Set-ExecutionPolicy Unrestricted”
c) Run the command “$LiveCred = Get-Credential” then enter the Office 365 administrator credentials.
d) Create a session with Office 365. Run the command “$Session = New-PSSession -ConfigurationName Microsoft.Exchange -ConnectionUri https://ps.outlook.com/powershell/ -Credential $LiveCred -Authentication Basic –AllowRedirection”
e) Run the command ”Import-PSSession $Session”. This import the remote exchange shell commands into Powershell.
f) Assign impersonation role to the unity user created in step 1. Run this command “new-ManagementRoleAssignment -Name:Unity -Role:ApplicationImpersonation -User:useraccount@domain.onmicrosoft.com”

Microsoft Office 365 and Single Inbox

Microsoft Office 365 and Single Inbox

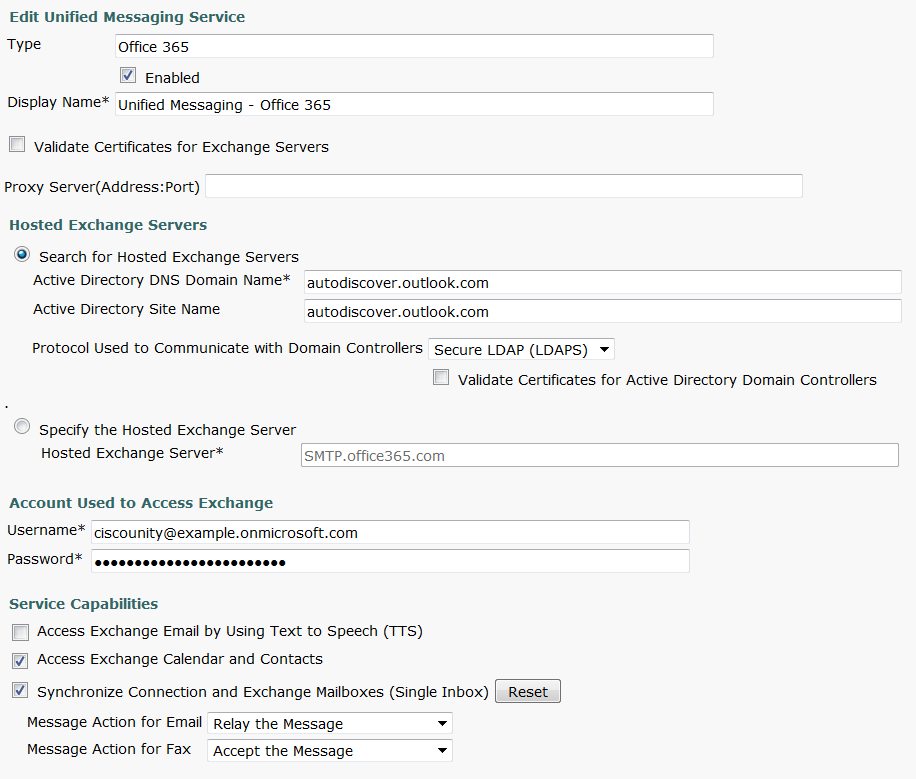
3. Cisco Unity Connection configuration tasks. Navigate to Unified Messaging -> Unified Messaging Services. Select Add New. I’ve attached a picture to explain the configuration. Key Notes to takeaway: Type is Office 365, Must select “Search for Hosted Exchange Servers” then enter “autodiscover.outlook.com” in both the DNS Domain and the Site Name fields. Must select Secure LDAP (LDAPS). The user account must include the full suffix, with the onmicrosoft.com.

Cisco Unity Connection and MS Office 365

Cisco Unity Connection and MS Office 365

4. Now all that’s left is to run tests and add a unity connection user to the unified messaging.