Jan 15

Finesse Agent Cannot View Live Widgets

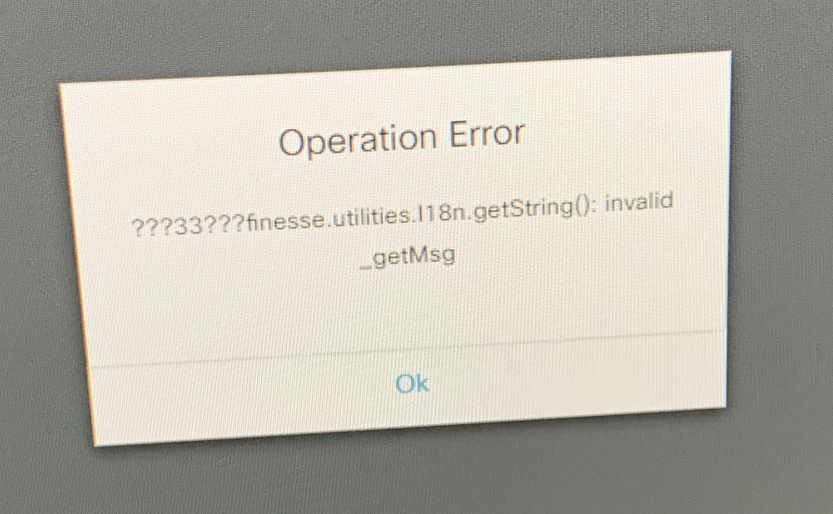
New Agents receiving an Operation Error when logging into the Finesse Client. Specific error for information is “???33??? Finesse.utilities.l18n.getString(): invalid_getMsg”

 Note the process for creating UCCX Agents was not changed from previous new Agent creations.

 Found the CCX system may have been hitting Bug ID:CSCvk65545.

I forced a data sync from CUIC to CCX Server as per the Bug ID workaround. Agent continued to receive the error. Next step, was to log into CUIC and manually changed Agent permissions to read/execute live widgets for Finesse.

This resolved the issue. Essentially, new Agents are not being placed into the Agent Group in the CUIC Server, hence the Agent did not have required permissions to view/open the live widgets on the Finesse Agent Screen.

Below are the snippets of the Error display also the CUIC Screens I navigated to resolve the issue.

Agent_Finesse_Error CUIC-Error-1 CUIC-Error-2

Sep 20

UCCX – Login Failed Due to Configuration Error

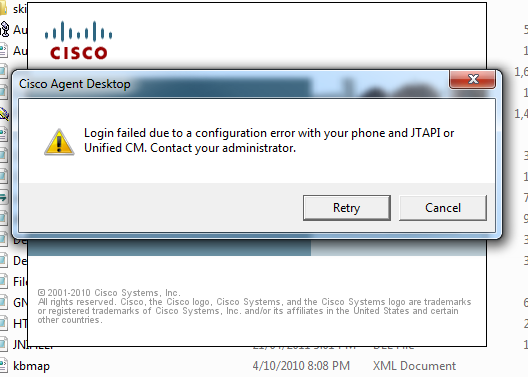
UCCX Agent receives the below error ” Login failed due to a configuration error with your phone and JTAPI or Unified CM. Contact your Administrator” when logging into UCCX.

uccx1

All CUCM and UCCX configuration looks to be correct, the user was successfully logged into CAD the day before. The Agents phone is currently logged in and registered.

Collect the MIVR Logs using RTMT. To do this open RTMT Tool against the UCCX Server and Select Traces and Alerts. Then select Collect Traces. Select the ‘CCX Engine’ for the log type and ‘All UCCX Server’. Click Next twice and select an appropriate location to download the logs too.

Unzip the .gz log files using 7zip application. Then open the MIVR Logs using Notepad++. Search for the Agent’s username. You should see similar output to the below. (username is bdodd)

uccx2

Cause:


This is caused by an Agent moving between phones. The DEVICE NAME is the above trace output is not the phone the Agent is logged onto today. The CTI or JTAPI caches the Device the Agent successfully logged onto last. If the Agent is an Extension Mobility user, its best to only add the Device Profile to the RMCM Application User’s CTI Controlled Device list.

To Resolve:

Remove the old device from the RMCM Application user. You may also have to resync JTAPI in UCCX and restart the CTI Manager to force the change if the problem continues.

Feb 15

HTTPHostConnectException Error – Cisco WFO AQM

Error received when running the PostInstall.exe wizard.

Cisco WFO AQM

Check to see if MS IIS is installed on the save server. If IIS s installed, this will also be listening on the TCP port 443. Therefore this conflicts with the jetty service for QM.

We need to change IIS to listen on a different port for HTTPS connections. IIS allows you to change the port binding for HTTP, however IIS will only allow the HTTPS port binding to changed once you have installed an SSLCertificate.

Easiest way is to sign a certificate using an Internal CA, if you don’t have this, you’ll need to purchase a certificate. Run the certificate request wizard on the IIS Server. Once you have completed the certificate signing with the CA and installed the DER file back into IIS, navigate back to the binding section and create a new binding for HTTPS, select the certificate you just installed and change the port to something other than 443.

Restart IIS, then restart the Monitoring and Recording Jetty Service. All should be good now.

Go back and complete the PostInstall.exe wizard.

Jan 11

Recording Voice Prompts using UCCX 10

To record and save prompts for either downloading or to assign to UCCX Applications we need to create the following variables.

Prompt = pRecordPrompt

Document = dGreeting

User = uccxadmin

String = sPIN

String – sHolidayGreeting

I will go ahead and create short recording script to demonstrate how to record a holiday greeting. In UCCX 10.0 we also need to authenticate with the UCCX Server in order to upload the prompt to the prompt repository.

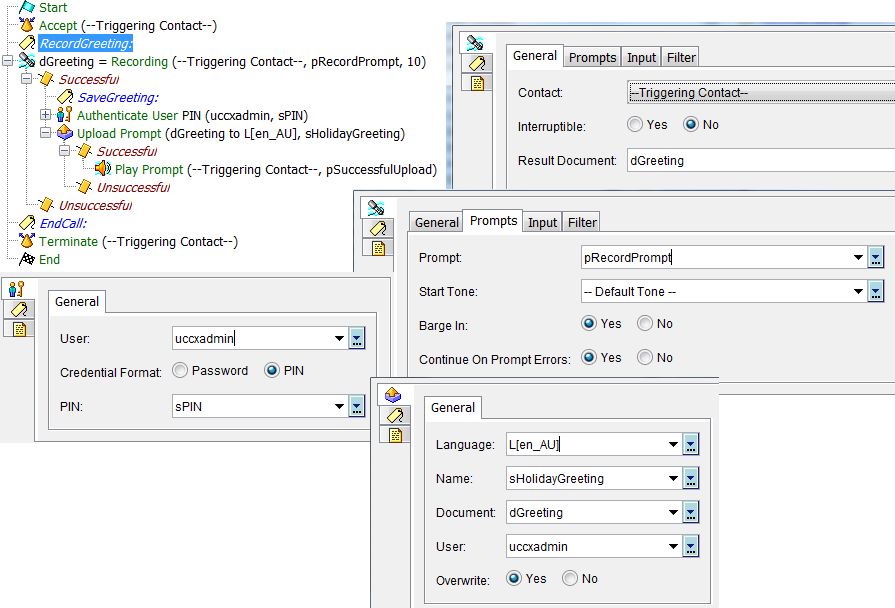
So lets start with a new script, and drag in the Recording Step. The resulting document will reference dGreeting and the prompt name will reference pRecordPrompt. The dGreeting will be the actual user recording file and the pRecordGreeting is essentially the Menu advising the user to record after the tone.

Once a recording has been completed, we need to authenticate with UCCX. This is done with the Authenticate User Step. Set the User to uccxadmin variable and the PIN to the sPIN variable. These variables have been configured with a uccx user account.

We then move into the Upload Document Step. We need to upload the document into the Language Document repository; otherwise the application may not be able to see the prompt to play. In my case I use AU Language. Set Language to L[en_AU], Name to sHolidayGreeting, Document to dGreeting and User to uccxadmin.

This will successfully upload the new voice recording to the AU Document repository.

UCCX Recording

Oct 21

Installing the Correct Database Driver for SQL 2008 UCCX 10

1. Browse to Sourgeforge.net (http://sourceforge.net/projects/jtds/files/jtds/1.2.7/) Download the jTDS 1.2.7 version.

2. Extract the jTDS1.2.7.zip file on your PC.

3. Browse to UCCX Admin -> Subsytems -> Database -> Drivers

4. Add New.

5. Browse to the extracted folder and select the .jar driver file.

6. Drop the Driver Class Name menu down and select “net.sourceforge.jtds.jdbc.Driver”

database1

7. Click Upload.

May 25

UCCX 10 – Intermittent MoH

Recently I had an issue where MOH intermittently was not playing to callers in a UCCX Queue. The symptoms were not logical. MOH played ok to a PSTN caller who connected to a CTI Port that was later also used for another PSTN caller where MOH did not play.

After checking the Data Sync in the AppAdmin portal, I could see that the renaming of the MOH file caused the UCCX and CUCM to become out of sync. A Simple ‘Data Resync’ on the Data Synchronisation page resolved the MOH issues.

Data Synchronisation - Cisco UCCX 10

May 05

On Demand Call Recording with UCCX v10

On Demand Call Recording SPANs RTP Packets from the IP Phone to the PC the CAD Software is installed, hence the PC must be directly connected to the IP Phone for this to work.

The CAD Software will then send the voice stream to the UCCX Server to store the recorded conversation as a WAV file. The WAV files can then be accessed via the Supervisor Console to playback and also option to save the WAV file for long term retention.

Lets get started on how to configure on Demand Call Recording.

Requirements:

1. Enhanced or Premium licenses
2. PC NIC Card supporting tagged vlans
3. IP Phones supporting SPAN to PC feature
4. PC directly connected to the PC port on the IP Phone

Configuration Steps

CUCM

1. Enable the SPAN to PC feature on the device configuration page.
2. Disable G722 codec negotiation either on the device configuration page or system wide via the Enterprise Parameters

UCCX Desktop Admin (Workflow Administrator)

1. Navigate to the Workflow created for the Agents. Under the appropriate Workflow Group, go to CAD Agent then User Interface. The CAD User Interface configuration page will be displayed in the right pane.

2. From the Toolbar Tab select the first available Task. Ensure the Visible checkbox is ticked, and then Add an Action. The Select Window is displayed. Here is where we will add the required action. Click ‘Utility Action’, now Click ‘New’. Give the Action a Name, Select ‘Record’ for the Action, then ‘Start’ for the Attribute. Click OK to save.

3. Complete the process again, but this time for the Stop Recording Action.

4. Now we have two Actions configured. We will select the Start Recording Action, and click ‘Add Action’. This adds the Start Recording action into the Task pane. Give the Task a Hint. Also customise the icon, this is optional. Then click ‘Apply’

5. Select the next available Task and Ensure the Visible checkbox is ticked, then Add an Action. The Select Window is displayed. Goto the Utility Action Tab. You will see the previous two Actions we configured. This time we will select ‘Stop Recording’ and click Add Action.

6. Give the Task a Hint and customise the icon. Click ‘Apply’ when complete.

Cisco Desktop Administrator

1. Access the Cisco Desktop Administrator through web administration pages for UCCX.

2. Navigate to Personnel, then Agents. On the Agents Window, for the required Agents select the Workflow Group where the Call Recording Actions are configured.

3. Navigate to Services Configuration, then Multiline, Monitoring & Recording, then VoIP Monitoring Device. Select the Monitor Service and enable Desktop Monitoring. The Monitor Service will more than likely be the UCCX Server.

4. Click SAVE.

Agents PC

1. Navigate to c:\Programs Files\Cisco\Desktop\bin – Then double-click the PostInstall.exe. Ensure the UCCX Server IP Address is correct. Click Next, now select the NIC that is connected to the IP Phone. Click OK.

2. Restart CAD software if you had this open. You will now see the Two new Tasks that were

3. As a side note, just ensure the NIC supports Priority and VLAN Tagging.

Retention Notes:

By default each recording message is retained for 7 Days only. The Supervisor has the option to extend the retention to 30 Days for each individual recording. If you wish to store the recording for a longer period, you will need to Save the recording as a WAV File on your PC or Storage Server.