Jul 27

SPA122 and CUCM Registration How-To…

Configuring an SPA122 for CUCM, quick guide.

Connect Network Port to Laptop, default IP is 192.168.15.1
Browse to the web page. Default login is admin and password admin
Navigate to Network Setup -> Internet Settings
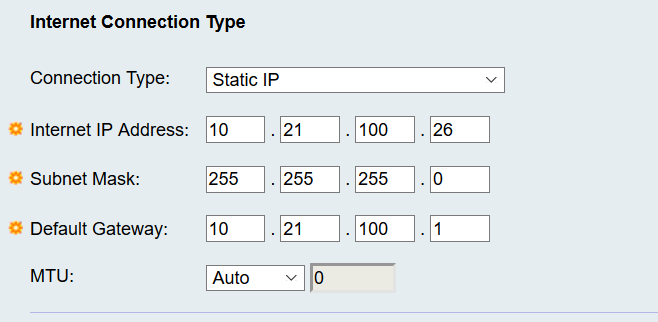
Complete the IP Details for the SPA122 device to connected to the network. The Internet Port is used for SIP Signalling, registration and media.

spa-122-1

Optional Settings for Domain Name and DNS.. Are also recommended.

Navigate to Voice – > Line 1

Scroll down to the Proxy and Registration Section

spa-122-2

Scroll down to the Subscriber Information Section
Complete the below fields

Display Name
User ID
Password
Enable Auth ID
Auth ID

spa-122-3

Submit

CUCM Configuration

Create an Enduser. *User ID must only be in numerical format.. Not characters permitted.
Set the Digest Credentials
Set the Telephone Number

Create a Third-party SIP Advanced Device.

Standard Phone setup.. With the exception for the below.

- Set the Owner ID to the above created User
- Set the Digest User to the above created User

The SPA122 should now successfully register to the CUCM Cluster.

Jul 02

Cisco Unified CM SIP Route Patterns

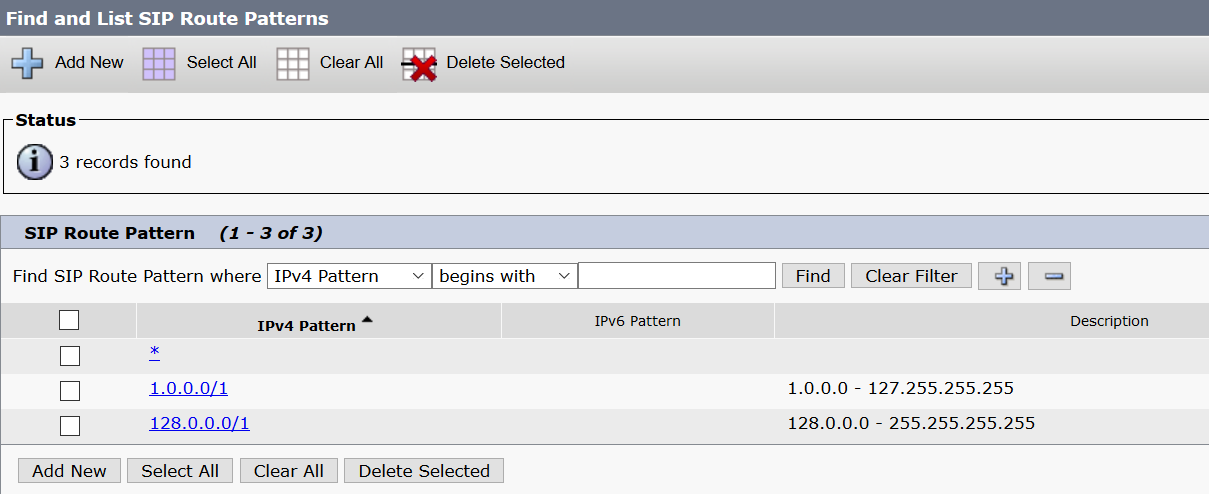
SIP Route patterns in CUCM allows the system to route SIP URIs to a predefined destination.. Mostly toward to the Collaboration Edge environment. To cover all possible URI formats use the below configuration.

Note: CUCM doesn’t allow to cover the entire IPv4 Range in one expression. The work around is to split into two expressions as per image below. (1.0.0.0/1 & 128.0.0.0/1)

SIP Route Patterns

Jul 15

Cisco CMS Ad-Hoc Conferencing with CUCM

For those interested.. A short article of configuring CMS as an Ad-Hoc Conference resource in CUCM.

NOTE: prior to CUCM 11.5 SU3 TLS used is version 1.0. CMS 2.3+ uses TLS 1.2 by default, so to allow pre 11.5 CUCM versions to connect to CMS.. We need to set the minimum TLS version via MMP.

Commands are:

tls webadmin min-tls-version 1.0
tls sip min-tls-version 1.0

For CUCM to use CMS as an Ad-Hoc conference bridge we need to configure a user on CMS with the API role associated. CUCM essentially creates a temp conference space for the ad-hoc conferences.. CUCM does this via HTTPS using API strings.

Commands to configure a User on CMS

User add username api
The MMP console will ask you to set a password.

Lets remain on CMS, and log into the Web Admin portal. We now need to configure Incoming Call Settings. This will allow calls to enter and terminate on the CMS Server. CUCM will add the SIP Trunk Destination Address as the suffix/domain to all calls for ad-hoc conferences. So we need to configure the SIP Trunk Destination Address into the Incoming Call Handling page on CMS.

Incoming Call Settings

cms-ad-hoc-2

Now we turn to the CUCM Server. First step is to upload the certificate chain that signed the ‘Web Admin’ service certificate to the CUCM as CallManager-trust.To find out which trust certificate to use you can jump back on the MMP for CMS and run the command ‘webadmin’ and look for the ‘CA Bundle File’. Jump into your SFTP client and download the CA file to you PC.. ready for upload to the CUCM Server.

Once uploaded, navigate to Media Resources and Conference Bridge and select ‘Add new’.

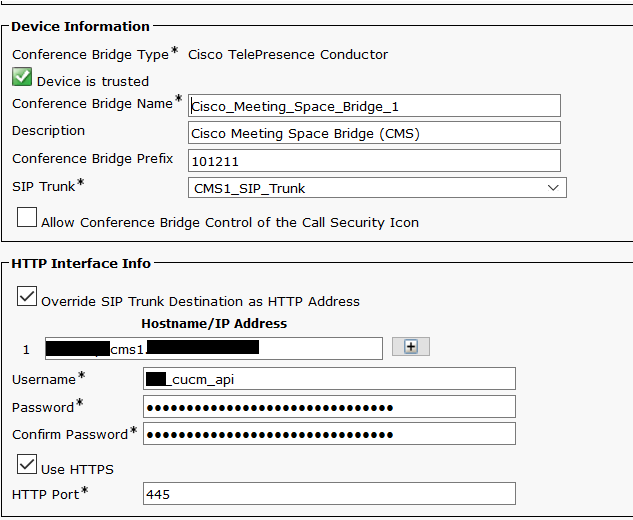
Complete the following fields on the conference bridge configuration page.

Conference Bridge Name = Nothing special here.. Just assign a logical name for the conference bridge.
Description = Again.. Something logical always helps
Conference Bridge Prefix = If you have multiple CUCM Clusters linked to CMS or multiple CMS Call Bridges, you will need to apply a prefix. This mitigates the risk of two CUCM Servers from two difference clusters creating a temp ad-hoc conference with the same conference ID. If there are two Call Bridges, you must then create a conference bridge resource for each with a different prefix. This will assist with load balancing issues (Load balancing across two or more Call Bridges is not supported in the Ad-Hoc Conferencing setup).
SIP Trunk = Select the CMS SIP Trunk, which will also be referenced below.
Override SIP Trunk Destination as HTTP Address = checked.
Hostname/IP Address = FQDN of your CMS Server..
Username = enter the username create in the above steps
Password = self explanatory..
Use HTTPS = checked.
HTTP Port = This is the port you have configured for the Web Admin Server.. I use 445 in this case, default is 443.

Save, then we reset the bridge. Should now show as registered. You can add the Conference Bridge to your select MRGs and MRGLs for testing.

cms-ad-hoc-3

cms-ad-hoc-4

Nov 25

DNS Unreachable Warning – CUCM Version 11.x

Recently upgraded a UC environement from 10.5 to 11.5. After the upgrade was complete, the CUCM Publisher server displayed a “DNS Unreachable” error upon logging into the Administration webpage.

cucm-dns-warning-1

This warning message only appeared on the CUCM Publisher and not the subscriber etc. I confirmed DNS had been configured identically for both the publisher and subscriber. I read that CUCM Version 11.x no does a couple of more network tests that have a direct impact on warning/error messages being displayed on the GUI. One of these tests is against the DNS Reverse Lookup Zone. Pre 11.x versions.. The CUCM server would check to see if a PTR record existed for the hostname, in fact this is required for CUCM installation process to succeed. In version 11.x the CUCM now also continuously checks against the Reverse Lookup Zone for mismatches and displays a warning message on the GUI. In my case, the customer had created an additional A Record for user friendly purposes called myphone.domain.com.au, this automatically created a PTR record. So when CUCM ran checks against the Reverse Lookup Zone, the results displayed a mismatch. Hence the warning was raised and displayed. (Although DNS was functioning perfectly)

Removing this PTR Record resolved the issue with the warning message.

I ran the command “utils diagnose test” to pin point the issue.

cucm-dns-warning-2

Oct 25

Removed Old Device Firmware after CUCM Upgrade

CUCM v11+ allows the removal of old or unused device firmware easily. It’s a good practice to clean up unused device firmware after completing system upgrades or after succesful completion of device pack installs or individual device firmware installs.

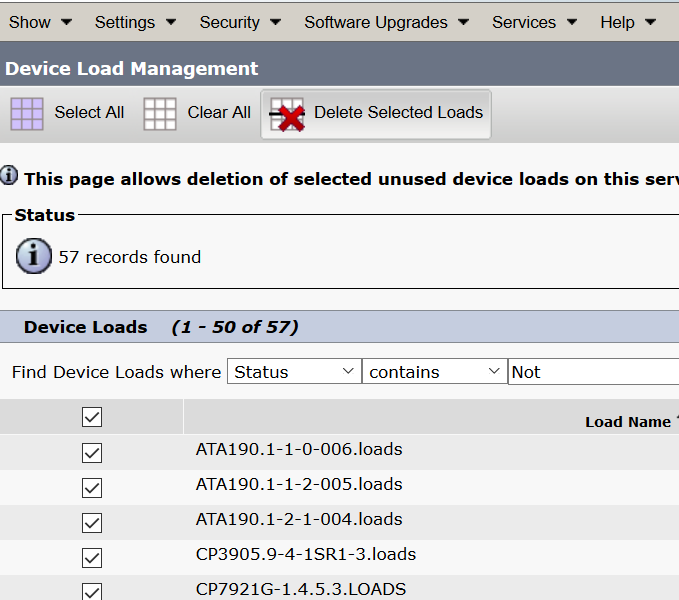
Browse to the OS Administration page and navigated to Software Upgrades -> Device Load Management.
CUCM Device Firmware

Search the ‘Status’ column for the keyword ‘Not’. This lists all device firmware not is use.
CUCM Device Firmware

Select the Select All button (top left), then select Delete.
CUCM Device Firmware

You do get a grace warning message.. Click ok to continue.
CUCM Device Firmware

And now you are just left with device firmware that is currently in use.
CUCM Device Firmware

Make sure to repeat the above process for all Subscribers in the Cluster.

Jul 20

Cisco’s Conference Now

Conference Now is new to Cisco Collaboration starting from release 11. The old Meet Me conference in CUCM (still exists by the way in version 11) didn’t meet the audio conferencing needs for many organisations, especially around security and having that conference menu and feel. Hacks had to be put in place, which typically involved UCCX scripting.

The Conference Now feature strongly competes with many of the audio conferencing bridges in the marketplace and best all of all, this feature is standard with CUCM, so no additional licensing is required. The Conference Now feature includes a standard single Meeting Phone Number while allowing multiple Meetings to be hosted simultaneously without the risk of barging into a uninvited meeting room. The Host can choose their own Attendee Access Code aswell, giving control to the user and not relying on IT Administrators to make these simple changes. The Conference Now feature allows includes a lobby room, where attendees can listen to selected music while they wait for the Host to join the meeting. This is a great enhancement for Cisco UC platform.

Configuring Conference Now

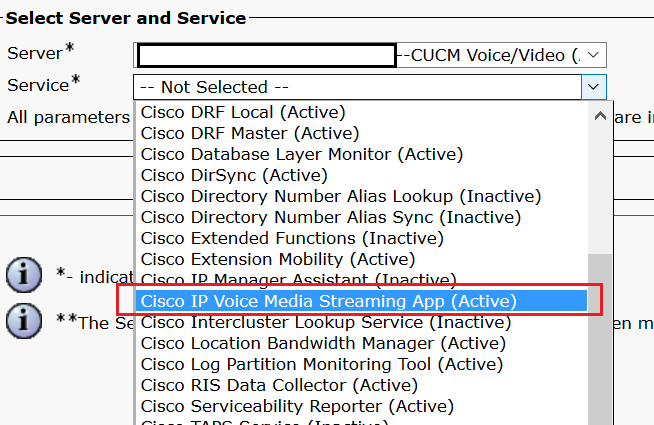
Conference Now uses the IVR media resources in CUCM. As we know Media Resources are enabled by activating the Cisco IP Voice Media Streaming App. Usually, you will enable this service as one of the first tasks you undertake when configuring a new CUCM build.

Cisco Conference NowAdditional Info. Can disable/enable the IVR media resource by navigating to the Service Parameters -> Cisco IP Voice Media Streaming App configuration window. Simply change the “Run Flag” setting.
Cisco Conference Now

Cisco Conference NowSo now, we should be seeing the IVR media resources successfully registered.

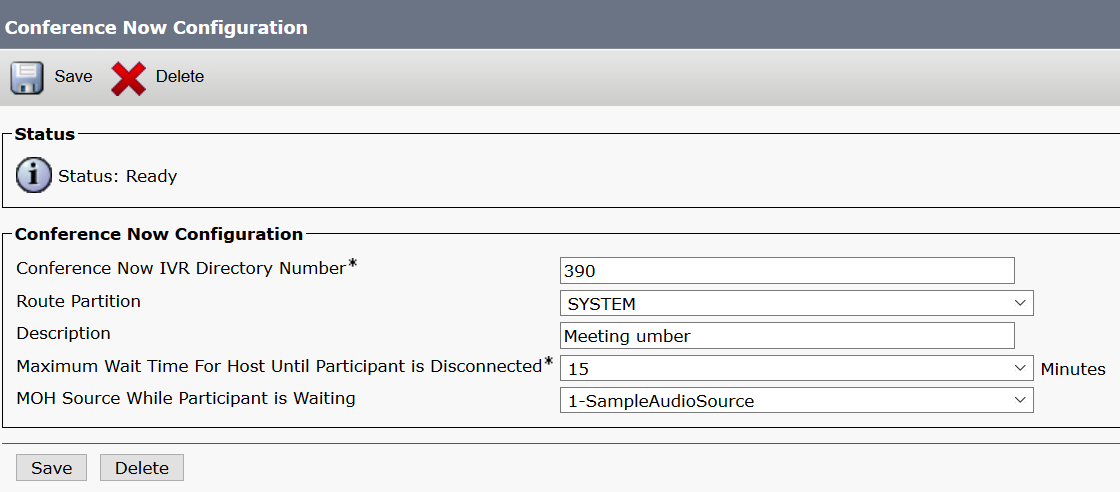
Cisco Conference NowNext is to configure the Conference Now Meeting Number. This is found under Call Routing -> Conference Now. Assign a DN and Partition. Also allows for two parameters to be modified being Music on Hold and Maximum Wait Time (default 15mins).
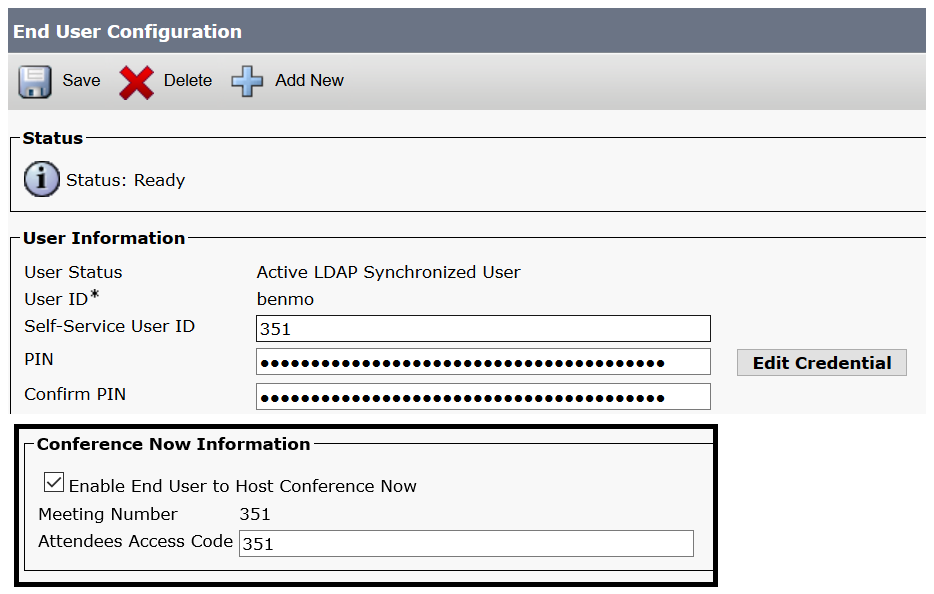
Cisco Conference NowAllowing access to host conferences is configured via the End User page. The Meeting Number is populated by the Self-Service User ID. Then check the “Enable End User to Host Conference Now” checkbox and allocate a Attendees Access Code. (The user can change this later).

I’ve also captured the PIN field for the end user, the PIN field is used by the Host to unlock the Meeting Room. I strongly recommend the PIN and Access Code by at least 8 digits in length.
Cisco Conference NowThe end user can now call into the Meeting Room phone number and follow the prompts to start a Conference. Attendees will be able to dial in anytime and join a meeting room, providing they know the Meeting Room ID and Access Code. If the Host has not joined the meeting within 15 minutes (default) the attendees will be disconnected from the lobby area.

Self Administering the Conference Settings.

Users can change the Meeting Room Access Code at anytime, using the Self Care Portal. URL is https://cucm_ip_address_or_hostname/ucmuser

Navigate to General Settings, then scroll to the bottom of the page where you will find the Conference Now Settings.

Cisco Conference NowCisco Conference NowModifying Announcements

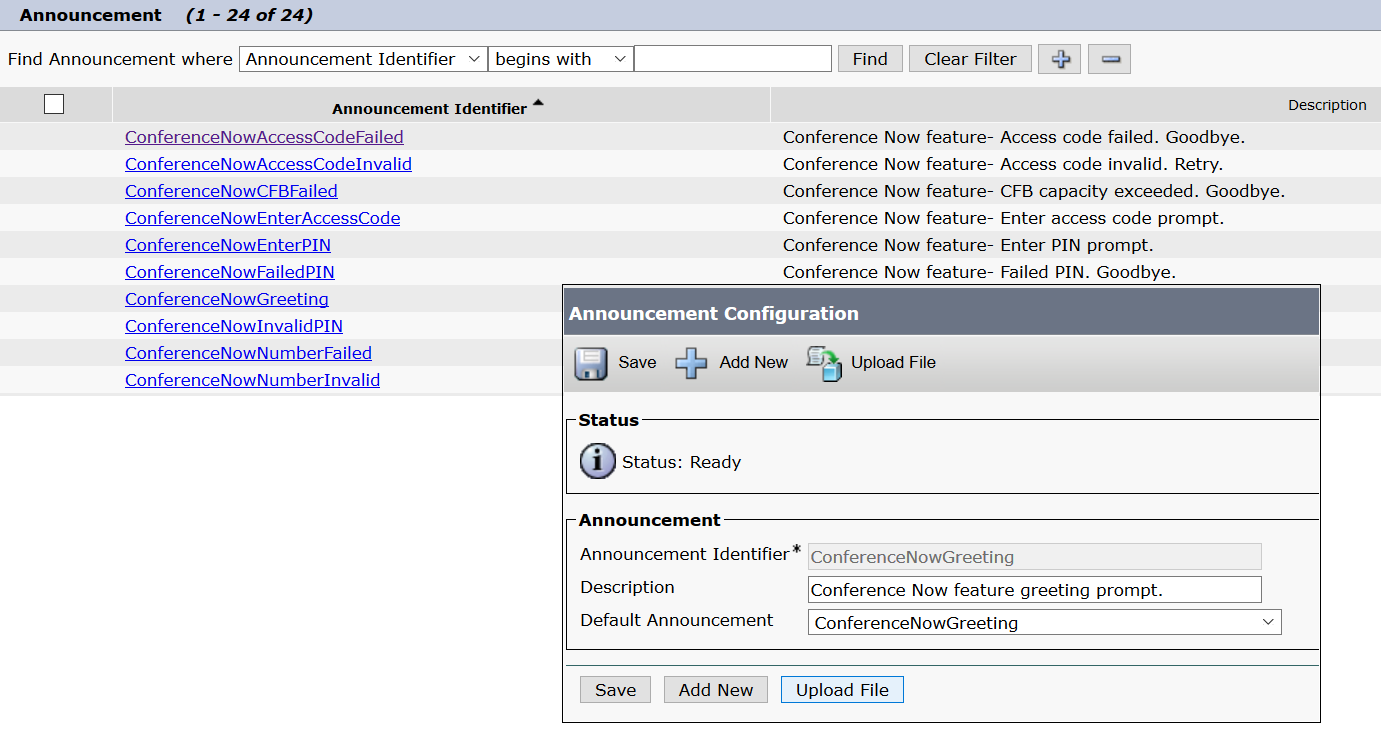
For those Administrators who feel the need to tinker with the default Conference Now announcements, all the announcements are located under the Media Resources -> Announcements Menu. Click on the required announcement and either upload a new wav file or select as existing audio file to use.
Cisco Conference Now

Dec 30

Faxing – Bearer Capability Not Implemented (65)

Faxes failing the negotiation process. When ringing through, the fax starts to signal, however after a couple of seconds, the signalling is supressed, followed by an error on the Fax Display or results sheet. The Disconnect cause is 65 – Bearer Capability Not Implemented.

Setup Traces in CUCM and display the output in the TranslatorX. TranslatorX displays the key information of a call leg within a couple of mouse clicks. Below we can see the an Internal Fax is attempting to fax out to the PSTN. The fax is connected to an ATA Device.

Due to the nature of faxes, the G729 codec is not compatible with fax signal. The G729 compresses the rtp and hence corrupts the fax transmission. Below we see the negotiated codec is G729. So we’ll have to check how this codec was negotiated and not the G711a/ulaw.

CUCM Fax

Check the codec negotiated.

1. Check the Device Pool of the ATA and Voice Gateway. Collect the Regions, the confirm the Regions between the ATA and the Voice Gateway can indeed negotiate G711a/ulaw.

2. If all looks good, log into the Voice Gateway and check the codecs configured for the dial peers. Voice dial-peers on IOS Voice Gateway default to G729 codec. You must configure a voice-class with a preference to use G711alaw first. This ensures G711alaw is negotiated between the ATA (Fax) and the Voice Gateway. In the below example, only the codecs G711alaw and G711ulaw are permitted on the dial-peers 10 and 11.

CUCM Fax

** With the latest CUCM Deployment models, there is also the option to create/modify Codec Preference list under the Regions Menu. This allows us to the preference codecs between endpoints registered to CUCM and/or the Voice Gateways leading to the PSTN Network.

Dec 20

CUCM – Auto Dial from SIP Phone (PLAR)

To allow a SIP IP Phone to dial out to a predetermined destination when the handset is lifted in Cisco Unified CM, follow the below steps.

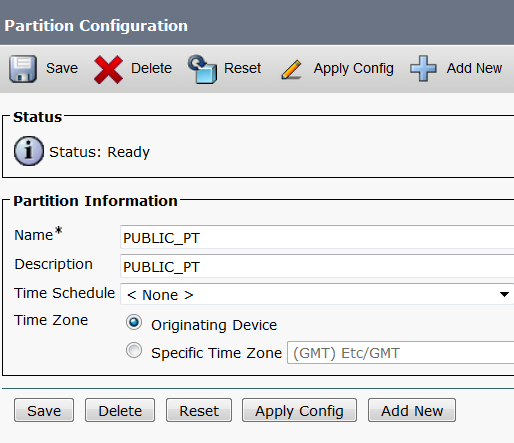
Create a Partition for the PLAR. I called my partition PUBLIC_PT
CUCM Partitions

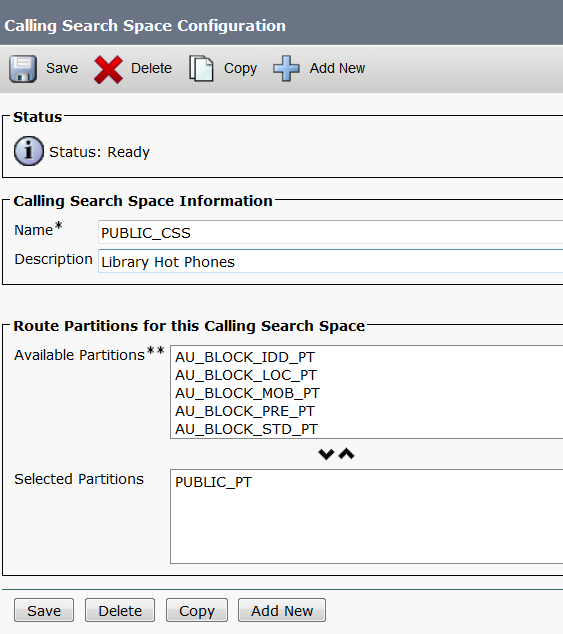
Create a CSS, and add the above partition to the ‘Selected Partitions’ window.
CUCM Partitions

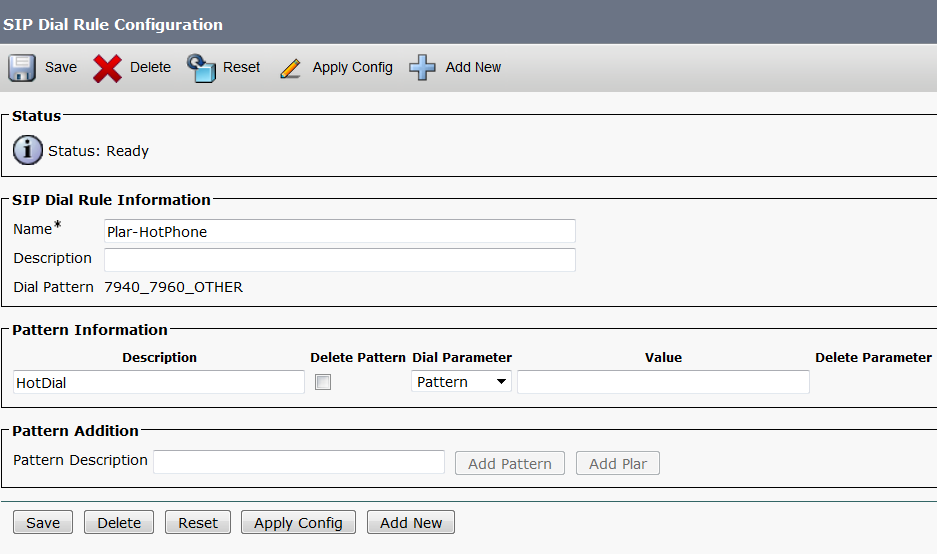
Create a SIP Dial Rule. The pattern value should be blank.
CUCM CSS

Create an ‘Blank’ Translation Profile in the PUBLIC_PT partition. Also ensure the CSS of the Translation has access to the ‘translated’ destination pattern. In my case DEVICE_CSS has access to the DN (Extension) 1012222.
CUCM Translation Pattern

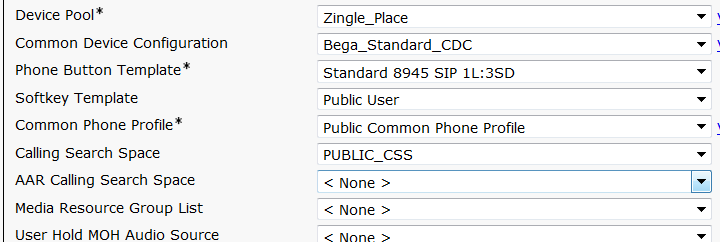
Navigate to the Phone configuration window. Select the Calling Search Space we created in step two. (PUBLIC_CSS).
CUCM Device Settings

Scroll down to the Protocol Specific Information section and select the SIP Dial Plan we created earlier.

Device SIP Settings

Give the Phone a reset and validate the above settings by lifting the handset.

Nov 05

Unusual Case Study of CUCM Call Recording Implementation

A week ago I’ve got a partnership offer from Cisco Solution Partner that develops various solutions on top of Cisco UCM, Telepresence and UCCX products and sells them through channel partners. While discussing their app suite for CUCM I was told about the interesting case study which I’ve decided to share with you to take a break from technical posts.

The client is a large media agency with hundreds of field reporters all over the country. They interview dozens of VIPs daily and the challenge was to minimize the time of delivering interview recordings to the agency newsmakers.

So here is the approach they took… When starting a new interview the reporter turns on his voice recorder (for high-quality recording) AND makes a phone call to the special office number placing the mobile phone on the table along with the voice recorder.

What happens next is:

1) CUCM routes the incoming call to the recording app, which establishes the connection with the reporter’s phone and starts recording the interview;

2) at the same time the recording application pushes the XML service to Cisco IP phones of several newsmakers who are subscribed to the call recordings of this reporter; the XML service plays “beep” informing newsmakers about the new interview started and shows the interface on the IP phone:

3) after pushing the “Listen” button, the newsmaker listens to the interview being recorded and composes the news message.

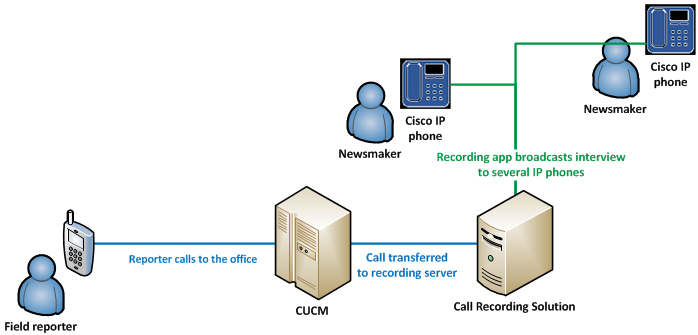
The whole picture looks like this:
recording1

This way the agency newsmakers receive new content just on the fly and the news message may go online even before the reporter returns to the office.

Quite an interesting client story, what do you think? If you need to learn more about them, here they are – aurus5.com

Oct 10

7945 / 7965 – Phones Services Menu Host Not Found

I come across an issue within a CUCM 10.5 environment with a 7945/65 IP Phone. The UC Cluster has a range of phone models varying from 7940/60s to 8851′s.

When the Phone Services button was pressed on a 7945 or 7965 IP Phone, the phone service subscriptions would list correctly, however the phone continued to request for subscriptions, the phone display would show “requesting…”, eventually timing out and displaying a “Host Cannot be Found” error.

However, if the phones services button was pressed on a 7940 phone, the phone service subscriptions would list and the request would complete. This was the same for 7941, 7942, 7962 etc.. Also the 8851 phones would also display the subscriptions correctly under the Settings Menu.

I captured the packets between the 7945 IP Phone and CUCM to see what was going on. The phone was sending a secure request over port 8443. However in the Enterprise Parameters page, the secure URL for Phones Services was entered as http:// and not https://. Normally this would fine except the tcp port also entered was 8443 and not 8080 (non-secure). I changed the Secure Phones Services URL to https:// and the 7945 and 7965 IP Phones would then display the correct Phones Services subscriptions and the requesting service would complete with no errors.