Microsoft Office 365 is becoming more popular with many Businesses taking advantage of its simplicity to manage and strong emphasis on data protection. However there are many services that are still located local to the Business premise that needs to integrate/communicate with the Office 365 Servers. One of these services is Cisco Voicemail. The main Cisco Voicemail application is called Cisco Unity Connection (CUC). Within the CUC application is a feature called Unified Messaging Single Inbox. The feature synchronises voicemails between the Cisco Voice mailbox and in this case the MC Office 365 user email mailbox. While this feature is not new by any means, what is in its early days is the configuration between Cisco and Office 365. There are some excellent guides on Cisco.com regarding Single Inbox, at the same time not all the required documentation is in a single place. I’ve documented the process I followed while integrating Cisco CUC with MS Office 365.
1. Create an MS Office 365 admin user. This user does not require a license on the MS Office 365 service. IMPORTANT NOTE: Cisco CUC does not support AD Federation Services (ADFS). What this means: do not create the admin user in the Active Directory environment. You must create the admin user in MS Office 365 directly.
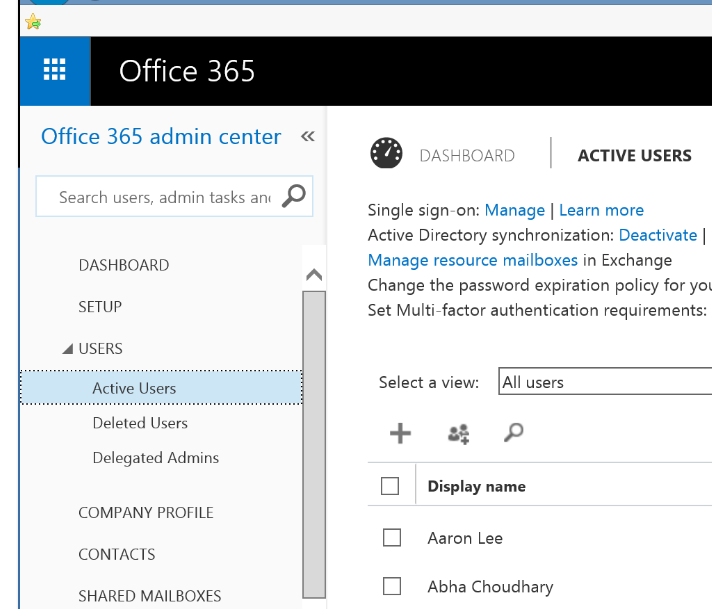
Browse to the MS Office 365 web admin page and login using your administrator credentials. Under the Office 365 Admin Centre, navigate to Users -> Active Users.
Click to create a new user and complete the required details. IMPORTANT NOTES: Uncheck the “Make this user change their password with Outlook Web App on next login”. Uncheck the license for this user. If you only have a single license plan, you will not be able to uncheck the license plan. Save the new user, then go back into the user account (edit) and then uncheck the license plan.
2. Assign Impersonation rights for the MS Office 365 user account.
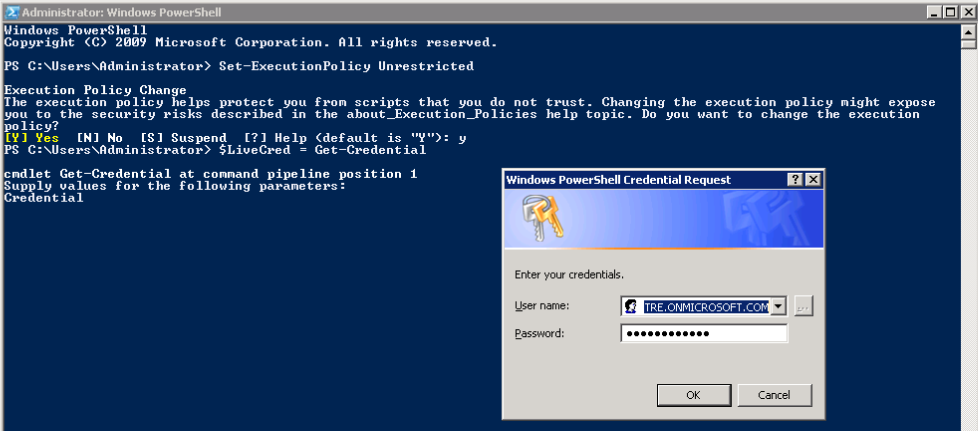
a) Run the Windows Powershell as Administrator.
b) Run the command “Set-ExecutionPolicy Unrestricted”
c) Run the command “$LiveCred = Get-Credential” then enter the Office 365 administrator credentials.
d) Create a session with Office 365. Run the command “$Session = New-PSSession -ConfigurationName Microsoft.Exchange -ConnectionUri https://ps.outlook.com/powershell/ -Credential $LiveCred -Authentication Basic –AllowRedirection”
e) Run the command ”Import-PSSession $Session”. This import the remote exchange shell commands into Powershell.
f) Assign impersonation role to the unity user created in step 1. Run this command “new-ManagementRoleAssignment -Name:Unity -Role:ApplicationImpersonation -User:useraccount@domain.onmicrosoft.com”
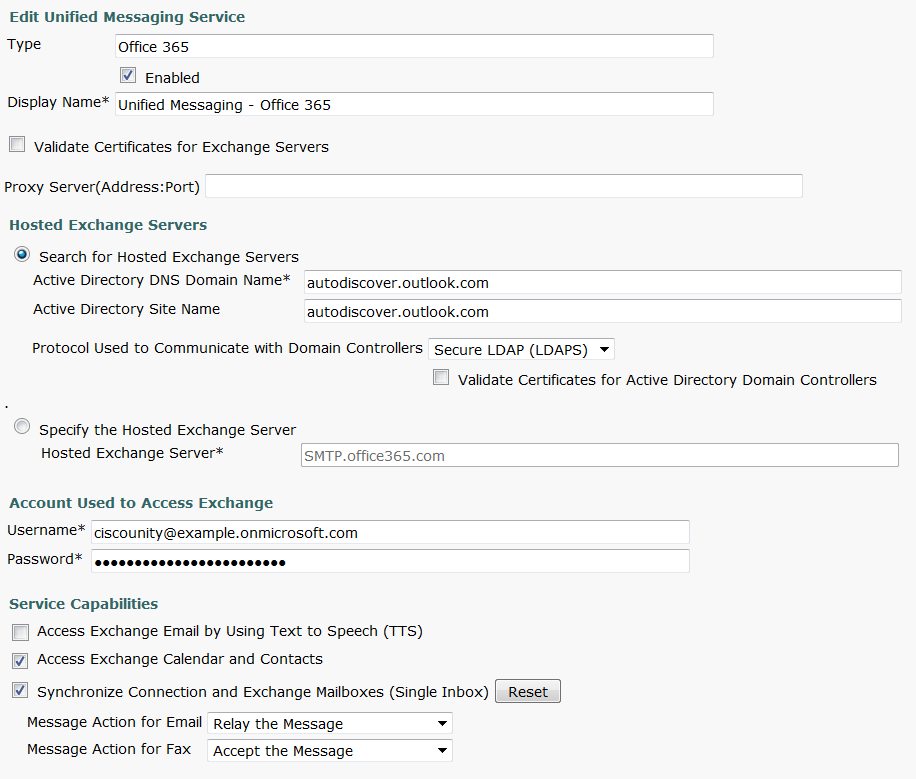
3. Cisco Unity Connection configuration tasks. Navigate to Unified Messaging -> Unified Messaging Services. Select Add New. I’ve attached a picture to explain the configuration. Key Notes to takeaway: Type is Office 365, Must select “Search for Hosted Exchange Servers” then enter “autodiscover.outlook.com” in both the DNS Domain and the Site Name fields. Must select Secure LDAP (LDAPS). The user account must include the full suffix, with the onmicrosoft.com.
4. Now all that’s left is to run tests and add a unity connection user to the unified messaging.


Aren’t you missing the SMTP Smart Host configuration before step 3?
Do not need the smart host completed for UM.. this is for mail relay, eg notify email recipients of voicemail. UM synchronises the MS mailboxes whether it be in the cloud or on prem via MAPI/HTTPS.