Aug 25

Jabber AD Search Filter

By default the Jabber client will only search for user accounts in the selected OU path under the Service Profile. The default AD search filter is

(&(objectCategory=person)

To enable Jabber to search for contacts and enabled users in Active Directory, modify the base filter to

(&(|(objectclass=user)(objectclass=contact))(!(objectclass=Computer))(!(UserAccountControl:1.2.840.113556.1.4.803:=2)))

Where to apply the Base Filter.

Navigate to the Directory Profile section in the Service Profile. The Service Profile is listed under User Administration -> Users Settings.

Enter the above mentioned filter into the “Base Filter (Only used for Active Directory)” field.

**Updated**
You also have to add the following lines to your jabber-config.xml.

<?xml version=”1.0″ encoding=”utf-8″?>
<config version=”1.0″>
<Directory>
<UseSIPURIToResolveContacts>true</UseSIPURIToResolveContacts>
<SipUri>mail</SipUri>
<UriPrefix>sip:</UriPrefix>
</Directory>
</config>

Aug 15

UCCX – Finesse Monitoring / Barge Features

Just like the CAD Agent Desktop software the Finesse Agent allows the Supervisor to silent monitor Agents in their Team. The audio though flows through the IP Phone and not the computer. From a silent monitor session, the Supervisor can then Barge into the call between the Agent and the Customer. The Agent will hear a beep to let them know the Supervisor has Barged in. The Customer will not hear the beep.

Barge is essentially a three way conference. From a Barge session, the Supervisor can then intercept the call and drop the Agent from the call. Therefore the Customer is now talking directly to the Supervisor, this is great for call escalation.

A couple to things to note about the setup.

- Built-in Bridge must be enabled on Agent Phones
- Supervisor DN must have the Monitor CSS populated with a CSS that has access to the Agents DN.
- For a Supervisor to Silent Monitor an Agent, the Supervisor must be in a Not Ready State. If the Supervisor is in a Ready State, the Silent Monitor will be greyed out.

Aug 05

Informacast Paging Basic Setup with CUCM

Informacast Paging UCM Edition Basic Information

- 50 members maximum in a recipient group.
- Can have multiple recipient groups
- Can have multiple Triggers or Dialcasts configured.
- Only support live paging.

Initial Informacast Paging System Install

- Deploy VM OVA
- IP Address Details
- Hostname

Configure CUCM

- Set the SNMP Read-Only string. This is configured from the Serviceability Page -> SNMP. Informacast only requires v2 SNMP and Read Only attribute.
- Activate the Cisco CallManager SNMP Service
- Configure 1x Route Point and minimum 2x CTI Ports. The CTI Ports are only for outbound usage. Route Points are the triggers for various paging announcements. The DNs configured for Route Points need to match the Dialcast DN in Informacast.
- Create a new Application user and assign AXL and the general CTI Groups. Add the above CTI RP and CTI Ports to the application user.
- Enable Web Access for intending destination phones.
- Modify the authentication URL in Enterprise Parameters. Copy the URL from the Informacast Server under the Telephony Configuration. The URL must be http://. Must also be copied to both the non-secure and secure Authentication URL Field.

Configuring Informacast Paging

Configure the telephony configuration, ensure the CUCM configuration is in-place first and SNMP Service has been activated.

Cisco Paging
Configure broadcast parameters. Ensure the “Send Commands to Phones By JTAPI is not checked.

paging2
Create Recipient Group. (Remembering 50 member is the limit per group).

paging3
Configure the Dialcast settings. Essentially, this is the trigger for the live page. Each Dialcast DN maps to a Route Point configure on CUCM. Also then map the recipient group to receive the Page.

paging4
Check the overview and status of the Informacast paging system. You should see the CUCM Cluster is connected and showing the version and also the CTI Points should be showing.

Note: The CTI Route Points and CTI Ports should be registered in CUCM.

paging5
Multicast Configuration

Informacast Paging uses multicast for live pages. The broadcast parameters displays the multicast address.

In its basic form, we need to enable multicast on the switches and routers. We also need to configure the L3 interfaces to participate in the multicast network. By default Multicast will not traverse L3 networks.

In its simplest form do the following:

Dense Mode

(config)# ip multicast-routing
(config)# interface fa0/0
(config-int)# ip pim sparse-dense-mode

**Repeat for all interfaces leading to an L3 network to which you should be receiving live pages.

Sparse Mode

(config)# ip multicast-routing
(config)# ip pim rp-address ip_address_of_central_L3_device

(config)# interface fa0/0
(config-int)# ip pim sparse-dense-mode

Jul 15

Cisco JID – Resolving Contacts with Blank Spaces

Resolving JID’s when the usernames have a blank space can be challenging. I had an issue where the IM Address would be formatted correctly (email address) when a user viewed their own profile from within Jabber. However, if that same user searched the directory and viewed a contact’s profile, the IM Address would only display the firstname.

The user ID was in the format of “firstnamelastname@domain”

The Jabber client was ending the IM Address string after the firstname. Therefore the presence status would only show offline and the IM Feature was disabled. The blank space was breaking the IM Address.

IMP 10.5.2 was in use and the Directory URI was checked for the Advanced Settings, this was working ok as the IM Address in self view in Jabber was showing the Directory URI

The issue here was the Directory Search and the resolving of contact JID’s to their SIP URI.

Nagajothi Thangapandian provided assistance in this case and advised to hardcode the directory lookup resolver to the SIP URI which was mapped to the email address. Below is the snippet of code that will be placed into the jabber-conf.xml file.

This resolved my issue, but will also come in handy if you need to migrate or change IM Addresses for contacts.

<?xml version=”1.0″ encoding=”utf-8″?>
<config version=”1.0″>
<Directory>
<SipUri>mail</SipUri>
<BDISipUri>mail</BDISipUri>
<UseSIPURIToResolveContacts>true</UseSIPURIToResolveContacts>
<BDIUseSIPURIToResolveContacts>true</BDIUseSIPURIToResolveContacts>
<UriPrefix>sip:</UriPrefix>
<BDIUriPrefix>sip:</BDIUriPrefix>
</Directory>
</config>

Jun 25

Working with Blank Spaces – UCCX 10.6

Working with spaces in usernames can be challenging. CUCM 10.5 supports spaces within the usernames and to go a little further CUCM also supports the following characters in usernames =, +, , #, ;, \, , “”. Cisco Jabber also supported the use of spaces in the username; however the space must be removed when entering the CSF/BOT/TAB/TCT device name.

Contact Centre on the other hand does not support spaces, Cisco have an open Bug ID for this at the time writing. This makes it a little hard when the UC system is heavily dependent on the integration with LDAP. Organisations will not simply change their username format for a single application (Phone System).

A workaround is to create local user accounts in CUCM and remove the blank space from the usernames. All other user parameters should reflect the comparable user account. Then allow this local user to control the device used with UCCX. This does create a little more overhead for the UC Administrator and some confusion for the UCCX Agent by having to remember to log into Finesse with a ‘no space’ in their username as well as having to remember a dedicated password for this login.

Jun 15

Adding Certificates to your UC Environment

Certificates are essential for a smooth operating UC environment. Most organisations have an Internal Certificate Authority and most of these CA’s are the Microsoft CA Server. So it does come in handy to know a little about the MS Certificate architecture and enrolment processes.

I’ll run through how to apply a certificate to a Cisco UC Application Server.

1. Browse to the Operating Platform administrator webpage. The navigate to Security -> Certificate Management.
2. Select Generate CSR. A signing request window appears, check the information and then select generate. After the CSR has been generated, close the window.
3. Download the CSR and save it to your PC. The certificate purpose will be “tomcat”.

Sometimes I come across CA’s that do not allow URL signing or the URLs do not work properly. So I always try to gain access to the console/RDP of the CA server and sign the CSR via the cmd line.

4. Transfer the CSR file to the CA Server.
5. Log onto the CSR server. Again you may need to request login right from the Network Administrator.
6. Open the CMD Prompt and type the following.
“certreq -submit -attrib “CertificateTemplate: WebServer” cucm01.csr”. We are basically signing the CSR using the Web Server Template.
7. Select the CA Server to use.
8. Save the newly created certificate as a .cer
9. While staying on the CA Server, navigate to the Certificates MMC and download its Certificate. We will need the CA’s certificate as a trust certificate.
10. Save the CA Cert in the same location as the above certificate.
11. Transfer the two certificates to the your PC.
12. We will now upload the two certificates into the CUCM Server. First we need to upload the CA’s certificate. This is the trust cert.
13. Select Upload Certificate. Select “tomcat-trust”, and navigate to the CA’s certificate. Select Upload.
14. Lets go ahead and upload the actual server certificate now. Change the type to “tomcat” and navigate to the server certificate. Select Upload.
15. You should see the two certificates under Certificate Management.
16. You may have to restart the Tomcat Service from the CLI. (utils service restart Cisco Tomcat)

Jun 05

Upgrade CUC form 9.1.1 to 9.1.2 – Sync Error on Switch-Version

When upgrading CUC 9.1.1 to 9.1.2. You may receive the following error when switching between active and inactive partitions.

—————————————–
Operation failed

ERROR: Sync after switch version failed
—————————————–

Steps to resolve the issue

On Subscriber run – utils dbreplication stop (here you have to wait some time once is finish wait for like 10 min.)

On Publisher run – utils dbreplication stop (here you have to wait some time once is finish wait for like 10 min.)

On Publisher run – utils dbreplication reset all

Reboot both servers using: utils system restart

On the Subscriber utils cuc cluster overwritedb (here you also need to give it time)

May 25

H323 ICT Trunk Woes with Unity Connection

I had a request to investigate why calls were failing between CUCM Clusters, but only when calls were being transferred/redirected from the Cisco Unity Connection system handler. Internal CUCM extensions could direct call between the two CUCM Clusters, Internal and external call forwarding and transferring work successfully across the clusters. Cisco Unity Connection could also transfer out to external numbers and also internal cluster numbers from the system handlers.

I setup traces in CUCM on Cluster A. I didn’t have visibility of Cluster B configuration. Below is a small snippet of the traces I collected. I’ve mainly just cut the error from the traces. The call was being rejected by cluster B in the H225 setup request. The cluster A was hunting for another Trunk/Gateway to send the call, but couldn’t find an alternate path.

So knowing cluster A is actually sending the initial h225 request was good point to start. I then examined the IP Address from which the H225 setup request was sourced from. A little bit Hex conversion on a bit a paper showed me the IP address. I then queried the Voice Administrator for Cluster B to let me know what IP Addresses had been configured for the ICT Trunk, and bingo the source IP Address was not configured on the Cluster B ICT Trunk. Remember CUCM by default will not accept inbound connections from unknown hosts. There is a service parameter to allow such behaviour though. After resetting the ICT trunk, call were now working from Cluster A to Cluster B.

The reasoning behind why IP Phones could dial across the cluster and the Unity Connection server could not is directly related to what CUCM server the device/CTI Port is registered too, or in the SIP world the primary destination IP Address. The Unity Connection server was directing to CUCM B, while IP Phones that I tested were registered to CUCM A. CUCM A was listed in Cluster B’s ICT Trunk configuration settings however CUCM B was not listed.

48627014.000 |18:53:43.199 |SdlSig |CcSetupReq |null0 |RouteListCdrc(1,100,83,9734) |RouteListCdrc(1,100,83,9734) |1,100,13,40817.2^*^* |[R:N-H:0,N:0,L:0,V:0,Z:0,D:0] CI=28537545 CI.branch=0 sBPL.plid=65 sBPL.l=0 sBPL.pl=5 sBPL.msd=0 FDataType=0opId=0ssType=0 SsKey=0invokeId=0resultExp=Fbpda=F pi.piid=30 pi.l=0 pi2.piid=30 pi2.l=0 pi3.piid=30 pi3.l=0 FQCGPN=pi=0si1 preXCgpn=tn=2npi=1ti=1nd=+642108375375pi=0si3 cgPart= cgPat= cgpn=tn=2npi=1ti=1nd=*64+642108375375pi=1si3 cgpnVM= unXCgpn=tn=2npi=1ti=1nd=+642108375375pi=1si3 cName=locale: 1 Name: UnicodeName: pi: 0 DD=ti=1nd=9014011User=9014011Host=10.129.6.1Port=5060PassWord=Madder=Transport=2mDisplayName=RawUrl=sip:9014011@10.129.6.1:5060pi=0si1 origDD=tn=0npi=1ti=1nd=8310pi=0si1 preXCdpn=tn=0npi=0ti=1nd=4900007pi=0si0 preXTagsList=SUBSCRIBER preXPosMatchList=4900007 cdPart=b165e2c8-d865-4f60-8283-bb946e961281 cdPat=49XXXXX cdpn=tn=0npi=0ti=1nd=4900007pi=0si1 cdpnVMbox= localPatternUsage=5 connectedPatternUsage=2 itrPart= itrPat= LRPart=b165e2c8-d865-4f60-8283-bb946e961281 LRPat=9017006 LR=tn=0npi=0ti=1nd=9017006pi=1si0 LRVM= LRName=locale: 1 Name: UnicodeName: pi: 1 FQOCpdn=ti=1nd=4900007pi=0si1 fFQLRNum=pi=0si1 oPart=b165e2c8-d865-4f60-8283-bb946e961281 oPat=49XXXXX oCpdn=tn=0npi=0ti=1nd=4900007pi=0si1 oCdpnVM= oRFR=130 oName=locale: 1 Name: UnicodeName: pi: 0 ts=SUBSCRIBER posMatches=4900007 withTags= withValues= rdn.l=0IpAddrMode=0 ipAddrType=0 ipv4=10.129.2.1:51025 region=R_Auckland capCount=4 ctiActive=F ctiFarEndDev=2 ctiCCMId=1 cgPtyDev=10.129.6.7 callInst=0 OLF=1Supp DTMF=1DTMF Cfg=1DTMF Payload=0isOffNetDev=T bc.l=3 bc.itr=1 bc.itc=16 bc.trm=0 bc.tm=0 maxForwards=70 cgpnMaskedByRedirect=F callingLRG=b506f727-c1af-2188-5cec-21d15743334d featCallType=0 muteEnabled=0 associatedCallCI=0 featurePriority=1 nonTargetPolicy=0 unconsumedDigits= suppressMOH=F numPlanPkid =58cb38ed-8432-1064-9608-ca1ebc003e4e networkDomain= bitMask=0 SetupReason=0 routeClass=1 sideACmDeviceType=7 protected=1 ControlProcessType=0 tokens=0 isPresent=F transitCount=0 geolocInfo={geolocPkid=, filterPkid=, geolocVal=, devType=3} locPkid=e510c28a-2766-bb3b-21f8-5bbf8781905e locName=L_AUCKLAND deductBW=F fateShareId=QBENZ:28537539 videoTrafficClass=0 oFromAnalogDvc=F bridgeParticipantID= callingUsr= remoteClusterID= isEMCCDevice=F lHPMemCEPN= cHPMemCEPN=TransparentData=null CanSupportSIPTandN=false TransId=0 AllowBitMask=0×0 UserAgentOrServer= OrigDDName=locale: 1 Name: UnicodeName: pi: 0 mCallerId= mCallerName=LatentCaps=null icidVal= icidGenAddr= oioi= tioi= ptParams= receivedPAID= routeHdr= routeCepn= requestURI= PCVFlag=F originallyHadISUP=F isIMSFinalRoute=F IMSMode=0 originalLRG= lastRedirectingLRG= nwLoc=1
48627014.001 |18:53:43.200 |AppInfo |GenAlarm: AlarmName = RouteListExhausted, subFac = CALLMANAGERKeyParam = , severity = 4, AlarmMsg = RouteListName : RL_AUST_ICT, Reason=41, RouteGroups(RG_AUST_ICT)
AppID : Cisco CallManager
ClusterID : Standalone
NodeID : UCMPUB

48627014.002 |18:53:43.200 |AppInfo |GenAlarm: Push_back offset 256 seq 256
48627015.000 |18:53:43.200 |SdlSig |CcRejInd |idle |RouteListControl(1,100,82,35) |RouteListCdrc(1,100,83,9734) |1,100,13,40817.2^*^* |[R:N-H:0,N:2,L:0,V:0,Z:0,D:0] CI=28537545 CI.branch=0 c.l=1 c.cid=8 c.cs=0 c.lc=0 c.r=0 CV=41 rejectType=1 dtmDisconn=F FDataType=0opId=0ssType=0 SsKey=0invokeId=0resultExp=Fbpda=FTransparentData=null CanSupportSIPTandN=false TransId=0 AllowBitMask=0×0 UserAgentOrServer= OrigDDName=locale: 1 Name: UnicodeName: pi: 0 mCallerId= mCallerName= mediaCause=0
48627016.000 |18:53:43.200 |SdlSig |CcRelInd |wait |Cc(1,100,213,1) |RouteListCdrc(1,100,83,9734) |1,100,13,40817.2^*^* |[R:N-H:0,N:1,L:0,V:0,Z:0,D:0] CI=28537545 CI.branch=0 c.l=1 c.cid=8 c.cs=0 c.lc=0 c.r=0 CV=41 isDeskPickup=F dtmDisconn=F FDataType=0opId=0ssType=0 SsKey=0invokeId=0resultExp=Fbpda=FTransparentData=null CanSupportSIPTandN=false TransId=0 AllowBitMask=0×0 UserAgentOrServer= OrigDDName=locale: 1 Name: UnicodeName: pi: 0 mCallerId= mCallerName=
48627017.000 |18:53:43.200 |SdlSig |DStopInd |idle |RouteListControl(1,100,82,35) |RouteListCdrc(1,100,83,9734) |1,100,13,40817.2^*^* |[R:N-H:0,N:1,L:0,V:0,Z:0,D:0]
48627018.000 |18:53:43.200 |SdlSig |CcRelInd |tcc_incoming_call_proceeding4 |Cdcc(1,100,212,81742) |Cc(1,100,213,1) |1,100,13,40817.2^*^* |[R:N-H:0,N:1,L:0,V:0,Z:0,D:0] CI=28537545 CI.branch=0 c.l=1 c.cid=8 c.cs=0 c.lc=0 c.r=0 CV=41 isDeskPickup=F dtmDisconn=F FDataType=0opId=0ssType=0 SsKey=0invokeId=0resultExp=Fbpda=FTransparentData=null CanSupportSIPTandN=false TransId=0 AllowBitMask=0×0 UserAgentOrServer= OrigDDName=locale: 1 Name: UnicodeName: pi: 0 mCallerId= mCallerName=
48627019.000 |18:53:43.200 |SdlSig |DStopConf |routeListExhausted_shutting_down |RouteListCdrc(1,100,83,9734) |RouteListControl(1,100,82,35) |1,100,13,40817.2^*^* |[R:N-H:0,N:2,L:0,V:0,Z:0,D:0] varChannelStatus=0

May 15

SIP Trunk to ITSP – 400 Service Unavailable

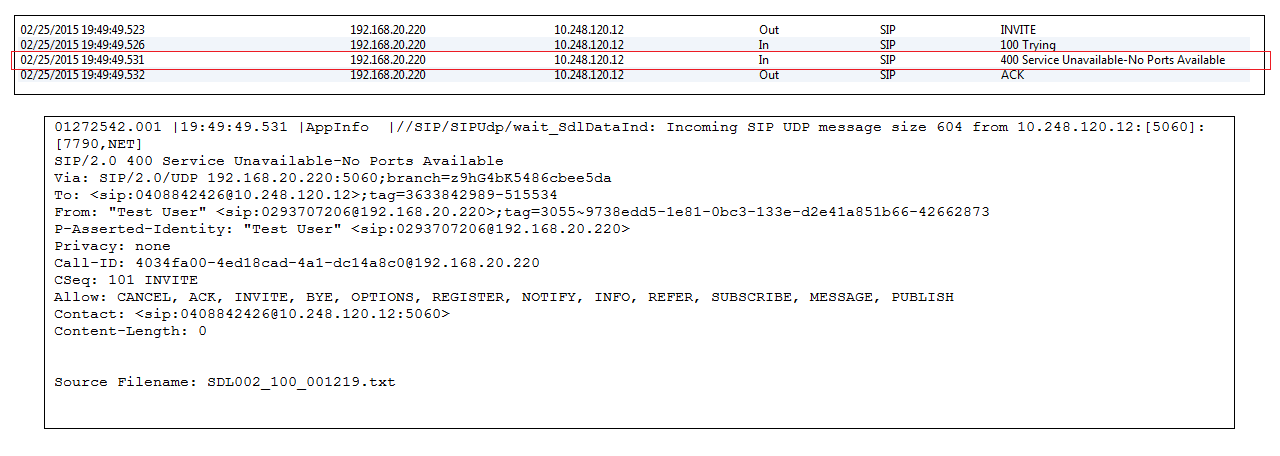
When calling outbound via SIP Trunk to ITSP you receive a 400 Service Unavailable-No Ports Available error after receiving the TRYING packet.

SIP Trace - CUCM

This error may indicate an issue with Early Offer being disabled. Most ITSP’s expect the SDP in the initial SIP INVITE. If the SDP is missing, the ITSP can return the above error.

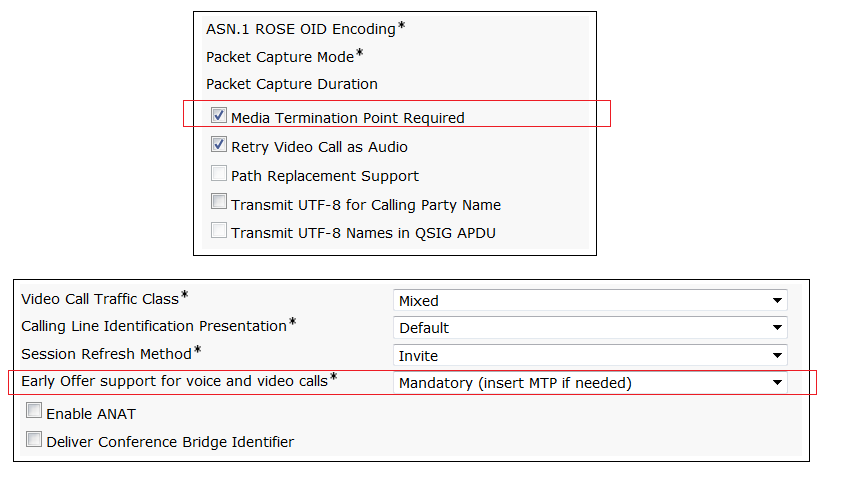
Simple fix is to enable Early Offer on Cisco CUCM. Below is a quick how to.

  1. Navigate to the SIP Profile configuration page and select “Mandatory (insert mtp if needed) for the Early Offer Support field.
  2. Navigate to the SIP Trunk configuration page and select “MTP Required”.
  3. Reset SIP Trunk.

CUCM Sip Trunk and SIP Profiles