May 05

Cisco RTMT Closes after Splash Screen

Frustrating… The RTMT application closes for no reason after displaying the splash screen. You try and open the application again, only to see the exact same result. You know Java is at play here but how?

Below is what I had to do to get RTMT v10.5 to run on my Windows 7 laptop with Java v7.

  1. Copy the jre7 folder located under Program Files\Java
  2. Paste the jre7 folder into the jre folder located in the RTMT program directory. (Program Files\Cisco\Unified RTM\jre)
  3. Restart the RTMT application and now it should successfully load.
Apr 25

Unified Messaging with CUC Distribution Lists

Quick note on Single Inbox with Cisco Unity Connection with Distribution Mailboxes configured. The voicemail .wav file will only be synchronised with the Member’s email inbox if the “Dispatch for Delivery” is unchecked.

So you can’t have the best of both worlds yet. Members will have to manage the voice messages amongst themselves for responding to customers/callers. Cisco Jabber will however display the voice messages in all instances.

The “Dispatch for Delivery” checkbox can be found under the System Handler settings, then Message settings menu.


Apr 15

UCCX Scripting: Uploading Files to Windows File Share

Enabling Cisco UCCX to upload files (wav files etc) to a Windows file share is very useful feature that not many Engineers know about.

Uploading file to Windows file share can be useful for many tasks including transferring Voice Messages from customers, backing up greetings, uploading xml documents with customer responses etc.

The procedure is fairly simple and I found a great discussion regarding this on the Cisco Support Forums.

https://supportforums.cisco.com/document/96366/uccx-8x-how-playwrite-file-prompts-fromto-windows-shares

I will more or less rehash this into a shortened version for quick reference.

1. Download the jcifs-1.3.18.zip file.
2. Upload the .jar file to UCCX Server. System -> Custom File Configuration.
3. Restart the CCX Engine.
4. In the CCX Scripting Editor, create a variable of type String. Name this variable smbFileURL, do not give it a value.
5. Add a Set Sep into the script. Select the variable created in the previous step. For the value go to the expressions editor and type the following:

“smb://domain_name;username:password@server_ip_address/share_name/filename.wav”

6. Create a variable of type Integer. Name the variable exitCode. Value should remain at “0”
7. Add a second Set Step into the UCCX Script. Select the variable created in the previous step. For the value go to the expressions editor and type the following:

{
java.io.OutputStream os = null;
java.io.InputStream in = null;
try {
int bufSize = 4096;
jcifs.smb.SmbFile smbFile = new jcifs.smb.SmbFile(smbFileURL);
os = smbFile.getOutputStream();
in = dVoicemail.getInputStream();
byte[] bytesRead = new byte[bufSize];
int bytesReadLength = 0;
while ((bytesReadLength = in.read(bytesRead)) > 0 ) {
os.write(bytesRead,0,bytesReadLength);
}
} catch (Exception e) {
return -1;
} finally {
in.close();
os.close();
return 0;
}
}

Apr 05

UCCX Scripting: Enterprise Variables

Lets go through the process of adding three Enterprise variables to be displayed on CAD for the Agent. I will be creating Variables called Patient Name, Patient Number and New Patient.

Start by opening the UCCX Script. Navigate to Settings -> Expanded Call Variables. A separate window opens. Here we will add the three variables, plus the User Layout that will host the variables.

Click the icon to create a new expanded variable and complete the Name, Type and Description Field. Reference the below image.
Also create the layout expanded variable. Following the process as above, however the name of the variable will be user.layout.
Close the Expanded Variables windows and lets dive into the actual script.

Create three variables of type String. Variable names are:

- sPatientName
- sPatientNumber
- sNewPatient

You can place a default value in the String if you like. I placed the value “Unknown” for both sPatientName and sPatientNumber and assigned the value “Yes” to the sNewPatient variable.

After we have the variables completed, we need to add the “Set Enterprise Call Info” step to the script. This step should be added before the Select Resource Step. Open this step and select the Expanded Call Variables tab. Click Add and complete the details. Follow the below image. Essentially we are adding the expanded variables we created in the first step.
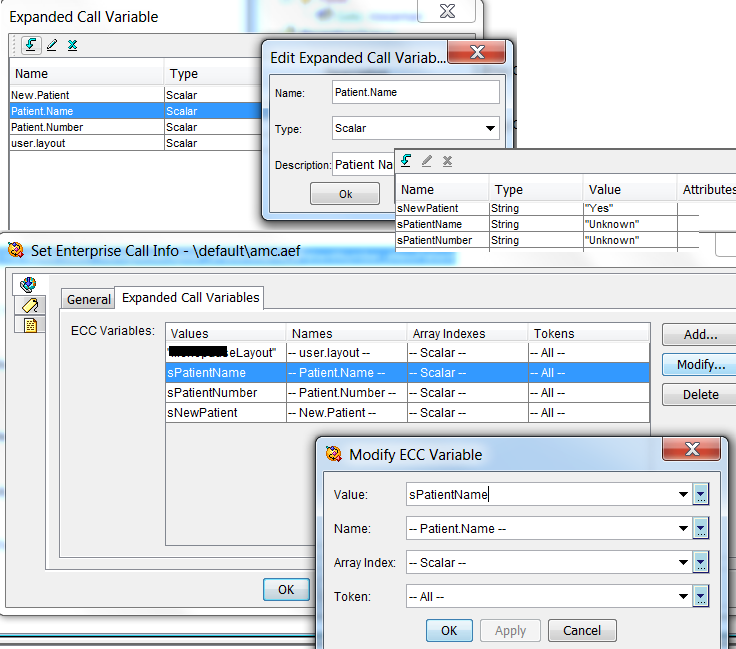
UCCX Expanded Variables

Now jump across to the UCCX Server and log onto the Desktop Administrator web interface. Navigate to the Fields Menu under Services Configuration -> Enterprise Data and click Add New.

The field name must match the expanded variable name created in the UCCX script application. Display name is what is displayed on the CAD Desktop. The field Index is a unique identifier for this field.

Create a field for all three variables, plus the User Layout variable. The user layout variable should be in the format:

- Field Name: user.layout
- Display Name: Layout
- Field Index: Unique Identifier
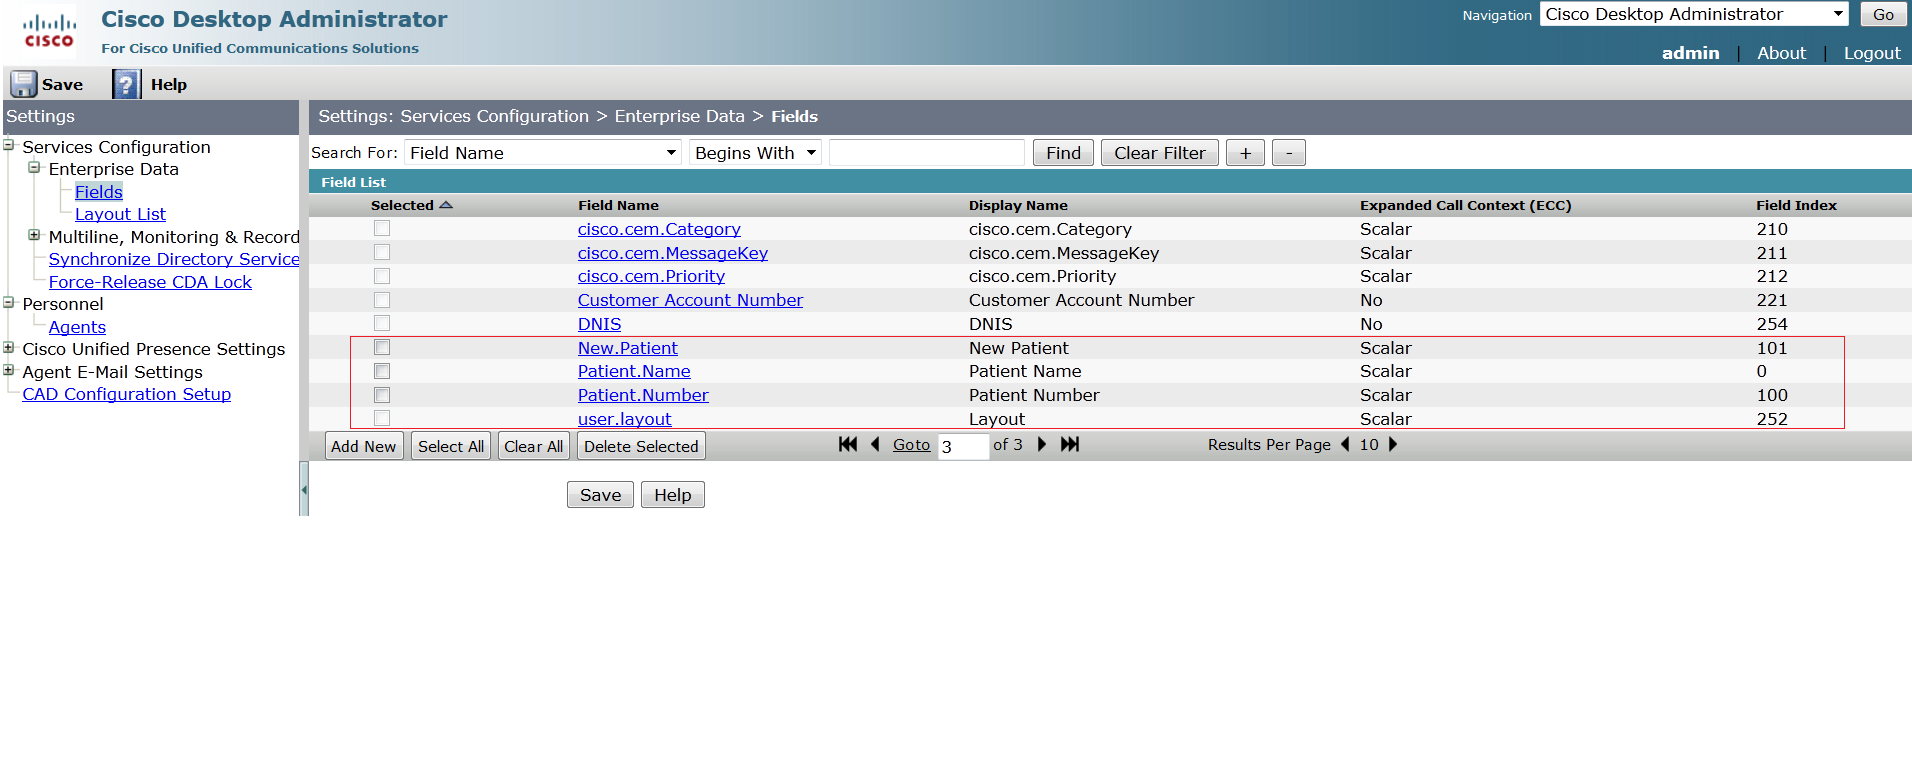
UCCX Desktop Administrator

Select the Layout List menu under Services Configuration -> Enterprise Data. Click Add New. The Layout Name must match the Value in the Expanded Call Variables under the Enterprise Call Info step. Now simply add (in order) the fields you would like to have displayed for Agents. I have selected ANI, Patient Name, Patient Number and New Patient. Click Save.
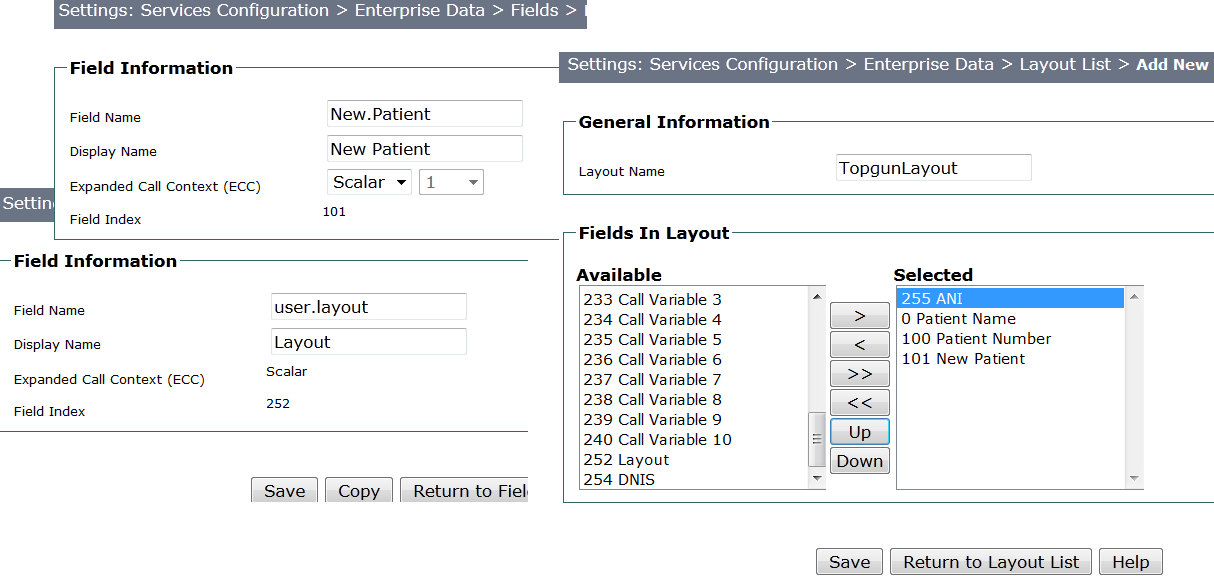
UCCX Layout List

So when an Agent answers a call that has passed through the Set Enterprise Call Info Step, they will have required fields displayed.

Mar 25

Phones not Registering with Cisco UC560 System

Existing registered phones all work fine. They can make and receive calls, speed dials work etc. However adding new phones or if an existing phone is reset, they do not register. The phone displays a spinning icon with the word ”Registering”. When you do a debug ephone register and debug tftp events, you only see the tftp debugs come through and no debug logs for ephone register.

This is caused by the SCCP listening socket being shutdown under the telephony-service menu. By default on the UC 560 and other versions of CME, the SCCP listening socket is enabled by default. However if shutdown, phones are unable to register, however existing registered phones maintain their operations.

Resolve the issue by entering the below commands. The confirm you start seeing debug messages for ephone register.

Commands

(config)#telephony-service
(config-telephony)#no shutdown

NOTE: This post also relates to all Cisco CME versions.

Mar 15

UCCX CUIC URL and Allow Users to View Historical Reports

URL for the UCCX CUIC Web Consoler is https://ip_address:8444/cuic. When initially logging in, use the UCCX Administrator credentials. Once logged in, navigate to the Security section and add selected users to pre-defined Groups in CUIC. Mostly it’s the Historical Reports section that we need to give users access too.

Security -> User Groups -> ReportingUsers Group then click Edit. Select the Group Members Tab, then highlight users and move across to the group.

Mar 10

Cisco SRV Records – Quick Reference

_cuplogin._tcp.example.com.au SRV 0 1 8443 cup.example.com.au (Presence Publisher/Subscriber)
_cisco-uds._tcp.example.com.au SRV 0 1 8443 cucm.example.com.au (Publisher/Subscriber)
_cisco-phone-tftp._tcp.example.com.au SRV 0 0 69 cucm.example.com.au (TFTP)
_cisco-phone-http._tcp.example.com.au SRV 0 0 80 cucm.example.com.au (CCMCMIP)
_sip._tcp.example.com.au SRV 0 0 5060 vcsc.example.com.au (VCS Control – Internal)
_sip._tcp.example.com.au SRV 0 0 5060 vcse.example.com.au (VCS Expressway – External)
_ciscowtp._tcp.example.com.au SRV 0 0 443 boot.ciscojabbervideo.com (Free Jabber Video)
_collab-edge._tls.example.com.au SRV 0 0 8443 expe.example.com.au (Expressway-E)

Mar 01

Installing the JDBC Driver for Cisco QFO AQM Server

Ensure you have installed Java JDK 1.5 or higher. Current version is 8.0.25. Install this JDK in the default directory. This then gives you access to install the Jar file below.

Navigate to the ibm.com website and search for Informix JDBC.3.70.JC8 Driver. Download this to you server. Extract the .tar file to the bin folder under the JDK install directory. This just makes is easier to install the jar file.
Open CMD and navigate to the SDK directory and run the following command to launch the Informix JDBC Driver setup wizard

“java -jar setup.jar”

This launches the install wizard for the JDBC Driver, follow the prompts and accept the defaults, this will install the JDBC driver under the C:\Program Files\ibm\Informix_JDBC_Driver\lib\ directory. Open the Quality Management Administrator and navigate to Cisco Unified CC Database page. Ensure the JDBC Driver path is C:\Program Files\ibm\Informix_JDBC_Driver\lib\ifxjdbc.jar.

Feb 21

Integrating Cisco Unity Connection with Office 365 – Simplified

Microsoft Office 365 is becoming more popular with many Businesses taking advantage of its simplicity to manage and strong emphasis on data protection. However there are many services that are still located local to the Business premise that needs to integrate/communicate with the Office 365 Servers. One of these services is Cisco Voicemail. The main Cisco Voicemail application is called Cisco Unity Connection (CUC). Within the CUC application is a feature called Unified Messaging Single Inbox. The feature synchronises voicemails between the Cisco Voice mailbox and in this case the MC Office 365 user email mailbox. While this feature is not new by any means, what is in its early days is the configuration between Cisco and Office 365. There are some excellent guides on Cisco.com regarding Single Inbox, at the same time not all the required documentation is in a single place. I’ve documented the process I followed while integrating Cisco CUC with MS Office 365.

1. Create an MS Office 365 admin user. This user does not require a license on the MS Office 365 service. IMPORTANT NOTE: Cisco CUC does not support AD Federation Services (ADFS). What this means: do not create the admin user in the Active Directory environment. You must create the admin user in MS Office 365 directly.

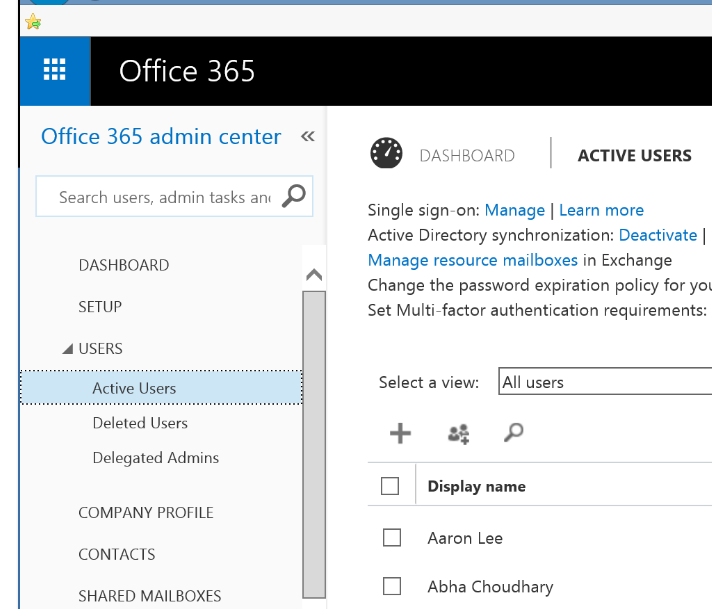
Browse to the MS Office 365 web admin page and login using your administrator credentials. Under the Office 365 Admin Centre, navigate to Users -> Active Users.

Microsoft Office 365 and Unity Connection

Click to create a new user and complete the required details. IMPORTANT NOTES: Uncheck the “Make this user change their password with Outlook Web App on next login”. Uncheck the license for this user. If you only have a single license plan, you will not be able to uncheck the license plan. Save the new user, then go back into the user account (edit) and then uncheck the license plan.

2. Assign Impersonation rights for the MS Office 365 user account.

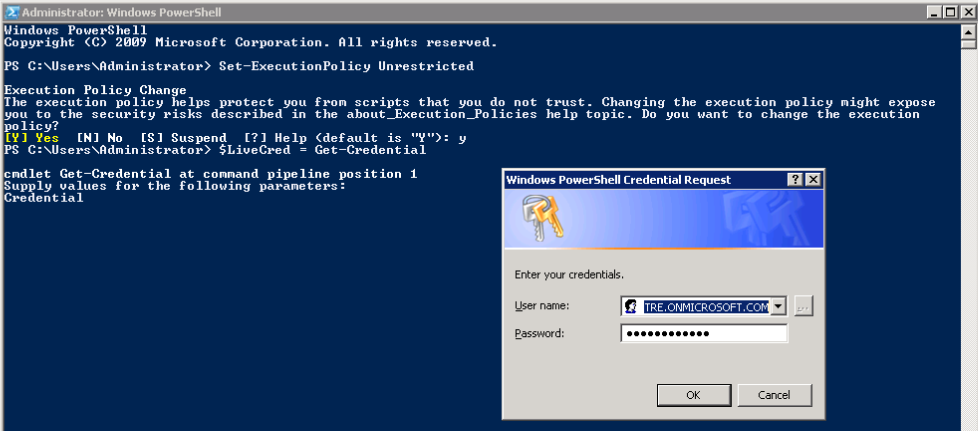
a) Run the Windows Powershell as Administrator.
b) Run the command “Set-ExecutionPolicy Unrestricted”
c) Run the command “$LiveCred = Get-Credential” then enter the Office 365 administrator credentials.
d) Create a session with Office 365. Run the command “$Session = New-PSSession -ConfigurationName Microsoft.Exchange -ConnectionUri https://ps.outlook.com/powershell/ -Credential $LiveCred -Authentication Basic –AllowRedirection”
e) Run the command ”Import-PSSession $Session”. This import the remote exchange shell commands into Powershell.
f) Assign impersonation role to the unity user created in step 1. Run this command “new-ManagementRoleAssignment -Name:Unity -Role:ApplicationImpersonation -User:useraccount@domain.onmicrosoft.com”

Microsoft Office 365 and Single Inbox

Microsoft Office 365 and Single Inbox

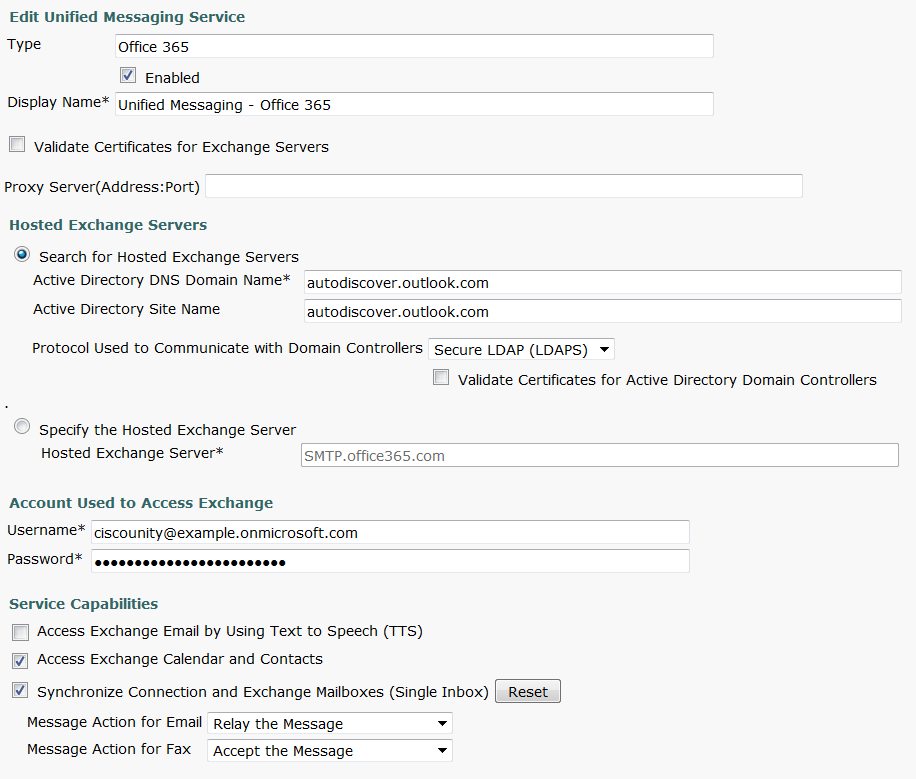
3. Cisco Unity Connection configuration tasks. Navigate to Unified Messaging -> Unified Messaging Services. Select Add New. I’ve attached a picture to explain the configuration. Key Notes to takeaway: Type is Office 365, Must select “Search for Hosted Exchange Servers” then enter “autodiscover.outlook.com” in both the DNS Domain and the Site Name fields. Must select Secure LDAP (LDAPS). The user account must include the full suffix, with the onmicrosoft.com.

Cisco Unity Connection and MS Office 365

Cisco Unity Connection and MS Office 365

4. Now all that’s left is to run tests and add a unity connection user to the unified messaging.