Feb 15

HTTPHostConnectException Error – Cisco WFO AQM

Error received when running the PostInstall.exe wizard.

Cisco WFO AQM

Check to see if MS IIS is installed on the save server. If IIS s installed, this will also be listening on the TCP port 443. Therefore this conflicts with the jetty service for QM.

We need to change IIS to listen on a different port for HTTPS connections. IIS allows you to change the port binding for HTTP, however IIS will only allow the HTTPS port binding to changed once you have installed an SSLCertificate.

Easiest way is to sign a certificate using an Internal CA, if you don’t have this, you’ll need to purchase a certificate. Run the certificate request wizard on the IIS Server. Once you have completed the certificate signing with the CA and installed the DER file back into IIS, navigate back to the binding section and create a new binding for HTTPS, select the certificate you just installed and change the port to something other than 443.

Restart IIS, then restart the Monitoring and Recording Jetty Service. All should be good now.

Go back and complete the PostInstall.exe wizard.

Feb 06

Collaboration Edge Deployment – Support for Multi-Domain

This article contains the process and information you need to configure Mobile Remote Access for Jabber and Cisco DX/MX/EX Series Endpoints. This does not include Jabber Guest at this time. As most organisations move towards a borderless network, collaboration technologies outside the workplace is becoming less of a feature and more a requirement. MRA assists organisations allowing collaboration to extend outside of the walls of the organisation while providing the same feature rich experience for users.

This article is based on the following UC platforms:

  • CUCM version 10.5.XX
  • CUC version 10.5.XX
  • IM & Presence version 10.5.XX
  • VCS Expressway version x8.2
  • VCS Control version x8.2
  • Cisco Jabber for Windows 10.5.XX

Preparation

Order your Licenses for MRA

Log onto the Cisco CCW Website and order the Expressway license. This is a zero cost order.

Know your network topology

Gather or create network topology documents and other tables documenting, how the DMZ is configured, or Internet edge zones, Domain Names, Hostnames to use, IP Addressing requirements etc.

Details to gather:

VCS Control

System Administration Details

System Name
System Name

IP Details

Configuration
Gateway
LAN 1
IP Address
Subnet Mask

DNS

DNS Settings
System Host Name
Domain Name
Default DNS Servers
Address 1
Address 2

NTP

NTP Servers
NTP Server 1
NTP Server 2
Timezone
Timezone

 VCS Expressway

System Administration Details

System Name
System Name

IP Details

Configuration
Gateway
LAN 1
IP Address
Subnet Mask

DNS

DNS Settings
System Host Name
Domain Name
Default DNS Servers
Address 1
Address 2

NTP

NTP Servers
NTP Server 1
NTP Server 2
Timezone
Timezone

IP Tel Cluster Devices

Hostname IP Address Description
CUCM Publisher
CUCM Subscriber
CUC Publisher
CUC Subscriber
IM & Presence Publisher
IM & Presence Subscriber

 Configuration

Create Public DNS Records

No we know where we are going to place the collab edge devices and sourced our IP Addresses with hostname etc we now need to start the configuration phase.

Create an A Record for your VCS Expressway device. Then create an SRV Record for the _collab-edge service.

_collab-edge._tls.domain.com.au

I’ve provided a template to use to send to your provider, complete the table and email.

Public DNS Modification – Domain: DomainName

 A Record

Record Name IP Address

 SRV Records

Domain Service Protocol Priority Weight Port Target Host
collab-edge tls 10 10 8443 A Record – Hostname from above table

Create Internal DNS Records

Create A Records for both your VCS Control and VCS Expressway devices. You should already have A Records configured for your all your IP Tel Servers. (CUCM, CUC, IM&P).

Create the following SRV Record for every domain name that will be used as a login for Jabber.

_cisco-uds._tcp.domainname.com.au

IMPORTANT: By now, every hostname and srv record should be resolvable. If not, go back through DNS configuration and correct.

Firewall Rules for MRA

 I’ve listed the firewall ports to open for the MRA solution. Referenced from the Unified Communications Mobile and Remote Access  via Cisco VSC – Deployment Guide x8.2

 VCS Control (Inside) to VCS Expressway (DMZ)

Purpose Protocol VCS Control (source) VCS Expressway (listening)
XMPP (IM and Presence) TCP Ephemeral port 7400
SSH (HTTP/S tunnels) TCP Ephemeral port 2222
Traversal zone SIP signaling TLS 25000 to 29999 7001
Traversal zone SIP media(for small/medium systems on X8.1 or later) UDP 36000 to 59999* 36000 (RTP), 36001 (RTCP) (defaults)2776 (RTP), 2777 (RTCP) (old defaults*)
Traversal zone SIP media(for large systems) UDP 36000 to 59999* 36000 to 36011 (6 pairs of RTP and RTCP ports for multiplexed media traversal)

VCS Expressway (DMZ) to Internet (Outside)

Purpose Protocol VCS Expressway (source) Internet endpoint (listening)
SIP media UDP 36002 to 59999 or36012 to 59999 >= 1024
SIP signaling TLS 25000 to 29999 >= 1024

Public Internet (Outside) to VCS Expressway (DMZ)

Purpose Protocol Internet endpoint (source) VCS Expressway (listening)
XMPP (IM and Presence) TCP >= 1024 5222
HTTP proxy (UDS) TCP >= 1024 8443
Media UDP >= 1024 36002 to 59999 or36012 to 59999*
SIP signaling TLS >= 1024 5061
HTTPS (administrative access) TCP >= 1024 443

VCS Control to CUCM / CUC

Purpose Protocol VCS Control (source) Unified CM (listening)
XMPP (IM and Presence) TCP Ephemeral port 7400 (IM and Presence)
HTTP proxy (UDS) TCP Ephemeral port 8443 (Unified CM)
HTTP proxy (SOAP) TCP Ephemeral port 8443 (IM and Presence Service)
HTTP (configuration file retrieval) TCP Ephemeral port 6970
CUC (voicemail) TCP Ephemeral port 443 (CUC)
Media UDP 36000 to 59999* >= 1024
SIP signaling TCP 25000 to 29999 5060
Secure SIP signaling TLS 25000 to 29999 5061

 Deploy VCS Control

Download and run the OVA template for VCS x8.2. Default username/password is admin/TANDBERG. This will shoot you straight in a wizard. Complete the wizard with details in the preparation section. When the wizard is complete, the device will reboot and you will now have HTTPS access to the GUI.

Log into the Web Interface and start to configure the necessary system information. I’ve outlined the details to either add or modify on the VCS Control.

*NOTE: Install the release keys and option keys for VCS Control before finalising configuration in the Web GUI. Some fields and options will only be available after the license keys are installed. You will need the serial number to enter in the Cisco Licensing Portal.

Parameter Location Notes
System Name System -> Administration Enter Fully Qualified Domain Name
H323 Mode Configuration -> Protocols -> H323 Disable
SIP Mode Configuration -> Protocols -> SIP Enable
Unified Communications Mode Configuration -> Unified Communications -> Configuration Select “Mobile and remote access”
Unified CM Servers Configuration -> Unified Communications -> Unified CM Servers Add New CM Server (Publisher). This will discover all Subscribers and add a Neighbour Zone into VCSc
IM and Presence Servers Configuration -> Unified Communications -> IM and Presence Servers Add New IM and Presence Server (Publisher). This will discover Subscribers.
Domain Configuration Configuration -> Domains Add New Domain. Need to add all domains that will be used with Jabber.Complete the below details.

Domain Name

SIP Registrations and provisioning on Unified CM : On

IM and Presence services on Unified CM : On

Calls to Unknown IP Addresses Configuration -> Dialplan -> Configuration Select “Indirect”
Traversal Zone Details Configuration -> Zones -> Zones Add Traversal Zone.Name: TraversalZone

Username: traversal

Password: ******

Port: 7001

Accept Proxied Registrations: Yes

Peer 1 Address: Enter the FQDN of the VCSe Gateway

Deploy VCS Expressway

Now its time to deploy the VCS Expressway. The initial deployment steps are alike to the VCS Control, use the same OVA Template and complete the wizard using the details collected in the preparation phase for the VCS Expressway.

Once the Wizard has finalised and the Expressway has rebooted, log into the Web GUI to start configuration. I’ve outlined the details to either add or modify on the VCS Control.

*NOTE: Install the release keys and option keys for VCS Expressway before finalising configuration in the Web GUI. Some fields and options will only be available after the license keys are installed. You will need the serial number to enter in the Cisco Licensing Portal.

Parameter Location Notes
System Name System -> Administration Enter Fully Qualified Domain Name
H323 Mode Configuration -> Protocols -> H323 Disable
SIP Mode Configuration -> Protocols -> SIP Enable
Unified Communications Mode Configuration -> Unified Communications -> Configuration Select “Mobile and remote access”
Calls to Unknown IP Addresses Configuration -> Dialplan -> Configuration Select “Indirect”
Traversal Zone Details Configuration -> Zones -> Zones Add Traversal Zone.Name: TraversalZone

Username: traversal

Password: ******

Port: 7001

TLS verify subject name: Enter the FQDN of the VCS Control Gateway.

Traversal Communications

Both the VCS Control and VCS Expressway configuration should now be complete. However the traversal zone will be throwing errors due to security invalid security certificates. From release X8.2 both the Control and Expressway need to validate security certificates to force secure communications. So, we need to either purchase external certificates or use an Internal CA to sign certificates.

First we need to generate a CSR from both the Control and Expressway. Navigate to Maintenance -> Security Certificates -> Server Certificates. Select Generate CSR. Enter the required details, ensure all domains are entered in the Unified CM registrations domains and the format is SRVName. Download the CSR file and give to your Security Admin to either enrol a certificate or purchase a third party certificate.

*NOTE: The common name must match the SRV Target Hostname in the Public DNS Zone. This has been identified as Bug ID CSCuo83458.

It is recommended a public certificate be generated for the VCS Expressway. This will eliminate the need to install the Install CA’s root certificate on all devices accessing Jabber remotely.

Upload the signed certificate once received. If you had the Internal CA sign the certificate request, you will need to upload the CA’s root certificate to each the Control and Expressway.

Reboot both Control and Expressway, the Traversal channel should now be active.

If you are using a MS CA, following the below link for a step by step to sign SAN certificates for Control and Expressway.

http://www.cisco.com/c/dam/en/us/td/docs/voice_ip_comm/expressway/config_guide/X8-1/Cisco-Expressway-Certificate-Creation-and-Use-Deployment-Guide-X8-1.pdf

Side Notes

I created an SRV Record for each domain the users will be logging into. However due to the above Bug ID mentioned, all the SRV Target Hostnames must point to a common A record, this A record must match the VCS Expressway System Name.

Use the System -> Logs to check for errors when logging into Jabber initially. Authentication errors can be caused by certificates, DNS mis-configuration.

HTTP Server Allow List under the Configuration -> Unified Communications -> Configuration then clicking on the hyperlink “Configure HTTP Server allow list”. This white list is where you enter any auxiliary servers for example photo database server also Unity Connection Servers so Jabber can access Voicemail.

That’s about it.

Feb 02

Cisco PCD Deployment Video

Jason Murray has recorded a great video on Cisco PCD. For anyone who is just starting read about PCD, this is a great tool to assist in multiple operational procedures. However PCD is mostly used for  CUCM migrations to 10.5. This tool makes it so much easier to migrate between CUCM versions. This video is based on 10.0 version, but same principles apply to 10.5.


Jan 28

Creating a Photo Repository for Collaboration Edge.

Install IIS on a selected Windows Server. Select the basic features, no need to change the defaults.
Open the IIS Management Window. Navigate to the Default Website. If this is an existing IIS Server, Right-click the Default Website and select “Add New Website”. Assign the new website a name, default path and unique port to use. More than likely the default website will already be port 80, so choose a different port.

Add your photos to the default path you selected above. The filename for the each photo must be in the following format: username.jpg

Modify the jabber-config.xml file and add the following lines:

<PhotoUriSubstitutionEnabled>true</PhotoUriSubstitutionEnabled>
<UdsPhotoUriWithToken>http://192.168.0.100:9080/%%uid%%.jpg</UdsPhotoUriWithToken>

Upload the jabber-config.xml to the all CUCM Servers. Restart the TFTP Service.

Browse to the VCS Control. Navigate to Configuration -> Unified Communications -> Configuration page. Under Advanced, select the hyperlink “Configure HTTP Server Allow List”. Select New to add the photo repository server to the Whitelist. Complete the IP Address and Description details and select create entry.

The Jabber client will now have access to the photo repository server from both inside and outside the corporate network.

Jan 11

Recording Voice Prompts using UCCX 10

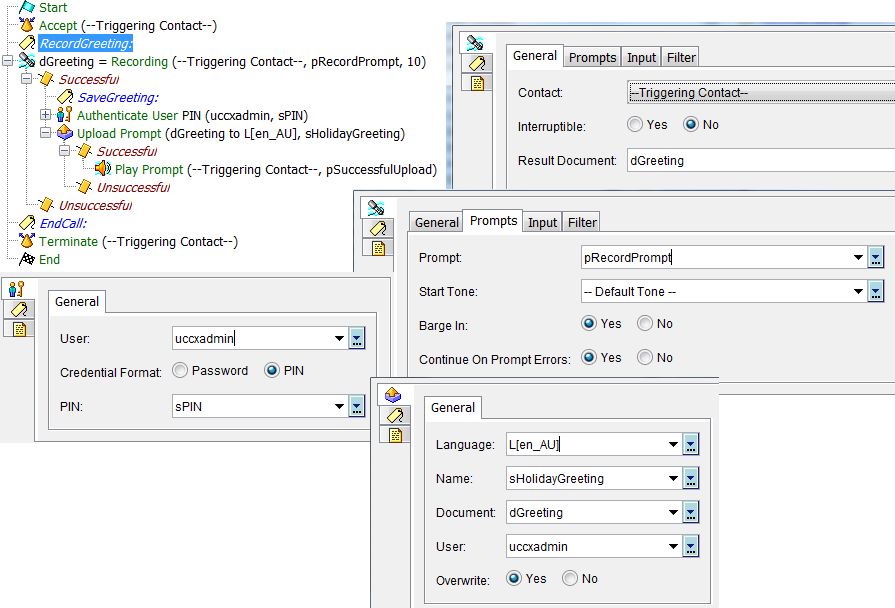
To record and save prompts for either downloading or to assign to UCCX Applications we need to create the following variables.

Prompt = pRecordPrompt

Document = dGreeting

User = uccxadmin

String = sPIN

String – sHolidayGreeting

I will go ahead and create short recording script to demonstrate how to record a holiday greeting. In UCCX 10.0 we also need to authenticate with the UCCX Server in order to upload the prompt to the prompt repository.

So lets start with a new script, and drag in the Recording Step. The resulting document will reference dGreeting and the prompt name will reference pRecordPrompt. The dGreeting will be the actual user recording file and the pRecordGreeting is essentially the Menu advising the user to record after the tone.

Once a recording has been completed, we need to authenticate with UCCX. This is done with the Authenticate User Step. Set the User to uccxadmin variable and the PIN to the sPIN variable. These variables have been configured with a uccx user account.

We then move into the Upload Document Step. We need to upload the document into the Language Document repository; otherwise the application may not be able to see the prompt to play. In my case I use AU Language. Set Language to L[en_AU], Name to sHolidayGreeting, Document to dGreeting and User to uccxadmin.

This will successfully upload the new voice recording to the AU Document repository.

UCCX Recording

Dec 29

Unity Connection Number Conversion – Integration with LDAP

In Unity Connection, we have the option to manipulate telephone numbers from the LDAP Directory for users. Typically we would map the LDAP attribute telephone to the Unity Extension field. However since in CUCM the DNs are configured as extension and not the full e164 number format, therefore the user and mailbox DNs/Extension do not match between CUCM and CUC.

This is where Unity Connection number conversion is helpful. This allows us to manipulate the telephone field from LDAP into an extension number. The conversion is based on a regular expression. I’ve listed the below regex examples from the Cisco Unity Connection Guide.

When the user is imported in Unity Connection a new field Telephone is created along the existing extension field.  The telephone field stores the e164 number and the extension stores the resulting regex number.

Example:

REGEX =        .*(\d{4})

E164    =        +61288793845

Extension =  3845

Unity Connection Number Conversion

Dec 16

CUCM and IM&P Integration with SRV Records

For us Cisco techs, one of the more often than not nowadays is that have to deal with the MS world of DNS (AND Certifciate Architecture… I’ll talk about this in later articles). I’ve had a fair bit of experience with DNS in the past, so I thought I would just share a little about integrating CUCM with IM & Presence using SRV records both ways to support CUCM Clusters and IM & Presence Clusters for high availability.

DNS Configuration

Create A (Host) Records

CUCM DNS A Records

Type Hostname IP Address
A cucm01.uplinks.com.au 192.168.0.20
A cucm02.uplinks.com.au 192.168.0.21

IM&P DNS A Records

Type Hostname IP Address
A imp01.uplinks.com.au 192.168.0.30
A imp02.uplinks.com.au 192.168.0.31

Create SRV Records

IM&P Cluster Name: imp.uplinks.com.au

Type Identifer Protocol Weight Priority Host
SRV _sip _tcp 10 10 imp01.uplinks.com.au
SRV _sip _tcp 10 10 imp02.uplinks.com.au

CUCM Cluster Name: cucm.uplinks.com.au

Type Identifer Protocol Weight Priority Host
SRV _sip _udp 10 10 cucm01.uplinks.com.au

Verify Records via NSLOOKUP

>  set q-all
>  _sip._tcp.imp.uplinks.com.au
>  _sip._udp.cucm.uplinks.com.au

The above should output the following results.

-        The SRV Records and their target hosts
-        An A record for every target host identified in the SRV record.

CUCM Configuration

SIP Trunk

  1. Navigate to Device, then select Trunks
  2. Select Add New
  3. Select SIP Trunk for Trunk Type
  4. Select Next
  5. Complete the details of the SIP Trunk as per normal.
  6. Under SIP Information, check the box  Destination Address is SRV

Note: When the checkbox is ticked, CUCM changes the outbound SIP protocol from udp to tcp.

  1. Type the IM&Presence Cluster Name. (imp.uplinks.com.au)
  2. Select Save and then reset the Trunk.

Configure SIP Publish Trunk

  1. Navigate to the Service Parameters, then Cisco CallManager.
  2. Find “IM & Presence Publish Trunk”
  3. Drop the arrow down and select the above SIP Trunk.

 IM & Presence Configuration

SRV Cluster Name

  1. Navigate to Service Parameters, then Cisco SIP Proxy.
  2. Find “SRV Cluster Name”
  3. Type the IM&Presence cluster name (imp.uplinks.com.au)
  4. Select Save

Presence Gateway

  1. Navigate to Presence, then Gateways.
  2. Select Add New
  3. Select CUCM for Presence Gateway Type.
  4. Type a Descriptive note.
  5. Type the SRV Record for the CUCM Cluster Name.

Note: Do not strip the SRV Identifier or Protocol. Example input would be _sip._udp.cucm.uplinks.com.au

Dec 09

Email Voice Recordings in UCCX 10.0 Script

This seems to be a growing requirement/need for Contact Centres, so I’ll spend some time discussing how to configure a UCCX Script to record and send voice message via smtp.

Here is my scenario.

Customer does not want to receive Emails if the Voice payload is null or less than 10 seconds. When the caller hangs up or disconnects after leaving the voice message the script should continue to process the email as per normal. If the payload is null or less than 10 seconds, an email is to be sent without an attachment with the Subject stating a Missed Call.

Software in use is Cisco Contact Centre Express 10.0.1

First component is to setup the voice recording step in the UCCX Script. You’ll need to record a prompt to play to the caller asking them to leave a voice message. Please read my other blogs regarding how to record prompts using UCCX 10.0 or Unity Connection 10.5. You will also need to declare a variable of document type.

Variables

Prompt = pVoicemail

Document = dVoicemail

Make sure you adjust the duration in the recording step, otherwise the callers may be cut off while recording their voice message.

The next component is to check the payload length of the voice message. This is so we can determine if the voice message has enough content to actually be useful. We need to declare and set a couple of variables of type String.

Variables

String = sVoiceMessageLength

String = sContentLength

After declaring the above string variables, we need to configure the following Set steps.

  1. Set sVoiceMessageLength = dVoicemail
  2. Set sContentLength = (sVoiceMessageLength).length()

The variable sContentLength now holds the total payload length in bits.

Now we can run the following IF Step to fork the script.

If (sContentLength > “15000”

1500 bits is approx. 6-7 Seconds of Voice payload. But you can tweak this figure to work out what best suits your environment.

The next component will be discussing is the True path from the IF Step. So this is where the voice payload is greater than 15000 bits. So we will proceed to attach the voicemail to an email. We will proceed to create a couple more variables to allow us to form and send an email from the uccx script.

Variables

Contact = EmailContact 

String = sEmailAddress

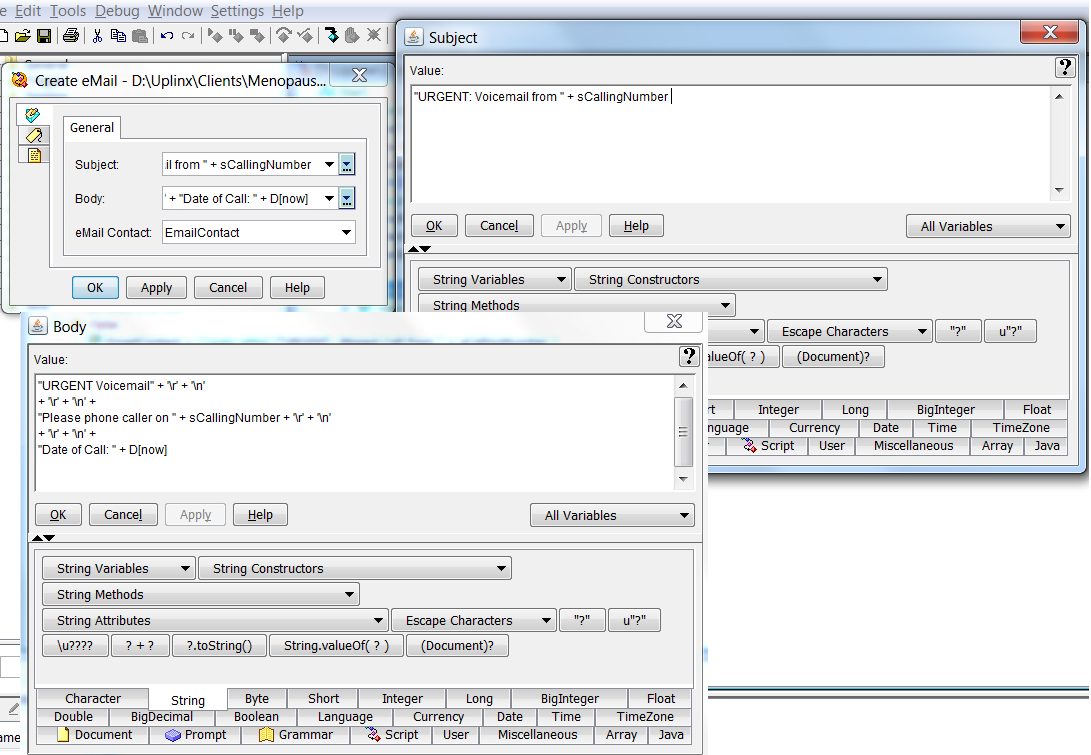
First step is to Create the Email, this includes the Subject and Body Content for the email. Open the expressions editor for the Create Email Step and enter in your Subject. Example:

“URGENT: Voicemail from ” + sCallingNumber.

Now repeat for the Body of the email. Example:

“URGENT Voicemail” + ‘\r’ + ‘\n’

+ ‘\r’ + ‘\n’ +

“Please phone caller on ” + sCallingNumber + ‘\r’ + ‘\n’

+ ‘\r’ + ‘\n’ +

“Date of Call: ” + D[now]

UCCX Expressions Editor

Next Step is to attach the voice message to the email created above. This is done with the Step called Attach To Email Step. Select EmailContact variable, then add the attachment. In my example I’m using sVoiceMessage as the name of the attachment and the actual file is dVoicemail.

Finally we can configure the Send Email Step. Again select the contact variable EmailContact and then the string variable sEmailAddress for the To: field.

This will effectively fire off an email!

Going back to the above IF Step, and now following the False Path (the voice payload is less than 15000 bits). We want to send an email without the attachment, and state that we have received a Missed Call only.

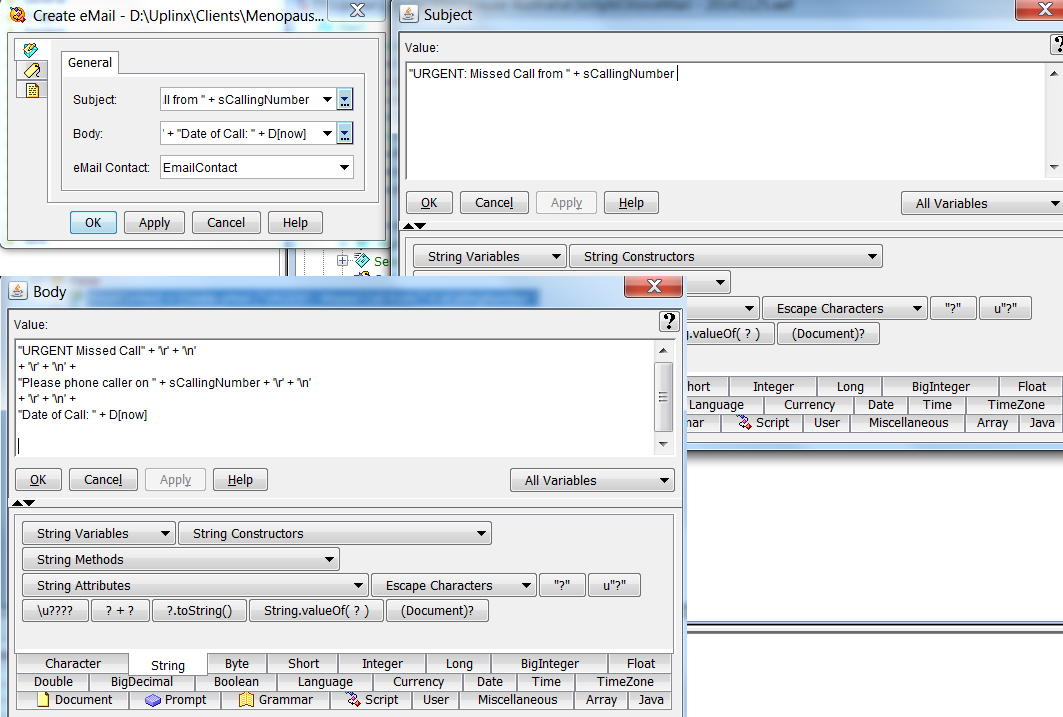
Seeing that we have already created the Contact (EmailContact) and String (sEmailAddress) variables in previous steps we can skip it here. Firstly Configure the Create Email Step and define the subject and body content. Just like the previous steps, go to the expressions editor and enter your require data. Exmaple:

“URGENT: Missed Call from ” + sCallingNumber

Repeat for the Body Content. Example:

“URGENT Missed Call” + ‘\r’ + ‘\n’

+ ‘\r’ + ‘\n’ +

“Please phone caller on ” + sCallingNumber + ‘\r’ + ‘\n’

+ ‘\r’ + ‘\n’ +

“Date of Call: ” + D[now]

UCCX Expressions Editor

We now go straight to the Send Email Step. Select the contact variable EmailContact and then the string variable sEmailAddress for the To: field.

Email will now be sent.

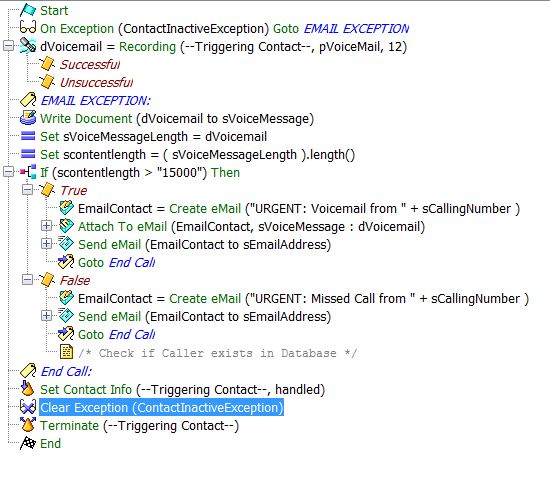
Now there is one important step I have not mentioned as yet and was seeing how I would integrate into the discussion. It’s the On Exception Step. What this basically allows us to do is action a set of predefined steps if the caller disconnects (hangs up) the call. As it is only natural for humans to immediately disconnect a call after recording a voice message.

We need to define a label and place it after the Voice Recording step. This label will effectively be our starting point for the set a defined steps if the caller disconnects the call. Let call this Lable “EMAIL EXCEPTION”.

Before we even allow the caller to record their voice message we need to trigger the On Exception Step and select “com.cisco.contact.ContactInactiveException”. Also select the above label “EMAIL EXCEPTION”.  When this step is triggered, the script will not allow the script to just end if the caller disconnects. This is great news as we want the system to continue to email us the voice message etc.

It’s important that we also clear the exception once we have completed our predefined steps otherwise the script will be left in an open state. The Clear Exception Step does just this. Select “com.cisco.contact.ContactInactiveException”.

Now we have a script that will continue to email the the voice message even after the caller disconnects the call.

Summary of my example script for your reference.

UCCX Script - Voice Recording

Oct 21

Installing the Correct Database Driver for SQL 2008 UCCX 10

1. Browse to Sourgeforge.net (http://sourceforge.net/projects/jtds/files/jtds/1.2.7/) Download the jTDS 1.2.7 version.

2. Extract the jTDS1.2.7.zip file on your PC.

3. Browse to UCCX Admin -> Subsytems -> Database -> Drivers

4. Add New.

5. Browse to the extracted folder and select the .jar driver file.

6. Drop the Driver Class Name menu down and select “net.sourceforge.jtds.jdbc.Driver”

database1

7. Click Upload.

Sep 30

Calling Party Number for Mobile Connect (SNR) on Internal Phones

Had a request from a customer to see about removing a prefix from the calling party number when a known Mobile (Remote Destination) calls an office extension phone. The prefix was interfering with call-back and visual display in Missed Calls. So the scenario was mobile 0420999xxx would call into the Office, this mobile is configured as a Remote Destination, therefore the system matches it with the internal extension (ext. 4000). The call proceeds to ring an internal extension, however the calling party display number is 04000. Zero is the access code for PSTN Calls.

I found the MGCP Gateway (this also relates to SIP and H323 gateways in CUCM) was directing the call to a translation pattern. This translation pattern was prefixing a ‘0’ to the calling party number. So even though the system matched the remote destination number to an extension the translation pattern still proceeded to prefix a ‘0’. This is because the transformation of the remote destination number to the associated extension is actioned at the gateway level when the call first arrives. But the Translation pattern prefixes a ‘0’ to all calls to extensions from the Gateway including calls from the transformed remote destination.

How to Resolve

There a few options to work around this issue. I was working with an MGCP Gateway, so I will opt to change add a prefix ‘0’ at the Gateway configuration page. There are four rows containing call types. International, National, Subscriber and Unknown. These types cover all possible calling party types. Under the Prefix Digit column, I will enter a ‘0’ into all the rows. I will also ensure the Use Device Pool checkbox is unchecked for each call type.

Then open the translation pattern and remove the Calling Party Prefix digit of ‘0’.

Make a test call and the calling number should only display the extension. Plus all other calls from the PSTN should maintain the ‘0’ prefix.