Aug 15

Troubleshooting CMS Webrtc Connections – Incorrect Username/Password

cms-webrtc-tshoot1

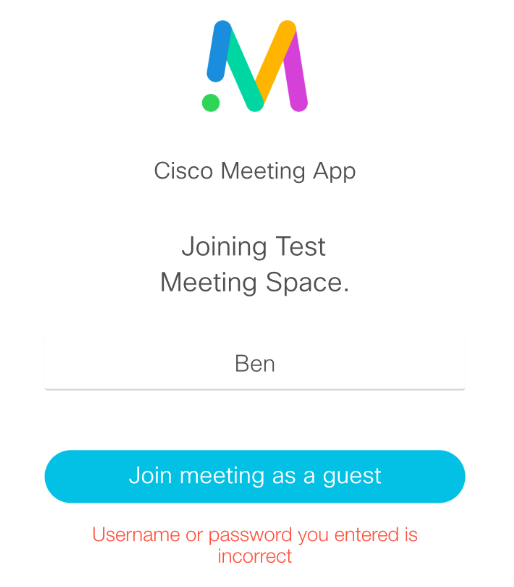
You receive this error when you attempt to log into your personal space via the “Sign in” button and also when you attempt to join a meeting as a Guest.

The XMPP Server is guy who will authentication users, whether they be local domain users or guest users.

With Guest users. The web bridge sends the call bridge instructions to create a temp guest user account, the call bridge creates this account, then send the web bridge the username/password details.. The Web bridge, then will contact the XMPP Cluster to verify authentication for the newly created guest user.. As you can see below capturing packets on the EDGE device.. The port TCP 5222 is being blocked toward the XMPP Cluster.

Cisco Document references the below ports only.

cms-webrtc-tshoot2

cms-webrtc-tshoot3

cms-webrtc-tshoot4

Aug 10

Cisco Expressway – CPL Reference to Block Toll Fraud

Quick reference for CPL rules to close all potential toll fraud calls. (Australia)

Single Domain reference below. For multi-domain environments, will just need to duplicate for each. Be careful of the order.

Please reference the image below, but essentially we allowing:

- Ben.morgan@domain.com.au
- ben@domain.com.au
- ben1@domain.com.au
- Ben.morgan1@domain.com.au
- 3 digit extension@domain.com.au
- Full 10 digit number@domain.com.au
- E164 number@domain.com.au

Block everything else.

expressway-cpl

If anyone has additional expressions to add in case I missed one.. Please add a comment.

Jul 30

2N GSM Gateway Voice Blue Configuration

As I get a few requests to setup GSM gateways for backup purposes and for mobile to mobile calling.. I always find that I have to sift through doco and click on boxes and to navigate the GSM configuration portal. I thought I would share a quick run down of a basic set of configuration for outbound and inbound calling.

Scenario to configure..
1. Use 2N GSM Gateway for backup purposes only.
2. Outbound calls to use all 4 SIMs and have called ID enabled.
3. Inbound Calls to be directed to the Reception, and also have all 4 SIMs available to use.

So we’ll start from the very beginning.. Crack open the GSM gateway and plug it into your LAN.. I normally direct connect it to my laptop initially. The default IP Address is 192.168.1.2/24.

Log into the gateway with the username: Admin and password is 2n.

There isnt too much to configure here.. Its just knowing where to go to get the gateway up and running.

Lets head to the Gateway Configuration Menu (Left), then select Voip Parameters. Here we will want to enter the IP Address of your CUCM Servers. I have entered for both fields IP->GSM and GSM->IP as I have the requirement to setup both outbound and inbound calling.

I also selected English for the VOIP Ring Tone.
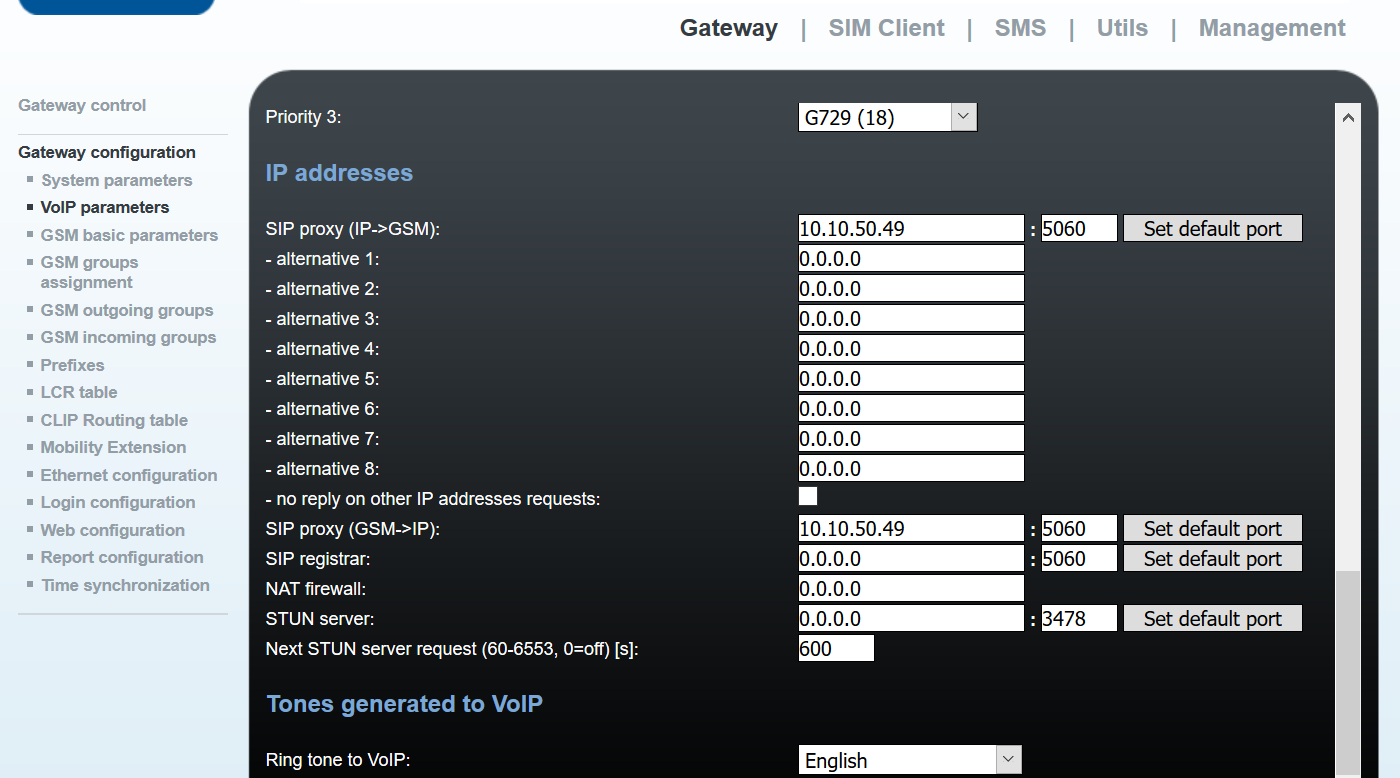
2n-1

Next is to ensure the Ring Tones are set correctly.. Default is set to European.. So that sound a lot different us Aussies. I set this to English for both Dial tone and Ring tone.
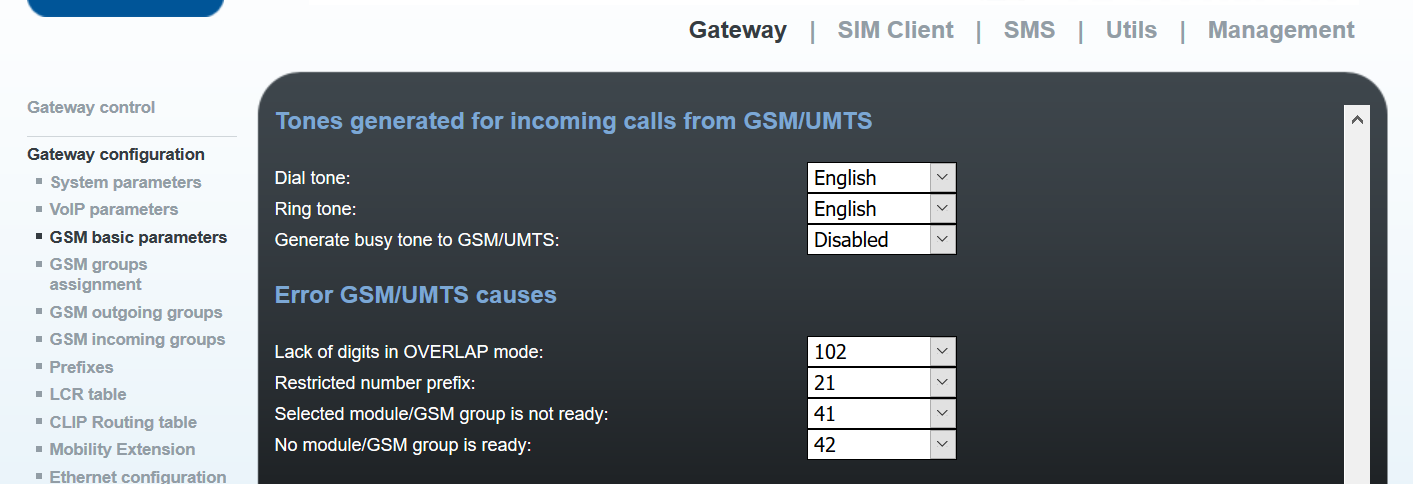
2n-2

Onto the GSM Groups Assignment. By default all SIMs are placed into Group 1. I will leave this for my scenario.. However, you can dedicate SIMs for either outbound or inbound calling.

2n-3

Lets jump down to Prefixes. Simply put, Prefixes allow for normalisation of called numbers. This is exactly what I need to do, as the GSM Gateway will receive Called Numbers from CUCM with a Zero (0) prefixed.. We need to remove the Zero before we dial out to the Telco network. The below image depicts just that. I’m removing the Zero and replacing with ‘nothing’ essentially.
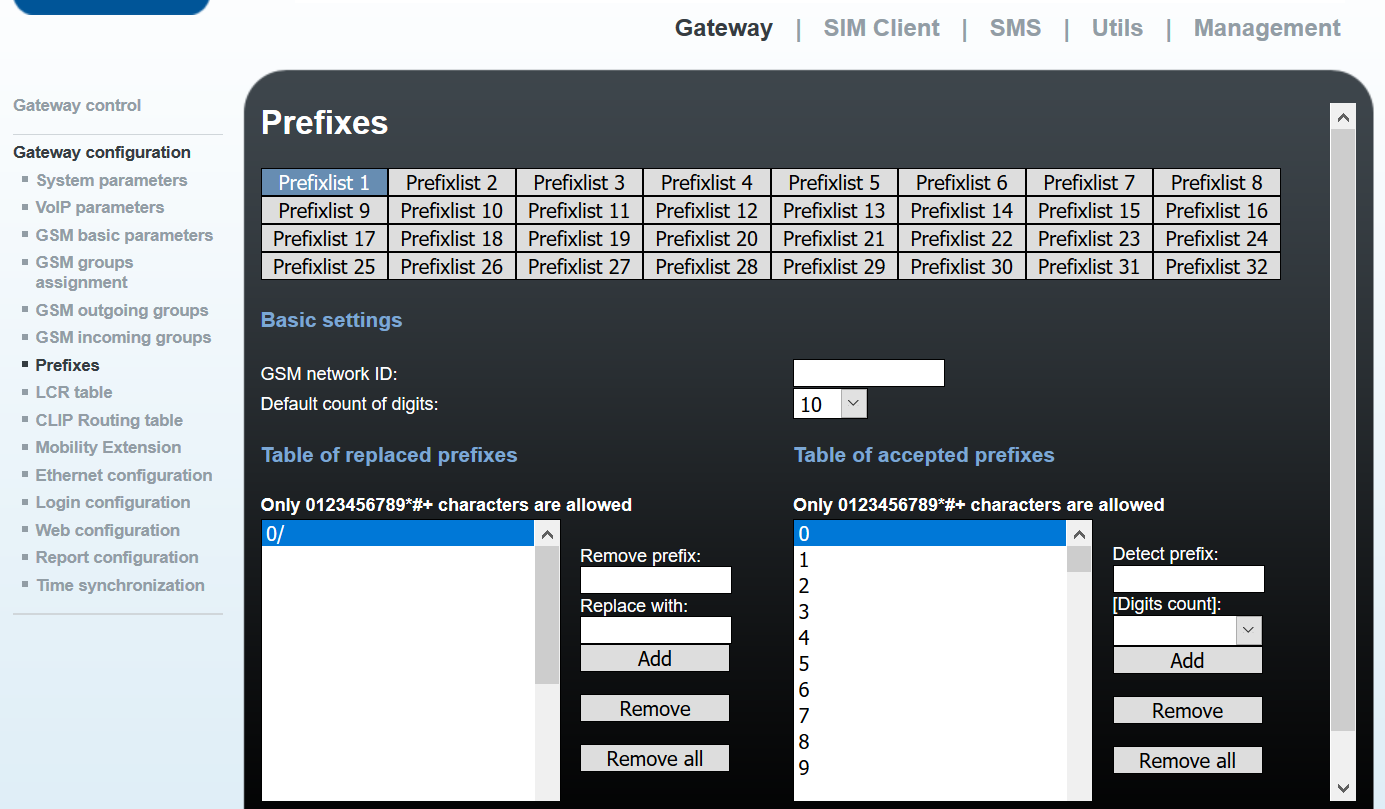
2n-4

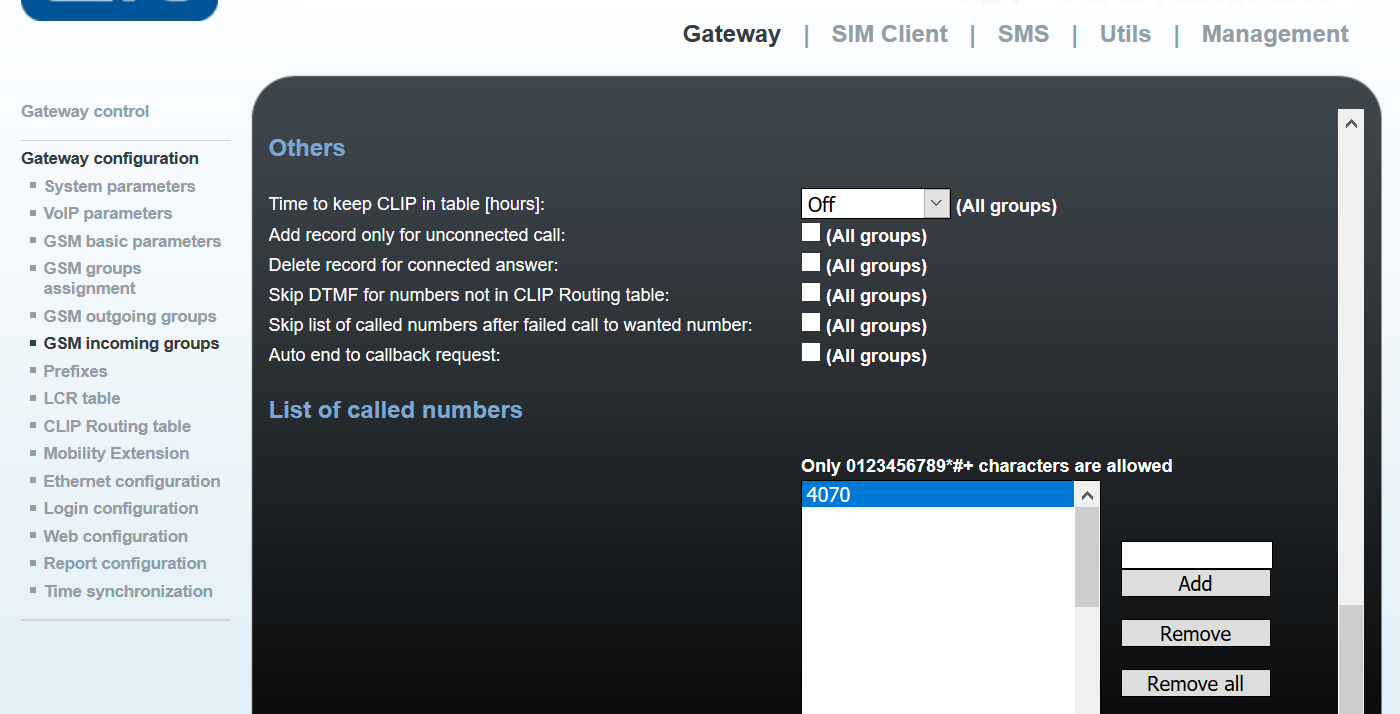
Ok, lets move onto GSM incoming groups. This is where we can configure some inbound functions. In my scenario, I need to direct all calls to the Reception Phone. Firstly, I need to drop down the ‘Mode’ box and select “Accept incoming call + dialtone”. The 2N GSM Gateway by default will reject all calls from the GSM network.

Next, I modify the DTMF dialling timeout field. Default is 10 seconds.. I change tis to 0 seconds. This will not wait for any dtmf digits to be pressed and forward the call onto the List of Called Numbers. (below image). Now this takes us to the List of Called Numbers, essentially all inbound calls in this group will call in a sequential order any number in the list. Just make sure this number exists in CUCM.
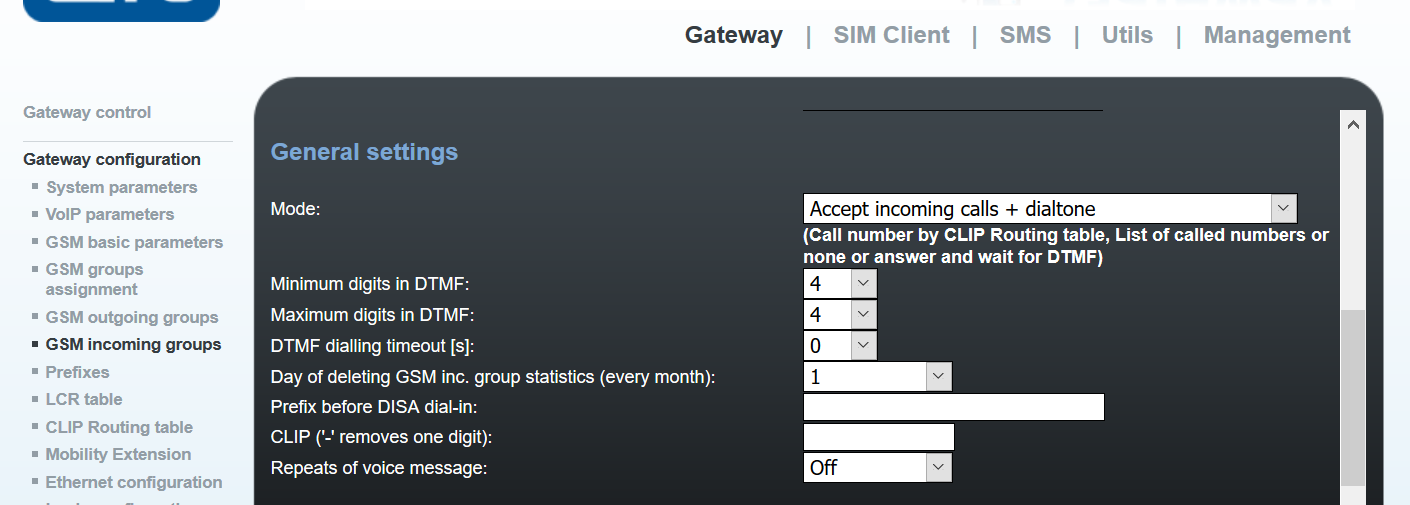
2n-5

2n-6

Now of course, I always recommend changing the default password.. I’ll let you figure that one out.

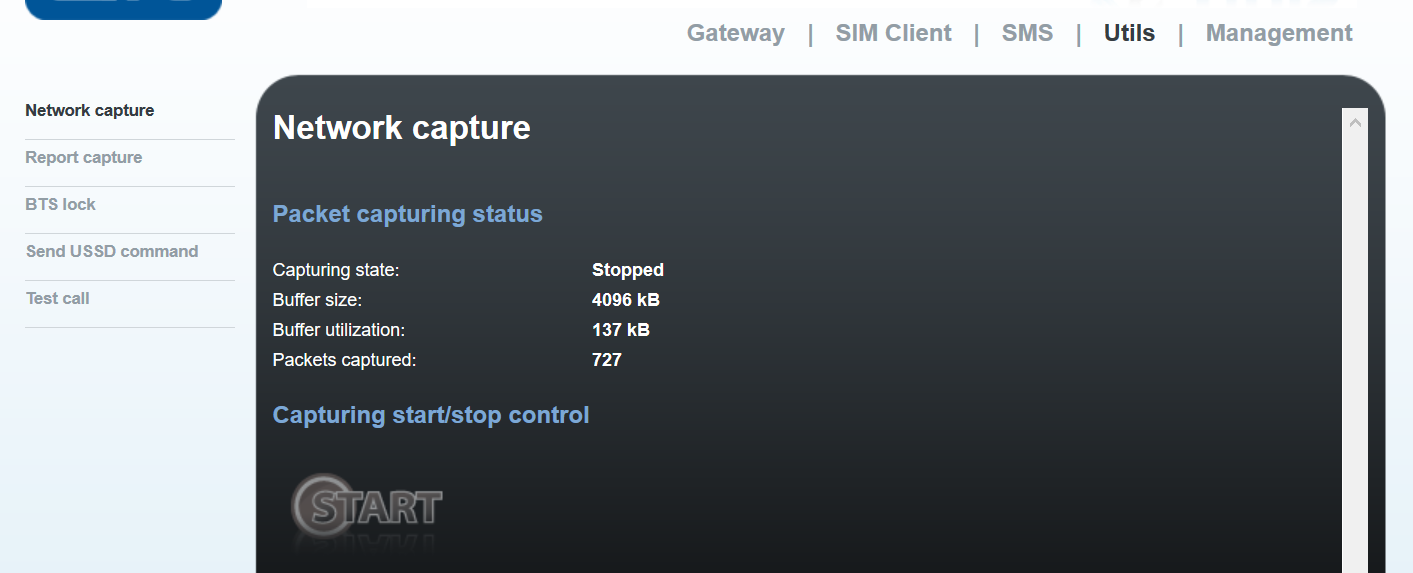
That’s it for the GSM Gateway side of the story.. I leave with a couple if useful features on the GSM Gateway.. Its packet capturing and making test calls both toward the GSM and CUCM. Self explanatory so if you get stuck, these two tool will definitely come in handy.
2n-7

Now onto the Cisco CUCM Side.

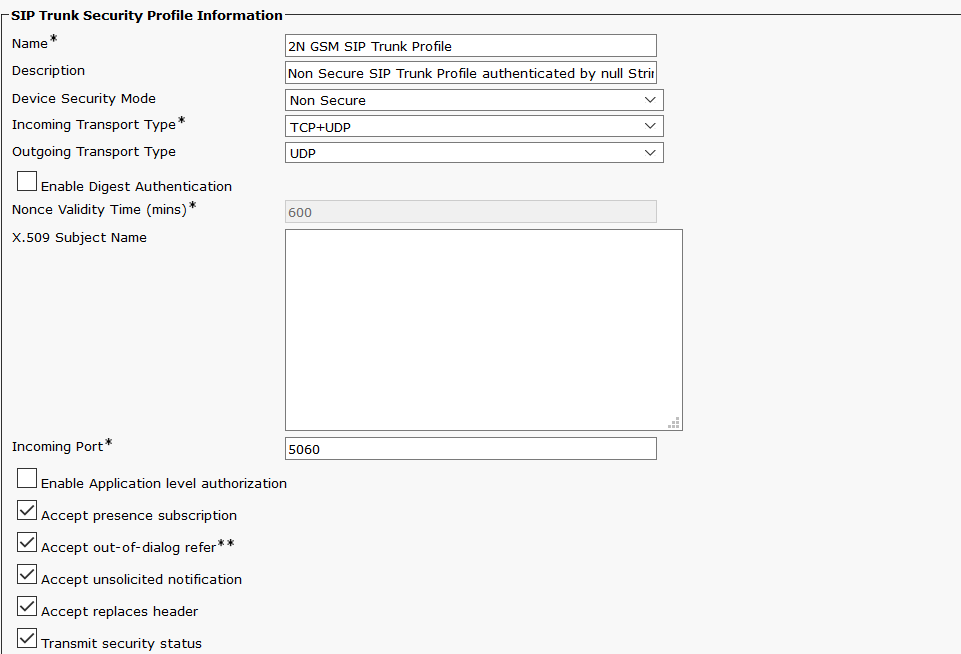
Start by creating a new SIP Trunk Security Profile. You can just copy the standard non secure security profile. Ensure the Outgoing Protocol is UDP. Also see below for the checkbox enablement.
2n-8

Next, lets create a SIP Trunk. Nothing fancy here. Just make sure you have the required fields configured along the below fields.

- Calling Search Space
- Destination Address
- Sip Profile
- SIP Trunk Security Profile

Create a Route Group and add the new created SIP Trunk. You can also edit an existing Route Group if you wish.

We then need to create a Route List, we add the Route Group we create in the previous step the this Route List. Forget this step if you have simply added the SIP Trunk to an existing Route Group.

Create a route pattern and select the Route List above.

Remember to Reset the Trunk!

Now make some test calls..
Jul 04

Create a Lecture Mode Space – Cisco CMS

Essentially we are creating a single meeting space with multiple access methods. ie the Speaker/Presenter will connect to the meeting space via a separate access method to a student or participant. It is through this means, we can apply or attach policies in the form of Call Leg Profiles, so when a student joins the meeting space we can have policy enforcing Mute Only for example.

Below it the process to creating a Lecture Only Room

Create the Call Leg Profiles

These profiles will determine what type of features or access the participants will have when they connect into a conference.

Presenter Call Leg Profile

POST /api/v1/calllegprofiles

Body

needsActivation = false
Name = Presenter
defaultLayout = allEqual

Guest – Muted Call Leg Profile

POST /api/v1/calllegprofiles

Body

needsActivation = true
Name = Guest – Muted
defaultLayout = speakerOnly
rxAudioMute = true
rxVideoMute = true
deactivationMode = deactivate

We need to retrieve both Call Leg Profile ID’s for use later.

GET /api/v1/calllegprofiles

Create the Meeting Space.

Now we create a space, name the space something meaningful and friendly to read.

POST /api/v1/cospaces

Body

Name = Class Meeting Space

Retrieve the Meeting Space ID

GET /api/v1/cospaces

Create the Access Methods

Once the space has been created, we will create two access methods (one for the Speaker or presenter and one for the students). We will attach the above created call leg profiles to their respective Access Method.

Access methods are appended to the cospace API string. Example.

https://cms_server.example.com.au:445/api/v1/cospaces/866aadfd-6ff4-43ca-ae0d-3aab6711c598/accessmethods

POST /api/v1/cospaces/cospace_ID/accessmethods

Included below is a Call ID, however you can also specify a SIP URI to call directly into this space, can also add passcode (PIN) to access to the meeting

Presenter Access Method

Body

callId = 1234
callLegProfile = 9a491602-851a-46c4-a2c9-9f144c1a53e9 (Presenter Call Leg Profile ID)

Guest – Muted Access Method

Body

Uri = guest.mute
callId = 5678
Passcode = 11111
callLegProfile = ed5834e4-c2fc-43b1-a703-2394b8e4d200 (Guest Call Leg Profile ID)

Now when a participant connects to the Meeting Space via the Call ID 1234, they will join the meeting without activation and be permitted to send/receive video/audio. However, if a participant connects to the Meeting Space using the Call ID 5678 (or the URI guest.mute@example.com.au), they will sit in the ‘Lobby’ until the presenter joins the meeting. When the participant does join into the meeting, their system will be muted for both video and audio. In addition, their screen will only ever show the active speaker.

Mar 15

Packet Capture on Cisco IOS-XE

Quick configuration snippet for capturing packets on an IOS-XE based Device. You can find the full Cisco article on this link.

  1. Define the location where the capture will occur:monitor capture CAP interface GigabitEthernet0/0/1 both
  1. Associate a filter. The filter may be specified inline, or an ACL or class-map can be referenced:monitor capture CAP match ipv4 protocol tcp any any
  2. Start the capture:monitor capture CAP start
  3. The capture is now active. Allow it to collect the necessary data.
  4. Stop the capture:monitor capture CAP stop
  1. Examine the capture in a summary view:show monitor capture CAP buffer brief
  1. Examine the capture in a detailed view:show monitor capture CAP buffer detailed
  1. In addition, export the capture in PCAP format for further analysis:monitor capture CAP export ftp://192.168.0.1/CAP.pcap
  1. Once the necessary data has been collected, remove the capture:no monitor capture CAP
Feb 25

WFO QM Not Syncing with CCX

A quick little blurb regarding WFO QM and CCX DB Connection.. I’ve setup QM a number of times now.. But I know the below is a little gotcha for newbies.. and speaking from experience this can be very frustrating!

Problem is when attempting to connect the QM Server to the CCX DB. No error is displayed in the Post Install setup.. However, you do not see any CCX info such as Agents when configuring the via the Admin Portal. When attempting to run a manual sync via the Admin Portal, it errors out.

The Sync Log show the below error:

ERROR SYNC2000 Failed to connect to side A of an ACD connection. Will try side B

Resolution is to replace the hyphens with underscores in the server name. This piece of information can be found in the install guide for QM.. Obviously my eyes perused over this key piece of information!

Feb 20

ATA190 Faxing to PSTN via ISDN and CUCM SIP Trunk

I’ve been deploying a lot of CUBE environments of late with faxing working from the T.38 protocol. I did want to jot something down regarding faxing to the PSTN via ISDN using an ATA190 registered to CUCM (doesn’t really matter what version) and connected the Voice gateway via a SIP Trunk.

I’m based in Australia and the fax settings I’ve found to be most successful as follows.

ATA190 Device Configuration page in CUCM

  •  Ring Voltage = 70V
  • Ring Frequency = 25Hz
  • Fax Mode = NSE Fax Pass-through g711alaw

 Voice Gateway (Cisco IOS)

Under the Voice Service Voip Menu.

  • modem passthrough nse codec g711alaw

CUCM SIP Trunk configured as per normal, no special configuration. I have aLaw configured, I found  uLaw (which is also acceptable in Australia) was working for outbound faxing but not for inbound faxing, however I have had some case where the opposite is true.

Just a matter of making logical/strategic changes to the faxing configuration to ensure both directions are operating correctly.

Feb 06

Cisco Jabber Last Logged in Report

To find out the last logged in times for Jabbers in CUCM required the below shell command. I found the command on the Cisco Support Forum.. I have added the reference link to the bottom of this blog. I though I would extend the the process of getting the info out of CUCM and into a spreadsheet to make some sense of the data.

SSH to the CUCM Publisher Server and execute the below SQL command.

run sql select e.userid, cd.timelastaccessed from enduser as e, credentialdynamic as cd, credential as cr where e.pkid=cr.fkenduser and e.tkuserprofile=1 and e.primarynodeid is not null and cr.tkcredential=3 and cr.pkid=cd.fkcredential order by cd.timelastaccessed

Jabber last Logged In

Snippet of the results.

jabber-last-logged-in-1

I had logging enabled in Secure Shell as the results will span past the shell buffer. Open Excel and import the log file generated. I use ‘Delimitated’ and separated via ‘space’.

After the log file has been imported into excel, I use the Unix to excel time formula to make sense of the date.

Formula is =CELL/(60*60*24)+”1/1/1970″

*Note: ensure the format of the cell is ‘Date’.

Save the spreadsheet, and you now have a full list of all users and their last logged in date for Jabber.

References:

Cisco Support Forum: https://supportforums.cisco.com/t5/unified-communications/jabber-report/td-p/2957556

Feb 02

CSR 12.0 Extension Mobility Sign-in Options

Extension Mobility in Cisco Collaboration Services 12.0 has expanded with a couple of useful options. When configuring Extension Mobility sign-in service, you can now elect to setup a further two types of sign-in options.

These are Primary Extension and PIN known as Login Type ‘DN’. The second is using the Self Service User ID and PIN, known as the login type ‘SP’. This is on top of the current User ID and PIN, know as the login type ‘UID’.

URLs for these options are below.

Login Type DN

URL: http://:8080/emapp/EMAppServlet?device=#DEVICENAME#&EMCC=#EMCC#&loginType=DN

Login Type SP

URL: http://:8080/emapp/EMAppServlet?device=#DEVICENAME#&EMCC=#EMCC#&loginType=SP

Login Type UID

URL: http://:8080/emapp/EMAppServlet?device=#DEVICENAME#&EMCC=#EMCC#&loginType=UID

Nov 14

MoH Silent – SIP CUBE to ITSP without MTP – OPTION 2

More MoH talk with ITSP and CUBE’s. I mentioned in earlier posts that playing MoH without an MTP can be achieved by creating sip-profiles to manipulate some of the SDP attributes. I recently have another MoH issues where the MoH stream was simply dead air or silent. Of course enabling the MTP on the SIP Trunk in CUCM resolved the issue.. however we want to avoid forcing an MTP for all calls.

I resolved this by removing the cmd “pass-thru content sdp” under the Voice Service Voip -> SIP config menu. In this case the sip-profile route was not working for me.. The above cmd negates the Gateway in the negotiation process, hence passing through codec and mtp negotiations. The potential problem here is the mismatch between CUCM and ITSP, we want the gateway to participate and effectively inter-work between CUCM and the ITSP.

If you have other options or methods that work to combat silence in MoH using an ITSP, please post.