Sep 20

UCCX – Login Failed Due to Configuration Error

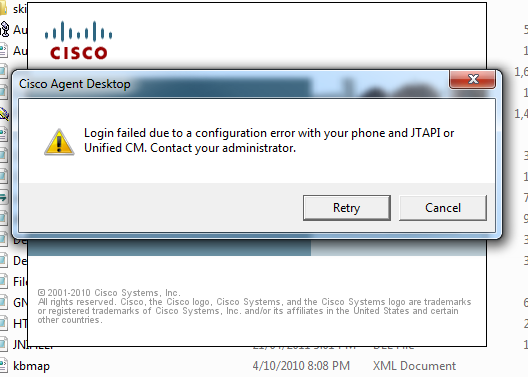
UCCX Agent receives the below error ” Login failed due to a configuration error with your phone and JTAPI or Unified CM. Contact your Administrator” when logging into UCCX.

uccx1

All CUCM and UCCX configuration looks to be correct, the user was successfully logged into CAD the day before. The Agents phone is currently logged in and registered.

Collect the MIVR Logs using RTMT. To do this open RTMT Tool against the UCCX Server and Select Traces and Alerts. Then select Collect Traces. Select the ‘CCX Engine’ for the log type and ‘All UCCX Server’. Click Next twice and select an appropriate location to download the logs too.

Unzip the .gz log files using 7zip application. Then open the MIVR Logs using Notepad++. Search for the Agent’s username. You should see similar output to the below. (username is bdodd)

uccx2

Cause:


This is caused by an Agent moving between phones. The DEVICE NAME is the above trace output is not the phone the Agent is logged onto today. The CTI or JTAPI caches the Device the Agent successfully logged onto last. If the Agent is an Extension Mobility user, its best to only add the Device Profile to the RMCM Application User’s CTI Controlled Device list.

To Resolve:

Remove the old device from the RMCM Application user. You may also have to resync JTAPI in UCCX and restart the CTI Manager to force the change if the problem continues.

Aug 15

UCCX – Finesse Monitoring / Barge Features

Just like the CAD Agent Desktop software the Finesse Agent allows the Supervisor to silent monitor Agents in their Team. The audio though flows through the IP Phone and not the computer. From a silent monitor session, the Supervisor can then Barge into the call between the Agent and the Customer. The Agent will hear a beep to let them know the Supervisor has Barged in. The Customer will not hear the beep.

Barge is essentially a three way conference. From a Barge session, the Supervisor can then intercept the call and drop the Agent from the call. Therefore the Customer is now talking directly to the Supervisor, this is great for call escalation.

A couple to things to note about the setup.

- Built-in Bridge must be enabled on Agent Phones
- Supervisor DN must have the Monitor CSS populated with a CSS that has access to the Agents DN.
- For a Supervisor to Silent Monitor an Agent, the Supervisor must be in a Not Ready State. If the Supervisor is in a Ready State, the Silent Monitor will be greyed out.

Jun 25

Working with Blank Spaces – UCCX 10.6

Working with spaces in usernames can be challenging. CUCM 10.5 supports spaces within the usernames and to go a little further CUCM also supports the following characters in usernames =, +, , #, ;, \, , “”. Cisco Jabber also supported the use of spaces in the username; however the space must be removed when entering the CSF/BOT/TAB/TCT device name.

Contact Centre on the other hand does not support spaces, Cisco have an open Bug ID for this at the time writing. This makes it a little hard when the UC system is heavily dependent on the integration with LDAP. Organisations will not simply change their username format for a single application (Phone System).

A workaround is to create local user accounts in CUCM and remove the blank space from the usernames. All other user parameters should reflect the comparable user account. Then allow this local user to control the device used with UCCX. This does create a little more overhead for the UC Administrator and some confusion for the UCCX Agent by having to remember to log into Finesse with a ‘no space’ in their username as well as having to remember a dedicated password for this login.

Apr 15

UCCX Scripting: Uploading Files to Windows File Share

Enabling Cisco UCCX to upload files (wav files etc) to a Windows file share is very useful feature that not many Engineers know about.

Uploading file to Windows file share can be useful for many tasks including transferring Voice Messages from customers, backing up greetings, uploading xml documents with customer responses etc.

The procedure is fairly simple and I found a great discussion regarding this on the Cisco Support Forums.

https://supportforums.cisco.com/document/96366/uccx-8x-how-playwrite-file-prompts-fromto-windows-shares

I will more or less rehash this into a shortened version for quick reference.

1. Download the jcifs-1.3.18.zip file.
2. Upload the .jar file to UCCX Server. System -> Custom File Configuration.
3. Restart the CCX Engine.
4. In the CCX Scripting Editor, create a variable of type String. Name this variable smbFileURL, do not give it a value.
5. Add a Set Sep into the script. Select the variable created in the previous step. For the value go to the expressions editor and type the following:

“smb://domain_name;username:password@server_ip_address/share_name/filename.wav”

6. Create a variable of type Integer. Name the variable exitCode. Value should remain at “0”
7. Add a second Set Step into the UCCX Script. Select the variable created in the previous step. For the value go to the expressions editor and type the following:

{
java.io.OutputStream os = null;
java.io.InputStream in = null;
try {
int bufSize = 4096;
jcifs.smb.SmbFile smbFile = new jcifs.smb.SmbFile(smbFileURL);
os = smbFile.getOutputStream();
in = dVoicemail.getInputStream();
byte[] bytesRead = new byte[bufSize];
int bytesReadLength = 0;
while ((bytesReadLength = in.read(bytesRead)) > 0 ) {
os.write(bytesRead,0,bytesReadLength);
}
} catch (Exception e) {
return -1;
} finally {
in.close();
os.close();
return 0;
}
}

Apr 05

UCCX Scripting: Enterprise Variables

Lets go through the process of adding three Enterprise variables to be displayed on CAD for the Agent. I will be creating Variables called Patient Name, Patient Number and New Patient.

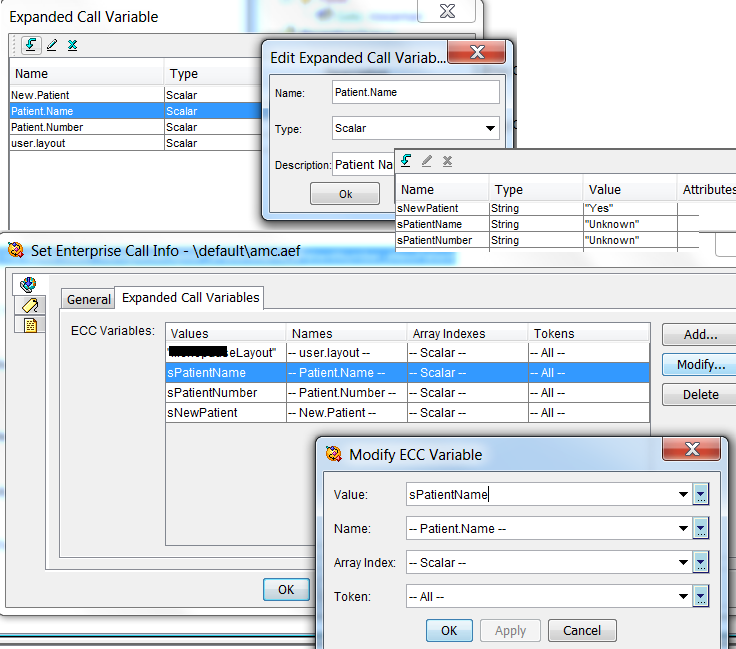
Start by opening the UCCX Script. Navigate to Settings -> Expanded Call Variables. A separate window opens. Here we will add the three variables, plus the User Layout that will host the variables.

Click the icon to create a new expanded variable and complete the Name, Type and Description Field. Reference the below image.
Also create the layout expanded variable. Following the process as above, however the name of the variable will be user.layout.
Close the Expanded Variables windows and lets dive into the actual script.

Create three variables of type String. Variable names are:

- sPatientName
- sPatientNumber
- sNewPatient

You can place a default value in the String if you like. I placed the value “Unknown” for both sPatientName and sPatientNumber and assigned the value “Yes” to the sNewPatient variable.

After we have the variables completed, we need to add the “Set Enterprise Call Info” step to the script. This step should be added before the Select Resource Step. Open this step and select the Expanded Call Variables tab. Click Add and complete the details. Follow the below image. Essentially we are adding the expanded variables we created in the first step.

UCCX Expanded Variables

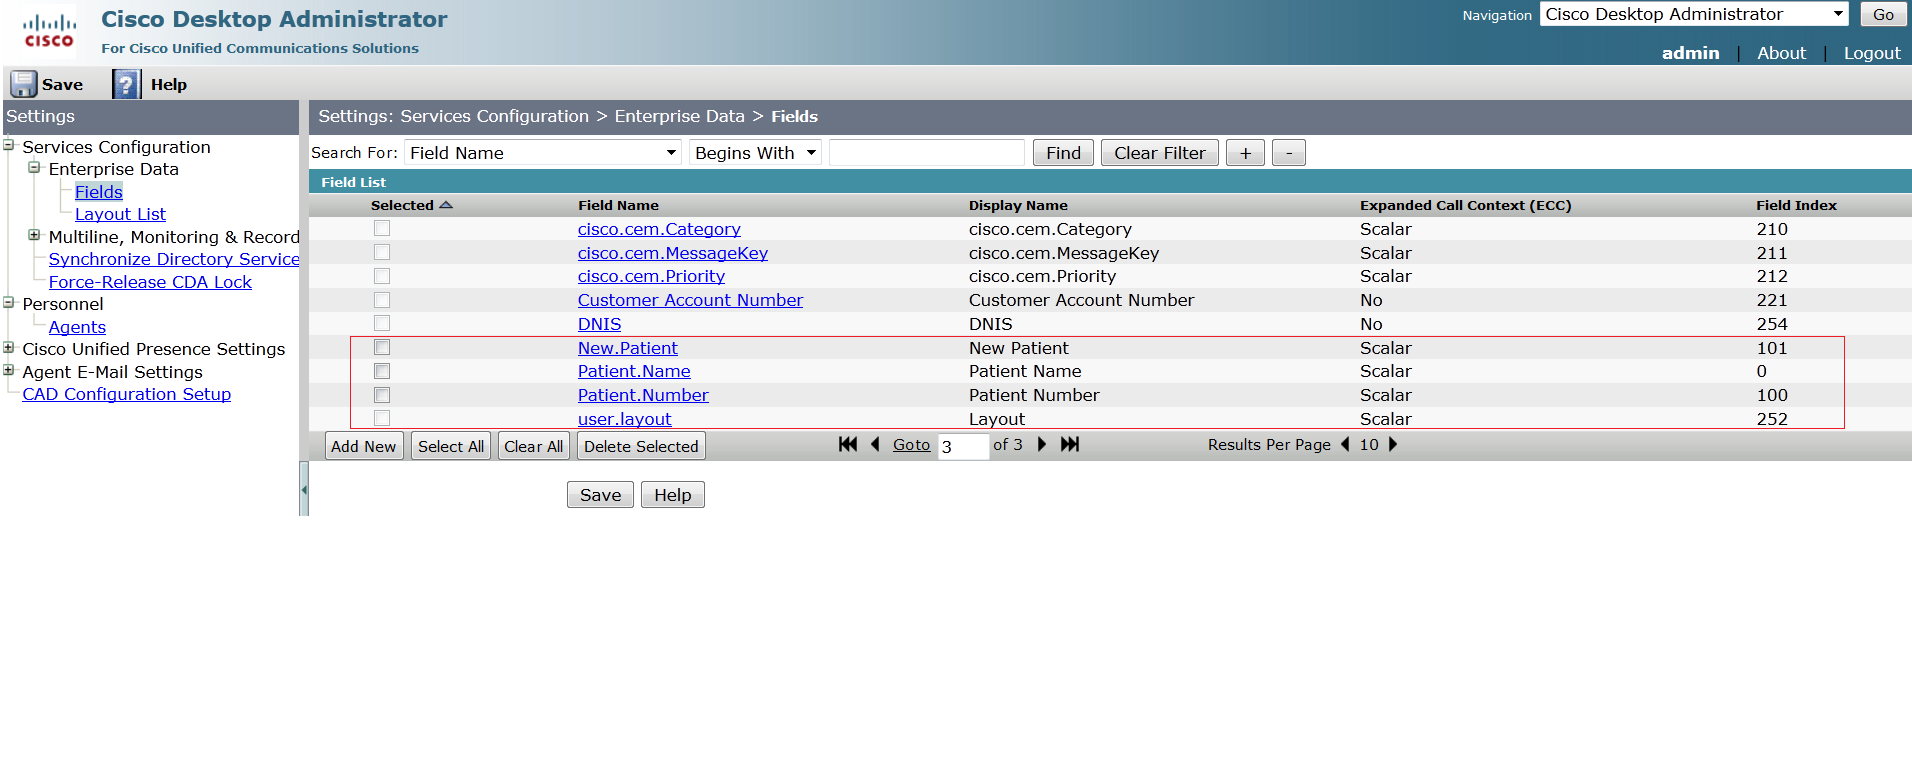
Now jump across to the UCCX Server and log onto the Desktop Administrator web interface. Navigate to the Fields Menu under Services Configuration -> Enterprise Data and click Add New.

The field name must match the expanded variable name created in the UCCX script application. Display name is what is displayed on the CAD Desktop. The field Index is a unique identifier for this field.

Create a field for all three variables, plus the User Layout variable. The user layout variable should be in the format:

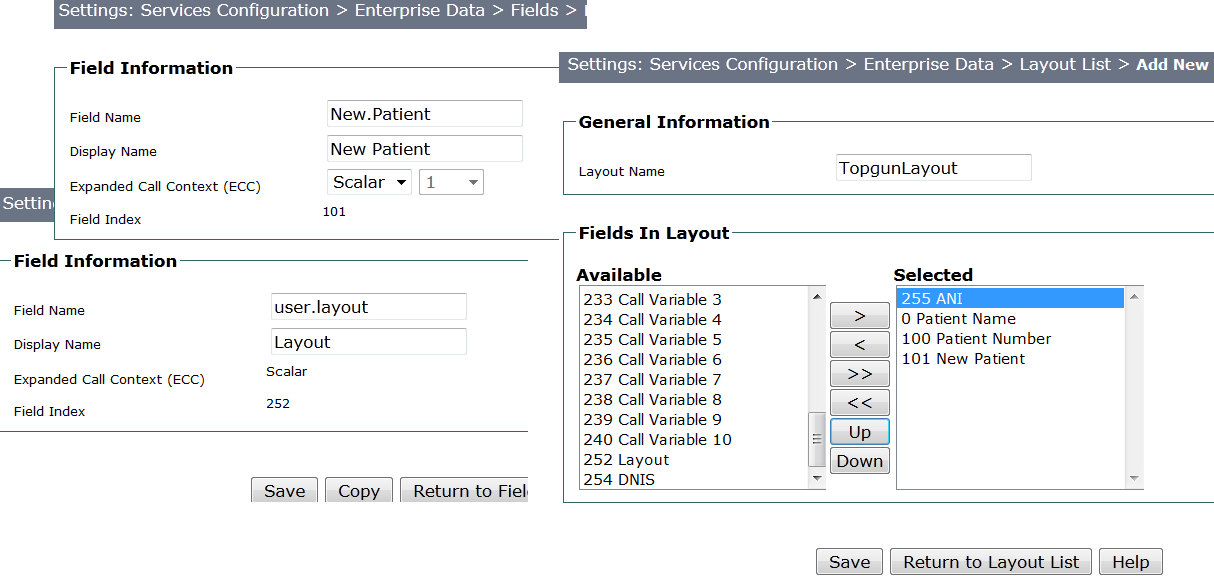
- Field Name: user.layout
- Display Name: Layout
- Field Index: Unique Identifier

UCCX Desktop Administrator

Select the Layout List menu under Services Configuration -> Enterprise Data. Click Add New. The Layout Name must match the Value in the Expanded Call Variables under the Enterprise Call Info step. Now simply add (in order) the fields you would like to have displayed for Agents. I have selected ANI, Patient Name, Patient Number and New Patient. Click Save.

UCCX Layout List

So when an Agent answers a call that has passed through the Set Enterprise Call Info Step, they will have required fields displayed.

Mar 15

UCCX CUIC URL and Allow Users to View Historical Reports

URL for the UCCX CUIC Web Consoler is https://ip_address:8444/cuic. When initially logging in, use the UCCX Administrator credentials. Once logged in, navigate to the Security section and add selected users to pre-defined Groups in CUIC. Mostly it’s the Historical Reports section that we need to give users access too.

Security -> User Groups -> ReportingUsers Group then click Edit. Select the Group Members Tab, then highlight users and move across to the group.

Mar 01

Installing the JDBC Driver for Cisco QFO AQM Server

Ensure you have installed Java JDK 1.5 or higher. Current version is 8.0.25. Install this JDK in the default directory. This then gives you access to install the Jar file below.

Navigate to the ibm.com website and search for Informix JDBC.3.70.JC8 Driver. Download this to you server. Extract the .tar file to the bin folder under the JDK install directory. This just makes is easier to install the jar file.
Open CMD and navigate to the SDK directory and run the following command to launch the Informix JDBC Driver setup wizard

“java -jar setup.jar”

This launches the install wizard for the JDBC Driver, follow the prompts and accept the defaults, this will install the JDBC driver under the C:\Program Files\ibm\Informix_JDBC_Driver\lib\ directory. Open the Quality Management Administrator and navigate to Cisco Unified CC Database page. Ensure the JDBC Driver path is C:\Program Files\ibm\Informix_JDBC_Driver\lib\ifxjdbc.jar.

Feb 15

HTTPHostConnectException Error – Cisco WFO AQM

Error received when running the PostInstall.exe wizard.

Cisco WFO AQM

Check to see if MS IIS is installed on the save server. If IIS s installed, this will also be listening on the TCP port 443. Therefore this conflicts with the jetty service for QM.

We need to change IIS to listen on a different port for HTTPS connections. IIS allows you to change the port binding for HTTP, however IIS will only allow the HTTPS port binding to changed once you have installed an SSLCertificate.

Easiest way is to sign a certificate using an Internal CA, if you don’t have this, you’ll need to purchase a certificate. Run the certificate request wizard on the IIS Server. Once you have completed the certificate signing with the CA and installed the DER file back into IIS, navigate back to the binding section and create a new binding for HTTPS, select the certificate you just installed and change the port to something other than 443.

Restart IIS, then restart the Monitoring and Recording Jetty Service. All should be good now.

Go back and complete the PostInstall.exe wizard.

Jan 11

Recording Voice Prompts using UCCX 10

To record and save prompts for either downloading or to assign to UCCX Applications we need to create the following variables.

Prompt = pRecordPrompt

Document = dGreeting

User = uccxadmin

String = sPIN

String – sHolidayGreeting

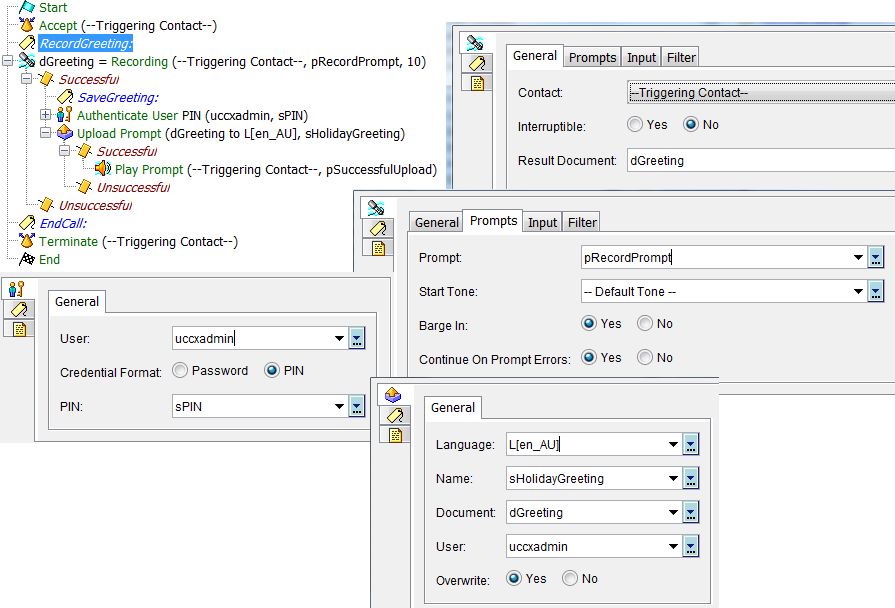
I will go ahead and create short recording script to demonstrate how to record a holiday greeting. In UCCX 10.0 we also need to authenticate with the UCCX Server in order to upload the prompt to the prompt repository.

So lets start with a new script, and drag in the Recording Step. The resulting document will reference dGreeting and the prompt name will reference pRecordPrompt. The dGreeting will be the actual user recording file and the pRecordGreeting is essentially the Menu advising the user to record after the tone.

Once a recording has been completed, we need to authenticate with UCCX. This is done with the Authenticate User Step. Set the User to uccxadmin variable and the PIN to the sPIN variable. These variables have been configured with a uccx user account.

We then move into the Upload Document Step. We need to upload the document into the Language Document repository; otherwise the application may not be able to see the prompt to play. In my case I use AU Language. Set Language to L[en_AU], Name to sHolidayGreeting, Document to dGreeting and User to uccxadmin.

This will successfully upload the new voice recording to the AU Document repository.

UCCX Recording

Dec 09

Email Voice Recordings in UCCX 10.0 Script

This seems to be a growing requirement/need for Contact Centres, so I’ll spend some time discussing how to configure a UCCX Script to record and send voice message via smtp.

Here is my scenario.

Customer does not want to receive Emails if the Voice payload is null or less than 10 seconds. When the caller hangs up or disconnects after leaving the voice message the script should continue to process the email as per normal. If the payload is null or less than 10 seconds, an email is to be sent without an attachment with the Subject stating a Missed Call.

Software in use is Cisco Contact Centre Express 10.0.1

First component is to setup the voice recording step in the UCCX Script. You’ll need to record a prompt to play to the caller asking them to leave a voice message. Please read my other blogs regarding how to record prompts using UCCX 10.0 or Unity Connection 10.5. You will also need to declare a variable of document type.

Variables

Prompt = pVoicemail

Document = dVoicemail

Make sure you adjust the duration in the recording step, otherwise the callers may be cut off while recording their voice message.

The next component is to check the payload length of the voice message. This is so we can determine if the voice message has enough content to actually be useful. We need to declare and set a couple of variables of type String.

Variables

String = sVoiceMessageLength

String = sContentLength

After declaring the above string variables, we need to configure the following Set steps.

  1. Set sVoiceMessageLength = dVoicemail
  2. Set sContentLength = (sVoiceMessageLength).length()

The variable sContentLength now holds the total payload length in bits.

Now we can run the following IF Step to fork the script.

If (sContentLength > “15000”

1500 bits is approx. 6-7 Seconds of Voice payload. But you can tweak this figure to work out what best suits your environment.

The next component will be discussing is the True path from the IF Step. So this is where the voice payload is greater than 15000 bits. So we will proceed to attach the voicemail to an email. We will proceed to create a couple more variables to allow us to form and send an email from the uccx script.

Variables

Contact = EmailContact 

String = sEmailAddress

First step is to Create the Email, this includes the Subject and Body Content for the email. Open the expressions editor for the Create Email Step and enter in your Subject. Example:

“URGENT: Voicemail from ” + sCallingNumber.

Now repeat for the Body of the email. Example:

“URGENT Voicemail” + ‘\r’ + ‘\n’

+ ‘\r’ + ‘\n’ +

“Please phone caller on ” + sCallingNumber + ‘\r’ + ‘\n’

+ ‘\r’ + ‘\n’ +

“Date of Call: ” + D[now]
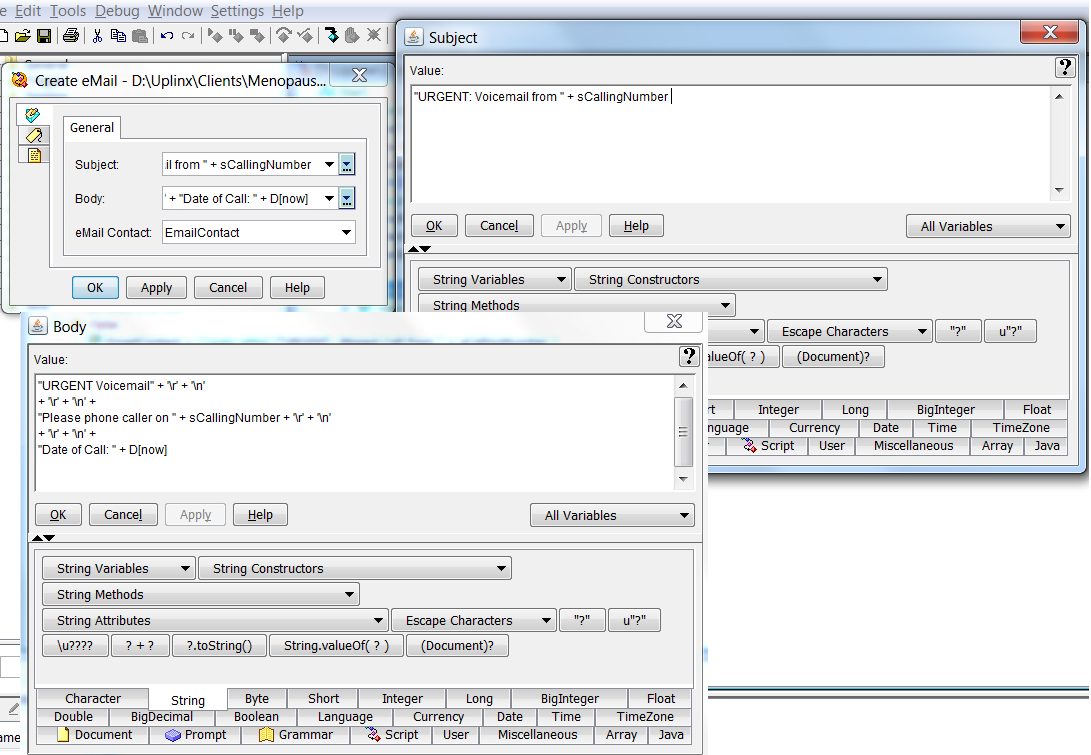
UCCX Expressions Editor

Next Step is to attach the voice message to the email created above. This is done with the Step called Attach To Email Step. Select EmailContact variable, then add the attachment. In my example I’m using sVoiceMessage as the name of the attachment and the actual file is dVoicemail.

Finally we can configure the Send Email Step. Again select the contact variable EmailContact and then the string variable sEmailAddress for the To: field.

This will effectively fire off an email!

Going back to the above IF Step, and now following the False Path (the voice payload is less than 15000 bits). We want to send an email without the attachment, and state that we have received a Missed Call only.

Seeing that we have already created the Contact (EmailContact) and String (sEmailAddress) variables in previous steps we can skip it here. Firstly Configure the Create Email Step and define the subject and body content. Just like the previous steps, go to the expressions editor and enter your require data. Exmaple:

“URGENT: Missed Call from ” + sCallingNumber

Repeat for the Body Content. Example:

“URGENT Missed Call” + ‘\r’ + ‘\n’

+ ‘\r’ + ‘\n’ +

“Please phone caller on ” + sCallingNumber + ‘\r’ + ‘\n’

+ ‘\r’ + ‘\n’ +

“Date of Call: ” + D[now]
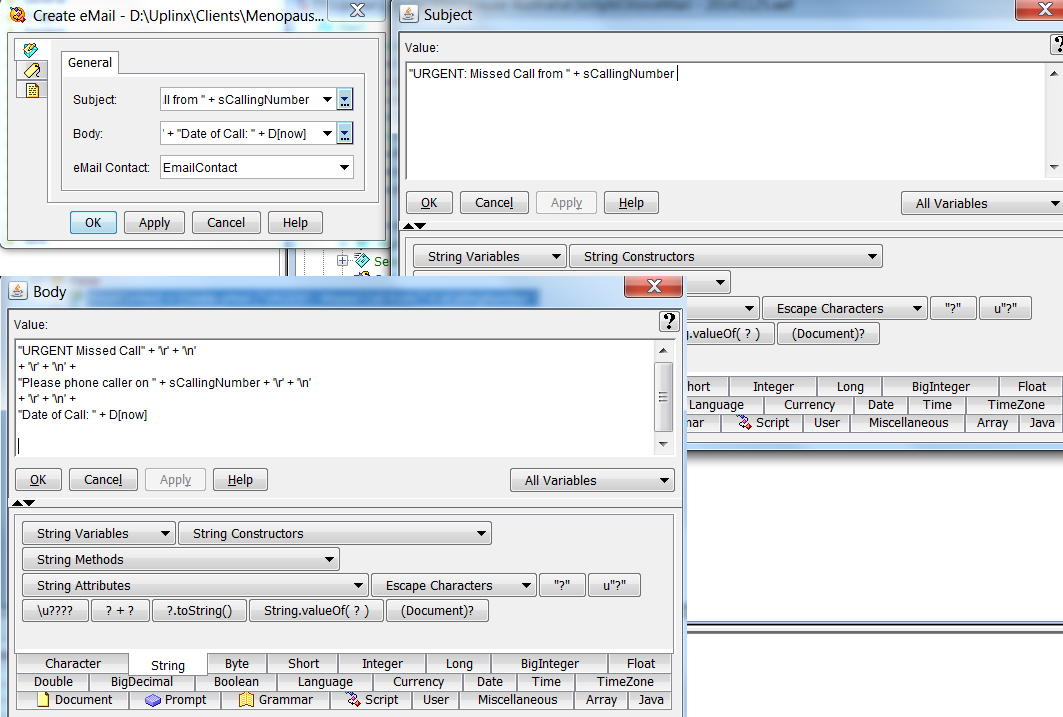
UCCX Expressions Editor

We now go straight to the Send Email Step. Select the contact variable EmailContact and then the string variable sEmailAddress for the To: field.

Email will now be sent.

Now there is one important step I have not mentioned as yet and was seeing how I would integrate into the discussion. It’s the On Exception Step. What this basically allows us to do is action a set of predefined steps if the caller disconnects (hangs up) the call. As it is only natural for humans to immediately disconnect a call after recording a voice message.

We need to define a label and place it after the Voice Recording step. This label will effectively be our starting point for the set a defined steps if the caller disconnects the call. Let call this Lable “EMAIL EXCEPTION”.

Before we even allow the caller to record their voice message we need to trigger the On Exception Step and select “com.cisco.contact.ContactInactiveException”. Also select the above label “EMAIL EXCEPTION”.  When this step is triggered, the script will not allow the script to just end if the caller disconnects. This is great news as we want the system to continue to email us the voice message etc.

It’s important that we also clear the exception once we have completed our predefined steps otherwise the script will be left in an open state. The Clear Exception Step does just this. Select “com.cisco.contact.ContactInactiveException”.

Now we have a script that will continue to email the the voice message even after the caller disconnects the call.

Summary of my example script for your reference.
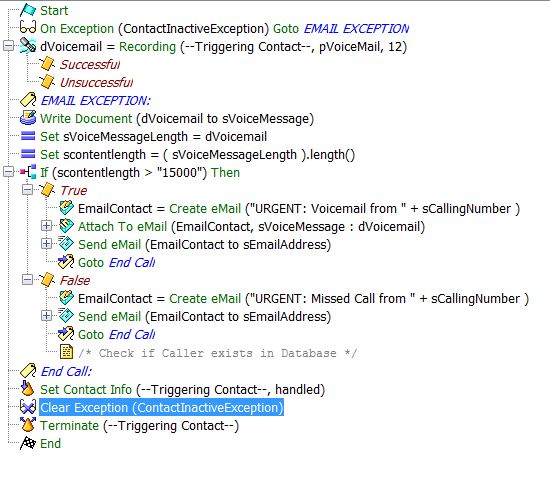
UCCX Script - Voice Recording