Sep 25

Deploying Jabber MSI via Group Policy Without Arabic Language

Cisco Jabber is great collaboration tool for any organisation.. The install process for individual PCs is simple and quick.. However deploying Cisco Jabber via Microsoft’s Group Policy is a more painful process for the Windows Administrator. This is because for some unknown reason.. The Cisco Jabber MSI package selects the lowest language identifier to install, this turns out to be Arabic! Great, so how do we deploy Cisco Jabber in English. Well there are a couple of hoops to jump through to have English as the selected language and I’ve briefly documented how below. I’ve also included a link to good Cisco reference and the required EXE’s for Microsoft to play nice.

Download and extract WinSDKTools.zip and install WinSDKTools_amd64.msi on Server (you will need x86 installer if 32 bit). After installing this, go to C:\Program Files\Microsoft SDKs\Windows\v7.1\Bin and double click on Orca.Msi. This will install the Orca application.

Open Orca and navigate to File > Open. Browse to and select the CiscoJabberSetup.msi.

Once the MSI is opened, navigate to View > Summary Information.

Cisco Jabber

Remove all language codes under languages except for 1033 (English).

Cisco Jabber Arabic Language

Click OK and go File > Save As and save over the top of the original CiscoJabberSetup.msi. Language of msi file has now been changed, set up GPO to deploy software.

Cisco Reference:

http://www.cisco.com/c/en/us/td/docs/voice_ip_comm/jabber/10_5/CJAB_BK_D6497E98_00_deployment-installation-guide-ciscojabber/install_client.html

Sep 15

CUCM and CUC LDAP Sync Error, null

Recently tried to connect to a customer’s Active Directory Server to sync users and groups as per normal.. However this occasion I received a Error While connecting to LDAP… , null. I tried entering a different password to see if I was actually getting into the LDAP server, I was received a username/password error. I also tried modifying the port to 3268 as this Domain Controller I was trying to access was also a Global Catalog Server.. However I received the same null error.

CUCM LDAP

I started digging around and what I found two things.. The Domain Controller had been moved to another general OU and was not sitting in the default Domain Controllers OU, where the Domain Controllers GPO could be applied, surely this can’t be right. The GPO being applied to the Domain Controller had a few Security Options manually configured, the one I was interested in was the Domain Controller: LDAP server signing requirements had been configured to “Require Signing”. Why this had been manually configured , I have no idea.

I had the Domain Controller object returned back into the Domain Controllers OU.. The Default Domain Controller’s GPO had the above setting defined as NONE. This was the default setting.

CUCM LDAP

After forcing the update GPUPDATE /FORCE then logging off and back on.. Wholla! .. I could now sync my CUCM and CUC servers to the Active Directory OU Structure.

Also check the local security policy (gpedit.msc) on the Domain Controller to confirm the above setting was being applied and as it was greyed out, this meant the governing GPO had been pushed down.

CUCM LDAP

Jun 20

Wireshark – Cannot See Outbound Packets.

I installed Wireshark 2.02 on my Windows 10 laptop, all good. However I was actively troubleshooting a customer issue when I realised I couldn’t see my outbound packets. I could only see inbound packets. Same behaviour for both my ethernet and wireless connection. Found I had to disable the “DNE Light Weight Filter” from the network adapter.. Both my Ethernet and Wireless adapter..

wireshark

May 06

Cisco IPSEC VPN Client for Windows 10 – Painful Experience

As most of you know the Cisco IPSEC VPN Client is not officially supported on Windows 8+. I have Window 10, now that puts me in the not so friendly basket. After googling this, there a raft of blogs and websites advising you to install additional components and modify registry settings.. Not all of which are proven. I finally found a sequence that worked for me.. AND successfully connected to customer sites.

First thing is to get around this virtual adapter filter thing that doesn’t get installed with Windows 10.. The SonicWall VPN Client however does install the ‘DNE Lightweight filter network client’. Beautiful.. Job done.

Link to Sonicwall website for vpn client. http://help.mysonicwall.com/applications/vpnclient/

If the above link is not available and you cannot find it anyway.. Ping me and I’ll email it to you.

Right. Lets install the Cisco IPSEC VPN Client now.. No wait another error.. ‘This software doesn’t support Windows 10′, great. To get around this one.. Extract the install files and manually run the .msi file. Job done.

Now the client is installed and we are away and running.. Try to connect to a customer site and low and behold another error.. ‘Secure VPN Connection terminated locally by the client. Reason 442: Failed to enable Virtual Adapter.’ we are getting closer though right?

Here comes the infamous registry change.. Now I’ll add the general blurb that everyone would say… ‘Backup your registry settings in case you absolutely blunder this change’. Now lets get started.

Open registry and go to HKLM\SYSTEM\CurrentControlSet\Services\CVirtA look for the key ‘Display Name’. We want to modify this key from something like this ‘@oem47.inf,%CVirtA_Desc%;Cisco Systems VPN Adapter for 64-bit Windows‘ to ‘Cisco Systems VPN Adapter for 64-bit Windows‘ (screen shot below of change).

Cisco IPSEC VPN Client

Now open the VPN Client again and try connecting to a customer site.. Whola! Job is now done. Thanks Internet.

Sep 16

VMware NIC Type for Windows 2012

Just a quick note for deploying UC Applications on Windows 2012 within VMware environment. The NIC type E1000e which is the default when configuring a Virtual Machine will cause intermittent networking issues with a Windows 2012 Server.

When deploying the Virtual Machine, you will need to select the NIC type VMXNET3. This NIC type will work well with Windows 2012.

Sep 05

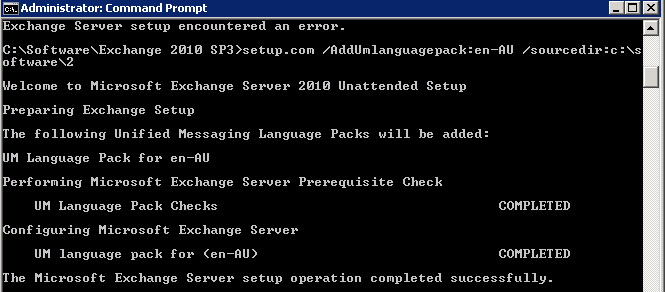
Install AU Language Pack on Exchange 2010

Download the correct version for the AU Language Pack from the Microsoft website.

Have access to the Exchange install files and ensure the install files are the correct SP version of Exchange.

exchange-2010-1

Restart the Microsoft Exchange Unified Messaging service.

exchange-2010-2

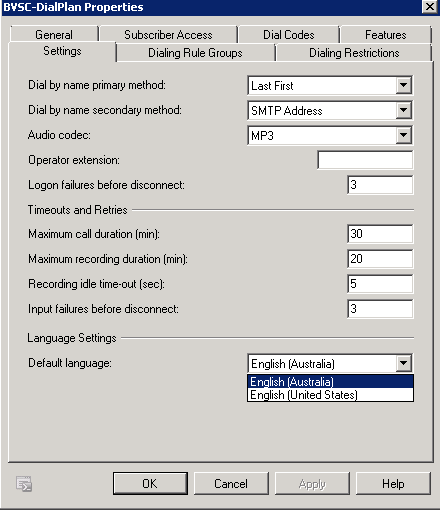
Navigate to the Dialplan properties in Exchange UM Role.

exchange-2010-3

Navigate to the settings tab, then select the Default Language drop down box and select English Australia.

exchange-2010-4


Jul 25

MS Exchange Distribution Voicemail

If you’ve ever setup Distribution mailboxes in Cisco Unity Connection, you’ll know its super simple with just creating the Distribution Mailbox, then adding Members. The Greeting can also be pushed out to several Distribution Mailboxes. However configuring the same feature in Microsoft Exchange is slightly different.

MS Exchange doesn’t support configuring an extension for a Distribution Group Mailbox. What needs to be done is configure a single user mailbox, and yes you will need to create an AD User as well. Enable Unified Messaging for this user and allocate an Extension Number.

Create a Distribution Group Mailbox with the appropriate members.

Next we need to configure email forwarding for the Single User to direct all emails to the Distribution Mailbox.

Generic Greetings cannot be uploaded. So you will need to (via OWA) record the greeting for each Single User separately.

Quick break down:

  1. Create AD User and mailbox
  2. Enable UM for User
  3. Create Distribution Group Mailbox
  4. Add members to the Distribution Group Mailbox
  5. Setup email forward (don’t leave a local copy) from the AD User to the Distribution Group Mailbox.
  6. Log into OWA for each AD User and record a Voice Greeting.
Dec 16

CUCM and IM&P Integration with SRV Records

For us Cisco techs, one of the more often than not nowadays is that have to deal with the MS world of DNS (AND Certifciate Architecture… I’ll talk about this in later articles). I’ve had a fair bit of experience with DNS in the past, so I thought I would just share a little about integrating CUCM with IM & Presence using SRV records both ways to support CUCM Clusters and IM & Presence Clusters for high availability.

DNS Configuration

Create A (Host) Records

CUCM DNS A Records

Type Hostname IP Address
A cucm01.uplinks.com.au 192.168.0.20
A cucm02.uplinks.com.au 192.168.0.21

IM&P DNS A Records

Type Hostname IP Address
A imp01.uplinks.com.au 192.168.0.30
A imp02.uplinks.com.au 192.168.0.31

Create SRV Records

IM&P Cluster Name: imp.uplinks.com.au

Type Identifer Protocol Weight Priority Host
SRV _sip _tcp 10 10 imp01.uplinks.com.au
SRV _sip _tcp 10 10 imp02.uplinks.com.au

CUCM Cluster Name: cucm.uplinks.com.au

Type Identifer Protocol Weight Priority Host
SRV _sip _udp 10 10 cucm01.uplinks.com.au

Verify Records via NSLOOKUP

>  set q-all
>  _sip._tcp.imp.uplinks.com.au
>  _sip._udp.cucm.uplinks.com.au

The above should output the following results.

-        The SRV Records and their target hosts
-        An A record for every target host identified in the SRV record.

CUCM Configuration

SIP Trunk

  1. Navigate to Device, then select Trunks
  2. Select Add New
  3. Select SIP Trunk for Trunk Type
  4. Select Next
  5. Complete the details of the SIP Trunk as per normal.
  6. Under SIP Information, check the box  Destination Address is SRV

Note: When the checkbox is ticked, CUCM changes the outbound SIP protocol from udp to tcp.

  1. Type the IM&Presence Cluster Name. (imp.uplinks.com.au)
  2. Select Save and then reset the Trunk.

Configure SIP Publish Trunk

  1. Navigate to the Service Parameters, then Cisco CallManager.
  2. Find “IM & Presence Publish Trunk”
  3. Drop the arrow down and select the above SIP Trunk.

 IM & Presence Configuration

SRV Cluster Name

  1. Navigate to Service Parameters, then Cisco SIP Proxy.
  2. Find “SRV Cluster Name”
  3. Type the IM&Presence cluster name (imp.uplinks.com.au)
  4. Select Save

Presence Gateway

  1. Navigate to Presence, then Gateways.
  2. Select Add New
  3. Select CUCM for Presence Gateway Type.
  4. Type a Descriptive note.
  5. Type the SRV Record for the CUCM Cluster Name.

Note: Do not strip the SRV Identifier or Protocol. Example input would be _sip._udp.cucm.uplinks.com.au

May 04

CUCM Users cannot access Voicemail from Exchange 2010 Server – Fast Busy

When CUCM users try to dial or access the VoiceMail pilot on an Exchange 2010 Server, they receive a fast busy. Upon viewing the application events logs on the Exchange 2010 Server, 3 events appear.

Source: MSExchange Unified Messaging

Event ID: 1327

Level: Error

Details:

The Unified Messaging server wasn’t able to retrieve the custom prompt data for the UM dial plan “UCMv9_DialPlan”. Check the dial plan configuration to ensure that all custom prompts have been configured correctly. “Microsoft.Exchange.UM.Prompts.Provisioning.PublishingPointException: An error occurred while accessing the custom prompt publishing point. Cannot open mailbox /o=contoso/ou=Exchange Administrative Group (FYDIBOHF23SPDLT)/cn=Configuration/cn=Servers/cn=CONTOSOPDC01/cn=Microsoft System Attendant. —> Microsoft.Exchange.Data.Storage.ConnectionFailedTransientException: Cannot open mailbox /o=TopGun2/ou=Exchange Administrative Group (FYDIBOHF23SPDLT)/cn=Configuration/cn=Servers/cn=CONTOSOPDC01/cn=Microsoft System Attendant. —> Microsoft.Mapi.MapiExceptionLogonFailed: MapiExceptionLogonFailed: Unable to open message store. (hr=0×80040111, ec=-2147221231)

Diagnostic context:

Lid: 18969   EcDoRpcExt2 called [length=257]

Lid: 27161   EcDoRpcExt2 returned [ec=0x0][length=180][latency=0]

Lid: 23226   — ROP Parse Start —

Lid: 27962   ROP: ropLogon [254]

Lid: 17082   ROP Error: 0×80040111

Lid: 26937

Lid: 21921   StoreEc: 0×80040111

Lid: 27962   ROP: ropExtendedError [250]

Lid: 1494    —- Remote Context Beg —-

Lid: 26426   ROP: ropLogon [254]

Lid: 60049   StoreEc: 0x8004010F

Lid: 49469

Lid: 65341   StoreEc: 0x8004010F

Lid: 56125

Lid: 47933   StoreEc: 0x8004010F

Lid: 32829

Lid: 49213   StoreEc: 0x8004010F

Lid: 48573

Lid: 64957   StoreEc: 0x8004010F

Lid: 59409

Lid: 45073

Lid: 11173   StoreEc: 0×80040111

Lid: 22970

Lid: 8620    StoreEc: 0×80040111

Lid: 1750    —- Remote Context End —-

Lid: 26849

Lid: 21817   ROP Failure: 0×80040111

Lid: 26297

Lid: 16585   StoreEc: 0×80040111

Lid: 32441

Lid: 1706    StoreEc: 0×80040111

Lid: 24761

Lid: 20665   StoreEc: 0×80040111

Lid: 25785

Lid: 29881   StoreEc: 0×80040111

at Microsoft.Mapi.MapiExceptionHelper.ThrowIfError(String message, Int32 hresult, Int32 ec, DiagnosticContext diagCtx)

at Microsoft.Mapi.ExRpcConnection.OpenMsgStore(OpenStoreFlag storeFlags, String mailboxDn, Guid mailboxGuid, Guid mdbGuid, MapiStore msgStorePrivate, String& correctServerDn, ClientIdentityInfo clientIdentityAs, String userDnAs, String applicationId, CultureInfo cultureInfo)

at Microsoft.Mapi.MapiStore.OpenMapiStore(String serverDn, String userDn, String mailboxDn, Guid guidMailbox, Guid guidMdb, String userName, String domainName, String password, String httpProxyServerName, ConnectFlag connectFlags, OpenStoreFlag storeFlags, CultureInfo cultureInfo, Boolean wantRedirect, String& correctServerDN, ClientIdentityInfo clientIdentity, String applicationId)

at Microsoft.Mapi.MapiStore.OpenMailbox(String serverDn, String userDn, String mailboxDn, String userName, String domainName, String password, ConnectFlag connectFlags, OpenStoreFlag storeFlags, CultureInfo cultureInfo, WindowsIdentity windowsIdentity, String applicationId)

at Microsoft.Exchange.Data.Storage.MailboxSession.ForceOpen(MapiStore linkedStore)

— End of inner exception stack trace —

at Microsoft.Exchange.Data.Storage.MailboxSession.ForceOpen(MapiStore linkedStore)

at Microsoft.Exchange.Data.Storage.MailboxSession.Initialize(MapiStore linkedStore, LogonType logonType, ExchangePrincipal owner, DelegateLogonUser delegateUser, Object identity, OpenMailboxSessionFlags flags)

at Microsoft.Exchange.Data.Storage.MailboxSession.<>c__DisplayClass12.<CreateMailboxSession>b__10(MailboxSession mailboxSession)

at Microsoft.Exchange.Data.Storage.MailboxSession.InternalCreateMailboxSession(LogonType logonType, ExchangePrincipal owner, CultureInfo cultureInfo, String clientInfoString, Action`1 initializeMailboxSession, InitializeMailboxSessionFailure initializeMailboxSessionFailure)

at Microsoft.Exchange.Data.Storage.MailboxSession.CreateMailboxSession(LogonType logonType, ExchangePrincipal owner, DelegateLogonUser delegateUser, Object identity, OpenMailboxSessionFlags flags, CultureInfo cultureInfo, String clientInfoString, PropertyDefinition[] mailboxProperties, IList`1 foldersToInit)

at Microsoft.Exchange.Data.Storage.MailboxSession.ConfigurableOpen(Exch”.

 ———————————————————————————————————————

Source: MSExchange Unified Messaging

Event ID: 1021

Level: Warning

Details:

The Unified Messaging server rejected an incoming call with the ID “ffb50f80-18316a64-a1-f26e0a0a@10.0.0.1″. Reason: “The Unified Messaging server cannot find a valid UM hunt group for “2998″ associated with UM IP gateway “10.0.0.1″.”

 ———————————————————————————————————————

Source: MSExchange Unified Messaging

Event ID: 32768

Level: Warning

Details:

The Telephony Manager declined a call with Call Id ‘ffb50f80-18316a64-a1-f26e0a0a@10.0.0.1 for the following reason in component telephony session: ‘The application has requested that the call be declined during media negotiation.’.

Further trace information for support personnel follows:

System.InvalidOperationException: The application has requested that the call be declined during media negotiation.

at Microsoft.SpeechServer.Core.SessionInfo.ApplicationRequiresSecureRtp(RemoteRtpOffer rtpOffer, IPEndPoint mediaEndpoint, IPEndPoint sipPeerEndpoint, CallInfo callInfo, Boolean& receiveRTAudio)

at Microsoft.SpeechServer.Core.TelephonySessionInbound.CreateMediaNegotiation(ContentDescription rtcMediaDescription, SessionInfo sessionInfo, CallInfo callInfo, IPEndPoint sipPeerEndpoint)

at Microsoft.SpeechServer.Core.TelephonySessionInbound.Initialize(SessionInfo sessionInfo, SessionReceivedEventArgs e, CallInfo callInfo, EventSerializer serializer, SpeechSession speechSession, Boolean isTlsConnection)

at Microsoft.SpeechServer.Core.TelephonySessionInbound..ctor(SessionInfo sessionInfo, SessionReceivedEventArgs e, CallInfo callInfo)

at Microsoft.SpeechServer.Core.TelephonyManager.CreateSession(Int32 inviteReceivedTickCount, SessionReceivedEventArgs e)

at Microsoft.SpeechServer.Core.TelephonyManager.SignalingSessionReceived(Object sender, SessionReceivedEventArgs e)

 ——————————————————————————————————————–

Cause:

The System Mailbox and/or System Attendant User account in Active Directory has been removed or is corrupt. The System Attendant Mailbox is used to publish prompts for Unified Messaging including the default Welcome prompt.

Resolution:

  1. Log onto the Exchange Server and open the MGMT Shell.
  2. Type into the Shell:

 Remove-Mailbox “SystemMailbox{e0dc1c29-89c3-4034-b678-e6c29d823ed9}” –Arbitration

This command will remove the System Attendant user from Exchange and Active Directory. If the user has already been deleted, you will receive an error in the mgmt shell.

3.   Mount the Exchange 2010 ISO or DVD and re-run the prepare AD switch.

Setup /prepareAD

4.   This will copy files onto the Server, then go through and re-create any system user accounts and    mailboxes that are missing.

5.   Verify the System Attendant user is present in Active Directory. Located under the Users CN

6.   One more step is to enable the SystemMailbox as an Arbitration mailbox.

Enable-Mailbox “SystemMailbox{e0dc1c29-89c3-4034-b678-e6c29d823ed9}” –Arbitration

Try and access VoiceMail again. VoiceMail and AA should be working as per normal.

Mar 02

Disabling PIN for MS Exchange VoiceMail

A popular integration is with using Microsoft Excahnge 2010 as voicemail as opposed to using CUE or CUC. In CUC and CUE a simple check box allows you to effectively disable the PIN (for internal only). However with MS Exchange 2010, there is no GUI option so its to the Exchange Management Shelll (Powershell) we go.

First thing to do is query the user’s mailbox to check the settings. IN particular we are looking for the option “PinlessAccessToVoiceMailEnabled”.

get-ummailbox -identity “emailaddress” | fl PinlessAccessToVoiceMailEnabled

If the mailbox does have a PIN enforced, the results will show “FALSE”

To disable the PIN on the mailbox type the following

set-ummailbox –identity email address –PinlessAccessToVoiceMailEnabled $true

Remember this only applies to internal access. Does not apply to accessing your voicemail from an external device. Also this does not apply to accessing our calendar or email via the phone system, you will need a PIN to access these areas of the MS Exchange 2010 Unified Comms.