This seems to be a growing requirement/need for Contact Centres, so I’ll spend some time discussing how to configure a UCCX Script to record and send voice message via smtp.
Here is my scenario.
Customer does not want to receive Emails if the Voice payload is null or less than 10 seconds. When the caller hangs up or disconnects after leaving the voice message the script should continue to process the email as per normal. If the payload is null or less than 10 seconds, an email is to be sent without an attachment with the Subject stating a Missed Call.
Software in use is Cisco Contact Centre Express 10.0.1
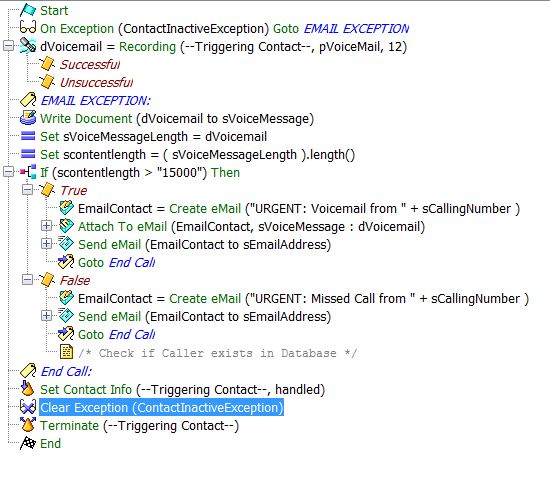
First component is to setup the voice recording step in the UCCX Script. You’ll need to record a prompt to play to the caller asking them to leave a voice message. Please read my other blogs regarding how to record prompts using UCCX 10.0 or Unity Connection 10.5. You will also need to declare a variable of document type.
Variables
Prompt = pVoicemail
Document = dVoicemail
Make sure you adjust the duration in the recording step, otherwise the callers may be cut off while recording their voice message.
The next component is to check the payload length of the voice message. This is so we can determine if the voice message has enough content to actually be useful. We need to declare and set a couple of variables of type String.
Variables
String = sVoiceMessageLength
String = sContentLength
After declaring the above string variables, we need to configure the following Set steps.
- Set sVoiceMessageLength = dVoicemail
- Set sContentLength = (sVoiceMessageLength).length()
The variable sContentLength now holds the total payload length in bits.
Now we can run the following IF Step to fork the script.
If (sContentLength > “15000”
1500 bits is approx. 6-7 Seconds of Voice payload. But you can tweak this figure to work out what best suits your environment.
The next component will be discussing is the True path from the IF Step. So this is where the voice payload is greater than 15000 bits. So we will proceed to attach the voicemail to an email. We will proceed to create a couple more variables to allow us to form and send an email from the uccx script.
Variables
Contact = EmailContact
String = sEmailAddress
First step is to Create the Email, this includes the Subject and Body Content for the email. Open the expressions editor for the Create Email Step and enter in your Subject. Example:
“URGENT: Voicemail from ” + sCallingNumber.
Now repeat for the Body of the email. Example:
“URGENT Voicemail” + ‘\r’ + ‘\n’
+ ‘\r’ + ‘\n’ +
“Please phone caller on ” + sCallingNumber + ‘\r’ + ‘\n’
+ ‘\r’ + ‘\n’ +
“Date of Call: ” + D[now]
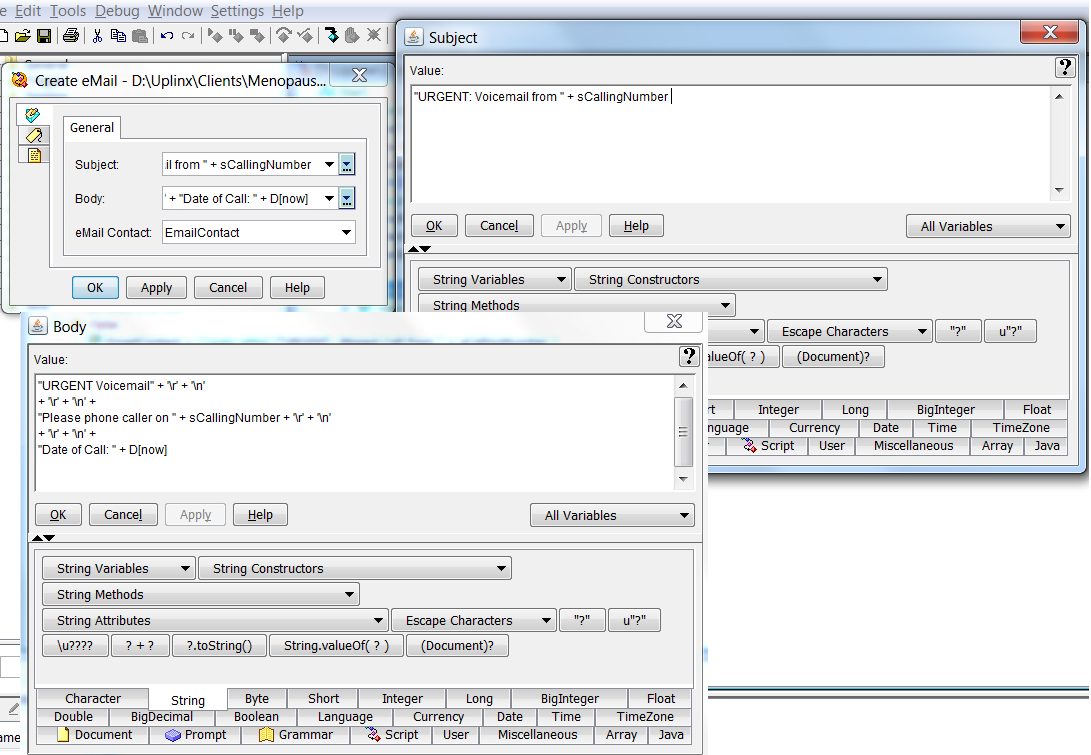
Next Step is to attach the voice message to the email created above. This is done with the Step called Attach To Email Step. Select EmailContact variable, then add the attachment. In my example I’m using sVoiceMessage as the name of the attachment and the actual file is dVoicemail.
Finally we can configure the Send Email Step. Again select the contact variable EmailContact and then the string variable sEmailAddress for the To: field.
This will effectively fire off an email!
Going back to the above IF Step, and now following the False Path (the voice payload is less than 15000 bits). We want to send an email without the attachment, and state that we have received a Missed Call only.
Seeing that we have already created the Contact (EmailContact) and String (sEmailAddress) variables in previous steps we can skip it here. Firstly Configure the Create Email Step and define the subject and body content. Just like the previous steps, go to the expressions editor and enter your require data. Exmaple:
“URGENT: Missed Call from ” + sCallingNumber
Repeat for the Body Content. Example:
“URGENT Missed Call” + ‘\r’ + ‘\n’
+ ‘\r’ + ‘\n’ +
“Please phone caller on ” + sCallingNumber + ‘\r’ + ‘\n’
+ ‘\r’ + ‘\n’ +
“Date of Call: ” + D[now]
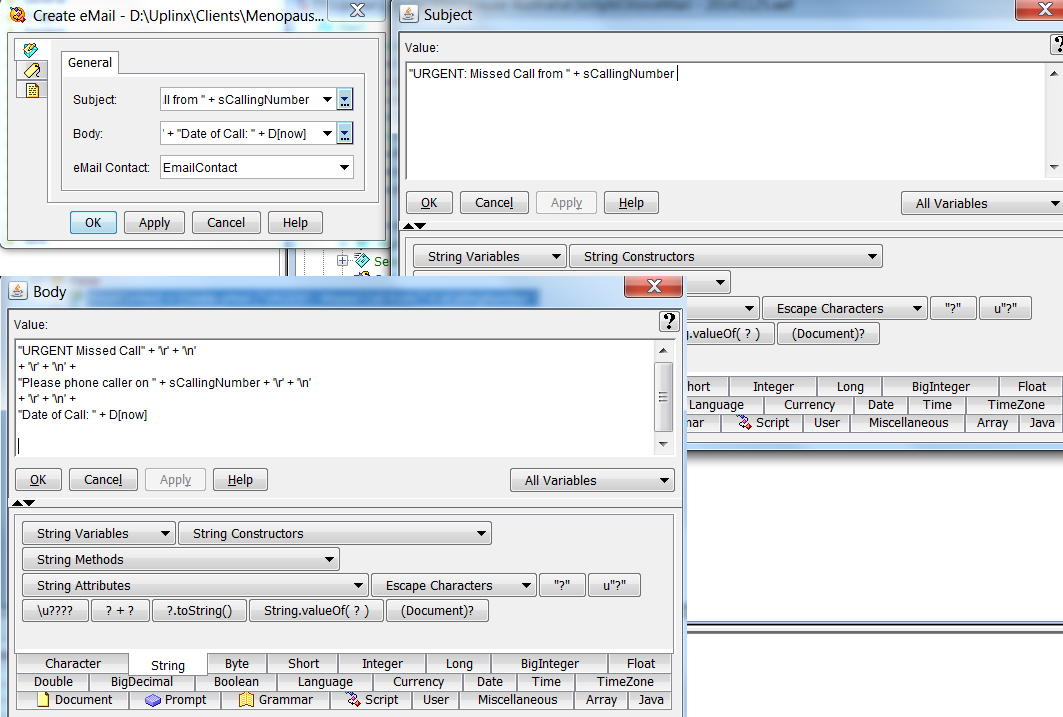
We now go straight to the Send Email Step. Select the contact variable EmailContact and then the string variable sEmailAddress for the To: field.
Email will now be sent.
Now there is one important step I have not mentioned as yet and was seeing how I would integrate into the discussion. It’s the On Exception Step. What this basically allows us to do is action a set of predefined steps if the caller disconnects (hangs up) the call. As it is only natural for humans to immediately disconnect a call after recording a voice message.
We need to define a label and place it after the Voice Recording step. This label will effectively be our starting point for the set a defined steps if the caller disconnects the call. Let call this Lable “EMAIL EXCEPTION”.
Before we even allow the caller to record their voice message we need to trigger the On Exception Step and select “com.cisco.contact.ContactInactiveException”. Also select the above label “EMAIL EXCEPTION”. When this step is triggered, the script will not allow the script to just end if the caller disconnects. This is great news as we want the system to continue to email us the voice message etc.
It’s important that we also clear the exception once we have completed our predefined steps otherwise the script will be left in an open state. The Clear Exception Step does just this. Select “com.cisco.contact.ContactInactiveException”.
Now we have a script that will continue to email the the voice message even after the caller disconnects the call.
Summary of my example script for your reference.
